Home
Motorcycle Home
Triumph Home
Export Home
Norton Info Home
Contact Us!
Special Parts
Updated
04/03/24
Customer Combat
Build Oct 23
Updated
04/22/24
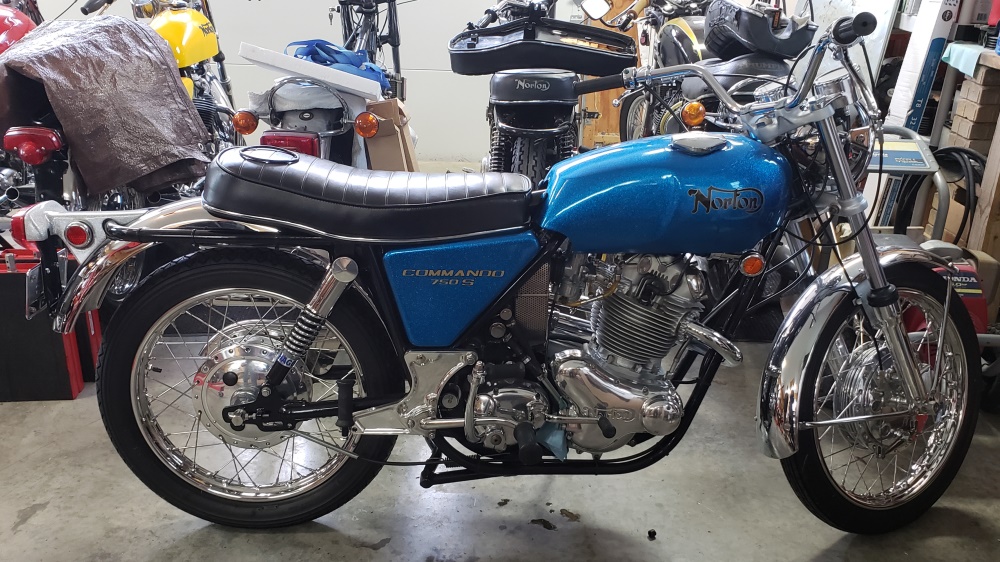
Blue 69S
Updated
04/16/24
1975 Norton Wiring
Updated
04/26/24
Combat 5
Updated
04/04/24
Roadster 850
Updated
04/03/24
1974 Norton Wiring
Updated
04/25/24
High Mileage 850
Delivered 03/26/24
Mk3 Engine & Gearbox
Delivered 03/07/23
1974 Norton 850
Commando Rebuild
Sold 01/12/21
Updated 06/10/21
1973 Customer
BasketCase Build
Delivered 07/15/22
1972 Norton 750
Commando Rebuild
Completed 05/15/19
First Place Norton 05/16/19
Sold 01/01/20
1972 Norton Wiring
Updated
04/03/24
Customer Combat
and 69S Builds
Closed 10/18/23
|
 | Saturday, April 27, 2024 |
In June 2021 I was contacted by a guy who wanted me to build him a 1972 Norton Commando Combat. That's the way this write-up started. Later, he also wanted a 69S that I bought but eventually it all fell through so I"ve split this into two. The original Combat build can be found here. I will cutout the overlap and leave this about the 69S.
That means some things that I miss will be confusing and the actual 69S parts will be quite a bit later date wise.
December 10, 2021 I've probably mentioned before that I've gone crazy! I have three more bikes on the way along with a pile of parts in boxes about 8 feet long, 4 feet high, and 3 feet wide. There was no way that would all fit. So, I've spent a lot of time rearranging, throwing away, and organizing. Then, last night my stepson helped me move the bikes around to put them order of how I will work them. Also, the 69S that I was working for a customer is now mine and on a back burner so it's off the stand. When the bikes and parts get here, I will go through all the boxes, put clean things in clean bins, label and put them in the house.
One of the bikes coming is a very nice 69S. Another of the bikes coming is built as a Fastback LR – and is also very nice. It shouldn't need much. The other is yet another Combat Roadster – it will be on a back burner unless someone commits to buy it.
December 16, 2021 I've sorted through most of the parts that arrived with the big shipment.
December 19, 2021 Finished sorting and putting things away. Filled my recycle tote, my neighbors recycle tote, and four giant lawn and leaf bags with all the packing!

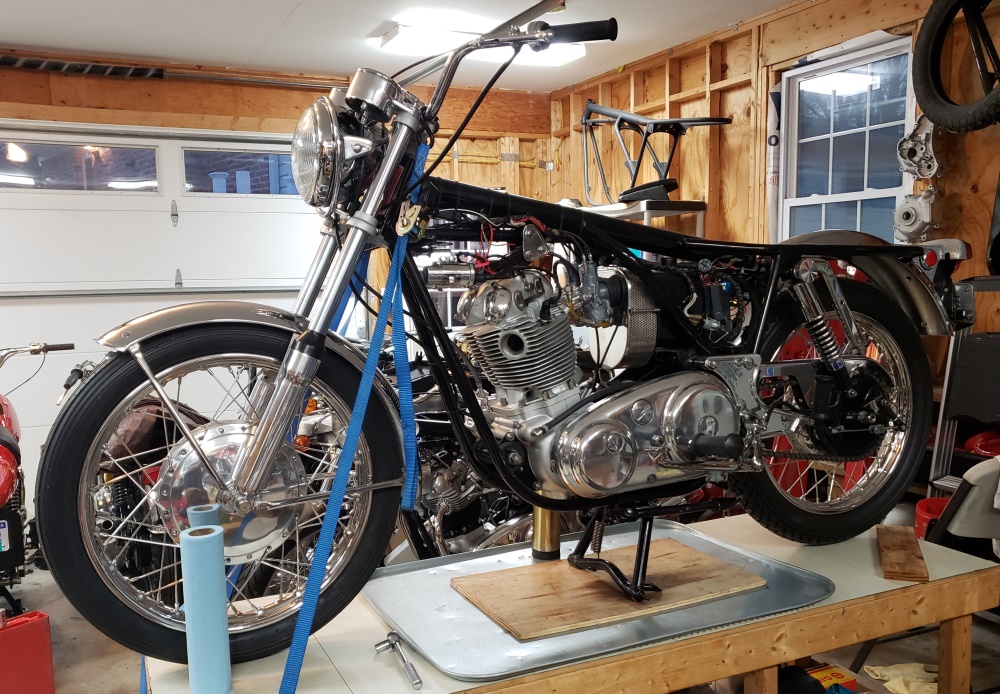
February 26, 2022 The day is here! Starting on the second bike. First is the "before" picture. This bike had a pretty good puddle of oil under it – hence it's turn on the table. The second shows it on the table with a few things done.
- Inspected for loose or improperly installed parts. Found a few minor things and one major. Due to the way the exhaust to muffler clamps were installed, could not get the left-side cover off without removing the exhaust and all parts of the exhaust were hand tight. So, I removed the exhaust for now.
- The major oil leak was from the oil tank to engine feed line where a check valve (BAD IDEA) was installed. Removed that mess and drained the oil tank in the process.
- Cleaned the bottom of the engine and gearbox throughly - now waiting to see if there are more leaks. I'm hoping that there earn't any - I'm prepared to take the engine out to reseal it but I won't if there's no need. If no more leaks show, I will put it back together for a test ride.
- Checked out the electrical system. The bike has the original bridge rectifier and Zener. It has a Boyer electronic ignition. It has a new harness but it has been modified for the Boyer ignition. Everything except the horn works - haven't determined if it wiring, the horn itself, or the handlebar button.
May 11, 2022 Low energy day. ITomorrow morning I'll get a steroid shot in my foot and I'll have help in the afternoon so I should ride then. Spent a lot of time putting things away and moving bikes around. I can get to the 69S again.
July 10, 2022 The Combat is done except needing a mirror. So, time to finish his 69S - unless stated otherwise everything below is for the 69S.
July 14, 2022 I mentioned before that the 69S had a check valve in the oil feed line and it was leaking. Back then I removed it and plugged the line. That has been replaced by a proper oil line now. Checked each of the fluids - the primary and gearbox were both over-filled and the engine was wet-sump'ed. Those are all good now. Looked in the cylinders with an endoscope.
- The engine has been run a little
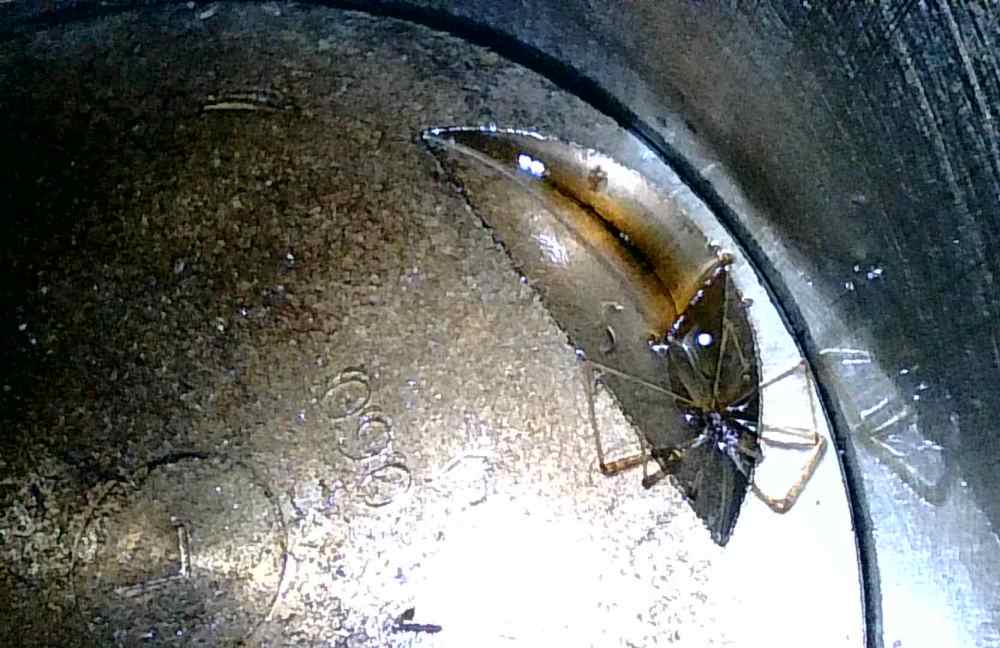
- The cylinder walls look good
- Found a surprise! We have a stowaway! I suppose he will be cremated on the first power stroke!
July 16, 2022 This bike is now the primary focus. The basket case I was working on at the same time is now finished and delivered. Have some decisions to make on this one. The bike was complete and "ready to ride". I'm getting closer to believing that and will soon start and ride it to see how well it really is assembled. Looks-wise, it is a show piece.
It has a new wiring harness, a Pazon ignition and standard charging equipment. I usually install a Tri-Spark ignition and regulator and I usually rewire the bike. That makes since sense I'm usually doing a build from raw frame/cases. In this case, that seems like a waste of money. I'll talk it over with the new owner to see what he thinks, but at this point, I'm thinking I'll keep the wiring as it is.
It has polished standard carbs. I'll inspect them, but unless they seem new, will replace them with Premier carbs.
July 17, 2022 Best laid plans…. Planned to test the 69S today, weather permitting, VA humidity, but otherwise the weather wasn't a factor. Tried to put the new exhaust the bike came with on – could not get it to all line up so I tried the used exhaust. That was better but still not good and there was a crack near the head. After two hours of trying things, I decided it was gorilla time. The drive side pipe was fine but the timing side did not align – a couple of manly pulls and it was gorilla-corrected. So then, I started checking things. Horn dead. Could see that one wire was not connected but on A Norton that means taking the rear wheel and rear fender off. Since this is a 69S, it should have a bolt-up rear hub. Removed the access plugs and no nuts! This bike had been converted to cush-hub but with a bolt-up hub covers so it looks correct. That was a pleasant surprise. Connected the horn and pushed the button. It made a racket and wouldn't stop so it was time to repair the handlebar
switch. That fixed and the horn worked but sounded like a fog horn so adjusted that. In the process of working on the horn I found that:
- The harness is new, but some ground wires are burned
- A separate ground and power were supplied to the headlight but they didn't go through the ammeter or fuse so that was dangerous and silly.
- The wiring in the headlight is a mess.
- It has a Pazon ignition but the wiring was again a mess.
So, I will re-wire
July 21, 2022 Took the harness off the bike – PITA since it was installed before the bike was finished and wires were run in places that trapped them. Anyway as I unwrapped the damage became clear. Where the ground wires from the battery entered the hardness, they melted and melted just about all the wires in that area. So, I have to run mostly new wires throughout the bike. Not hard, just time consuming and somewhat expensive. Since I re-wring I will install Tri-Spark products.
I was wondering why the fuse didn't stop the damage: There was an AGC 35 amp fuse installed. When British bikes say to use 30 amps, they mean British Standard 30 amp which is equivalent to AGC 17. I use SFE 20 amp which is about the same as AGC 15 when considering time to blow. The 14-strand (18 AWG) wire that is standard on British bikes is good for 8 amps sustained and probably 20 amps for a milliseconds or two. A partial short circuit and easily reach 20 amps and a AGC 35 fuse woudn'e even notice! When I'm wiring and testing, I use AGC 5 amp fuses since I test as I go and the battery is generally installed - any mistake and I want the fuse to blow, not the wires to melt!
July 31, 2022 Things keep getting in the way of this bike and updating this page. I had some more minor medical issues to take care of. Finished the wiring today and inspected the carbs. They have been sleeved - not a fan. The rear shocks are definitely wrong and the chain guard was installed wrong. The chain guard is sorted out and I have the correct shocks to install. I really hope to start this bike soon and make sure that the engine and gearbox work properly.
August 1, 2022 New issue. The wiring in completely done and while doing the static timing I came across a new problem. The bike doesn't change gears easily and won't go into 4th at all. So, I have that to fix before starting it.
August 2, 2022 While trying to get the bike to change gears, I noticed that the speedo drive was almost rubbing on the cover and the rear wheel wasn't even tight. The rear axle had been way over tightened and the speedo housing is bowed. I did a bunch of measuring as that's a current subject on Access Norton and then installed a new speedo drive. Now there's a proper gap.
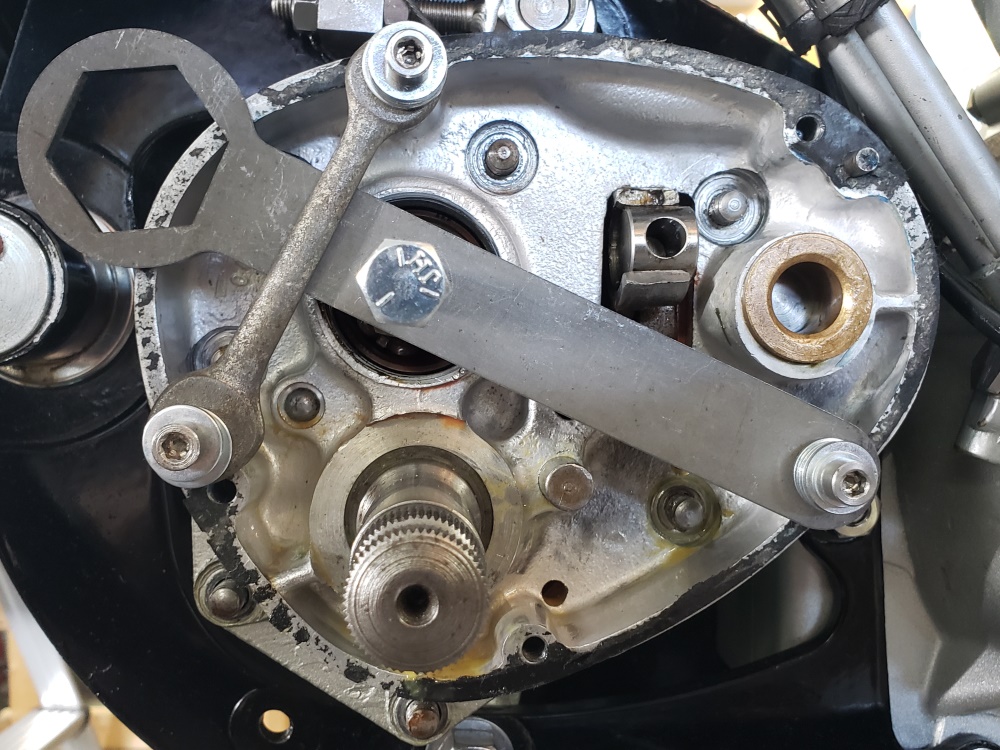
August 3, 2022 Buy a "perfectly restored" bike. Check it over - no 4th gear. Drain the gearbox - combination: ATF/Water/Grease and stinks. OK, outer cover a bear to get off - glued on with some sort of black substance. Easy enough to see that the shift quadrant is off one tooth. Try everything you can think of to get the inner cover off - no way. On the bench you could use a rubber hammer on the back, but not in the frame. Finally made the contraption in the picture. The wrench already had a hole at one end. Drilled and tapped for 3/8" UNF and used and old wrench to old the other end down. Used grease to hold a washer in place to protect the end of the main shaft while tightening. Had to tighten the bolt a LOT to get the cover to break free. The inner cover was glued on with some sort of gray crap. All told, 3.5 hours to get it apart and get the gasket surfaces cleaned! Then a half hour to get all the ATF/Water/Grease cleaned up. Still have to put it back together. The timing
side mainshaft bearing is bad but the other two are good and the rest of the components are good.
August 4, 2022 The gearbox is complete cleaned inspected and back together. Besides the bad timing side mainshaft bearing, the ratchet spring was properly bent but installed upside down. Also, the kickstart pawl retractor had a burr that causes the kickstart to catch - they was easily smoothed. A big problem was that the gearbox adjuster cross head was loose in the cradle/ It took two of us and every 9/16" wrench/socket/universal to get it tight and aligned. For a ready-to-ride bike, I certainly didn't expect to spend eight hours with a helper on a gearbox! Getting the quadrant timing right is one of the few things easy on a Norton and It should have taken less than an our to fix that silly mistake. Anyway, the gearbox is properly filled with 75W80 gear oil and shifts nicely on the bench so I expect perfect on the road.
The clutch may need service. It has a medium pull but feels rough. That probably just a cable issue but the cable is routed very smoothly. If it doesn't feel right with a new cable, I'll look into the clutch itself after it have been run a little.
August 5, 2022 More rear wheel :=(. The shocks that were installed were 13" eye to eye and the tire was on the ground with a 1/2" piece of plywood under the center stand. I ordered a set of shocks I've used before that look identical to originals, are the right length (12.9") and do not interfere with the chain guard. The ones that arrived had the same Wassell part number but were EMGO marked for Norton. They look right and are the right length but interfere with the chain guard - a lot. So, I tried a new set of Hagons that are the right length and don't interfere with the chain guard. I thought good enough, but the rear wheel would still lightly touch the ground on the center stand. So, then I looked at the front end - oops, the forks are stuck in full extension - won't move. So, I decided to finalize the rear wheel install and work on the forks. Well, that's when it really when to hell.
If both sides are tightened, the wheel won't
turn! OK, all apart to see why. The primary reason is that some idiot ground down the bearing spacer and did a poor job of it - it's lopsided and definitely should not have been ground down. On top of that. the bearing is wrong - it's unsealed, not greased and the grease shield is missing which is probably why the bearing is bad. Also the brake backing plate spacer is missing.On top of that, the bearing retainer/speedo drive was never tightened. Now I don't rust the hub either so I'll take that apart.
Since this bike has so much stainless and the bearing and bearing spacer are junk and the threads on the axle have seem better days, I'll install a Don Pender single axle with sealed bearing and if the hub doesn't have sealed bearings I'll probably do them too depending on condition and if all the correct parts are there or not. I guess I'll have to check the front wheel as well. At least the rear hub is nearly new as are the brake shoes and springs.
This is getting really embarrassing. I was supposed to try to have these two bikes ready by summer. Came close on the red one even with my medical issued late last year and this one was only supposed to need servicing - so much for that! Unfortunately for him and good for me, the new owner got hurt and can't ride right now. I hope he's better soon and that I'm done by then!
August 6, 2022 Cleaned up the brake hub, installed the single-axle adapter and the new sealed double-row bearing. That when fine. When I checked the hub for sealed bearing I realized that one bearing was missing and the other was damaged. OK, cleaned that all up, put the new timing side sealed bearing in, the retainer/speedo drive, the bearing spacer and then the drive side sealed bearing – it slipped in WAY to easily! On investigation the hole in the hub is 0.002-0.003" too big and the bearing can move side-to-side, no good! After pondering for quite a while about what to do I realized that I had another bike with the same wheel that looked just as good. So after moving bikes around for quite a while I took the wheel from that bike, removed the bearings, cleaned the hub and spacer and put it back together with new sealed bearings. The rest of finalizing the rear wheel went smoothly and I have peace of mind that it is all correct.
Then it was time for the front end. To make a long story short, every component is new and nothing was put together right! It even had two different short gaiters, both split. I haven't put the front end back together yet – tired – but don't expect any further problems.
August 7, 2022 More fun due to dummies! Put the front end together correctly up to a point. I build the forks on the bike without the springs and just letting the damper rods fall. That makes it easy to add the oil. Then I put in the springs and use a simple homemade tool to retrieve the damper rod. It is an old damper rod with a 5/16" UNF coupler. If fits down the spring and you twist to thread it on the damper rod. Once caught, it's easy to pull the damper rod up, put the thick washer and nut on, and then attached to the top bolt. I put the oil in, and picked up the springs (clearly brand new) and let one end sit on the table so I could wipe them - that's when I saw that one is 3/4" shorter than the other! Crap!
OK, let's get finished with the wheel. Since the bike I took the rear wheel from had matching tires and the same front drum brake, I took the front wheel from it. PITA without a helper so I setup my engine hoist to hold up the front of the donor machine. Something is wrong
with the brakes on that wheel as it took forever to get then brake plate out. The bearings are good and the brake plate on the original is good and all the components are new so I used that one. Next issue, a burr in the drive-side fork slider causing the front axle to not go in. Of course I could have been a gorilla and hammered it in, but I don't do that. Took forever but the axle slides in properly now.
So, the front end is mostly installed and is cleaned and polished. I'll determine what to do about the springs tomorrow when I'm not tired. I have plenty of options - all good.
The carb set that is actually meant for 1969 has not been available from Amal but the individual carbs were. I complained and they now have them listed but they are back ordered. The carbs for 1968 are identical except for the sub-number. The bike came with generic 930 carbs (300/301) that have been sleeved. if it had the correct carbs and they were sleeved I would consider using them.
August 9, 2022 Finished up the front end.
August 10, 2022 Worked on finalizing things - speedo and tach cable routing. Studied on the center stand a long time - have a plan to fix it but need a little welding. While installing matching handlebar controls (the one on the bike were junk), I realized that there was something wrong with the clutch - that's when today went downhill. After rechecking everything involved with the primary cover still on, and finding nothing, it was time to get into the primary. The clutch stack height was terrible - 750 plates, 850 pressure plate - at least all was new. Put in a 750 pressure plate and then had the opposite problem - stack to high. I had a known good set of plates so put them in and the clutch was fine. I noticed that the rotor was flush with the stator - wrong on a Norton! On investigating I found oversize nuts rather than spacers on the studs and one stud was home made. On further investigation I found that the mounting boss for one stator stud was broken off. So, the bike needs a
new inner primary. I have some from installing cNw e-start kits so I found the best one and will polish tomorrow. I normally don't polish the inner primary cover much but this bike is so polished that I have to. The clutch center nut has the tab washer but not the other thin washer and it was soaked in locktite. The rotor nut came off too easily – and the engine sprocket pulled off very easily – no doubt that this would have failed on startup! I'm really hoping that there are no engine problems – the engine was sent out so hopefully it's OK.
August 12, 2022 The new carbs are inspected - as usual, they are perfect. The twist grip on the other hand is junk. Replacing it meant that the junction to twist grip cable was the wrong length so that has been resolved. The carbs are bench sync'ed and are ready to install.
August 13, 2022 The carbs are on - I wish I could say that went smoothly- it didn't. First the studs in the manifolds were installed backwards and Loctited. They have a short threaded end that goes to the manifold and a long threaded end that goes towards the carb. when installed backwards, there are only a couple of threads holding the carbs on the manifolds. Once that was corrected I tested the Allen screws into the head. The middle ones must go in by fingers except for final tightening. These did OK, but it was quickly obvious that they we way too short. They are supposed to be 7/8" and were 1/2"! So, I got correct screws and washers from stock and they would not screw in as far as needed. I ended up having to chase all four with a tap - not easy in the limited space. Anyway, once chased they were fine and the rest of the installation went fine.
Then I started on the replacement inner primary. It had the standard scratches from people trying to install the air cleaner after the carbs. Spent a long time sanding and polishing. Also spend a LONG time getting the gasket off - glued on again!
August 14, 2022 The inner primary is polished and on but it was certainly not easy! The stainless steel loving gorilla before me use stainless 1/4x20 bolts to attach the inner primary to the engine. Thankfully, they were too short! Why? Those holes are factory Helicoiled for Whitworth 1/4" screws. The UNC screws pulled out about half of the first thread. The only way to actually replace those helicoils is to strip the engine down. After stuffing the holes, I carefully used a Dremel to get the surface flat again. Then ran a 1/4" Whitworth tap in the hole part way. After that, the correct screws went in without problem.
The rest of the primary went together find but since I had the cover off I wanted to check the timing marks. They are often off 1-2 degrees, these are about 40 degrees off! Since that's not possible I'm a little confused and must investigate more. I know that the rotor is from a Triumph Trident (have no idea why). When I'm not tired I'll take a proper one from another bike and see if the rotor is the problem.
August 16, 2022 I've probably used "Bad day at Black rock" before – this is the Worst Day at Black rock!
Put the primary all back together yesterday and tried to check that the outer primary timing marks were right. They were way off. Even though I've don't it many time, I thought I must just be tired and doing something wrong so I quit for the day.
Today I tried again and they were consistently 22 degrees off. So, I asked on Access Norton if anyone had seen this. One guy said it might be an Atlas crank. More checking showed that the Atlas crank is 90 degree off from a Commando – but I wasn't 90 degrees off.
Figured it out! Took a known correct crank half and used a degree wheel to determine where the rotor keyway is. It's at 200 degrees from TDC best I can measure. The keyway in the problem crank is at 340 degrees from TDC best I can measure. I put the rotor on with no key but turned to where the keyway should be and the 30-degree mark lines up but with the other rotor mark. So, this
crank, whatever it is, has the rotor keyway about 140 degrees from where it should be on a Commando.
This is a beautiful bike that I was supposed to only need to service - so far, EVERY component has had a problem!This bike only needed static timed and a tank to start. Now I have to take the engine out and my helper left for college - o'well, I can do it.
August 18, 2022 I got as far as getting the head off today. Got a steroid shot in my foot this morning and it started to kick in. I was planning to get to the point where able to unbolt the head but steroids take away pain, give you strength, give you energy and mess with your, focus, inhibitions, and emotions. They gave me the pain free hands to get the head off. Tomorrow with them fully in force I should be able to take the engine out and put it on the bench - have to be careful though, I'v torn muscles and tendons when steroids turned me into Superman.
August 19, 2022 There are two pictures below. In the first, the engine is rigged to be lifted out by my engine hoist. Next step - remove four bolts and lift it out. Three minute job - except! The bolts and nuts are all highly polished stainless steel and the gorilla before me apparently didn't know that anti-seize must be used with stainless. The big front bolt unscrewed about two turned before the galling stopped it. Hurt myself trying to power it out. Then tried my impact - just rounded off the head. So, I don't know if it's clear how tight a spot that is to cut off a nut. I clearly got it done and I didn't damage anything but it took 3 hours of very careful work with an angle grinder. Next problem - the bottom stud was a bolt that interfered with the frame. Fortunately with the other studs out I could jack the cradle high enough to get it out. Then it was a simple job to get the engine out. mount on a engine stand
one a Workmate.
Since it was now in my hand, I inspected the isolastic. The fixed side was finger tight and the set screw was not locked down. The insides were not pushed all the way in, and more importantly, the wrong lube was used and the rubber has been attacked so there goes another $110.
August 20, 2022 Finally got the timing cover off - had to split the gasket with razor blades. Then more nonsense. An automatic timing chain tensioner was installed and was jammed holding chain super tight. Some sort of anti-sump valve was installed - maybe AMR, but the parts all fell out so I don't even know if I found them all. Had to use the nuts with thin metal protectors to jack the barrels off - same sealer. Then noticed that the pistons were on the wrong sides and the valves have been lightly touching them - will have to inspect the head and valves carefully - probably would have been worse but the cylinder base nuts were only slightly more than finger tight, and the head was not fully torqued down. Also have to check the piston clearances - it's a fresh bore and if the bores were matched to the wrong pistons no telling what I've got. And, just for fun, one circlip on the right cylinder was in past the slot and the other not to the slot - any chance they would have migrated into
place? No, more likely a seized engine! This is the 2nd bike in the group of three that I bought that the pistons were in the wrong sides - best check the 3rd one I guess!
Camshaft nut - no effort to get off. Crank worm gear/nut, no effort to get off. Took over an hour to get the cases apart. Crank has been split - tabs not bent. Conrod nuts - blue locktite and maybe 10 ft. lb.
Care to guess which thing would have blown this engine first?
I've finished cleaning one case half, the other half is in my kitchen sink. Still have a lot of gasket scraping but got tired of everything being oily.
August 22, 2022 Recovered a crank from another engine. It's in nice shape. Took it apart and throughly cleaned it. The journals are standard size in good shape but did polish with 1000 grit paper and WD40. Will have to use new shells -the crank I took out was ground 0.010" under. I sent the cases to cNw to get the breather mod. No point in going this far and not doing that. So, there will be a delay in continuing.
August 23, 2022 The crank is back together and the conrods are on so it'[s ready to go in the cases when they get back.
August 25, 2022 Cleaned up the pistons and checked the ring gaps. The right cylinder gaps were a snug 0.015" and were perfectly parallel. The lefts we a snug 0.014" and not files parallel. When I filed them parallel, they were also a snug 0.015".
August 26, 2022 I mentioned earlier that the pistons were in the wrong sides. In the picture you can clearly see that the piston marked R is in the left cylinder and the L is in the right. Those are the sides and orientation they came out of. When you switch them to the correct sides based on the marking, they are clearly wrong as the intakes are far apart and the exhaust are close together. It was confusing me, and I was second guessing myself, so I got out an old OEM piston to double check. A little hard to see in the picture but in the red oval is says EX LF so that is clearly the correct side and orientation, and it clearly matches the piston marked R! The pistons are marked wrong! They are JCC. The current Hepolite pistons are also JCC, but they have no side or front/back marking - good thing, I guess!
The two barely visible valve marks could not be made in this orientation so my guess is that the engine wouldn't turn over, so the last builder took the head off, saw the problem
and redid the pistons.
September 6, 2022 I don't remember if I mentioned it but since the cases had to come apart I sent them cNw to be machined for their breather. They came back today. I also don't remember if I talked about the three screws that hold the inner chaincase to the engine. The wrong screws were used and the helicoils were damage. I had fixed them as best I could with the engine together, but since the engine is apart, I replaced them with new today. I used 1/4" x 20 UNC as the 1/4" Whitworth coils were a little loose. I installed them with gap filling Locktite and once in, ran clean screws in and out of them a few times to make sure the threads are clear. This ensures that they will stay in place. I also touched up the cases (they are painted) and installed the main bearings.
Also don't remember if I talked about the center stand and frame. When on the center stand, the rear wheel touches the ground. A spot of weld on both sides of center stand, new pivots, and installing the stand correct will help. The big fix is straightening the bottom tubes of the frame. I did the timing side today, it was easy and didn’t mess up the finish. I’ll have to make a jig for the drive size as it needs a little more than the timing side. Still no big deal.
September 7, 2022 Planned on putting the bottom end together today. When I took it apart I was so annoyed that I didn't study each fastener and several were seized. So, today I tried a dry fit of them and checked all threads. The two 3/8" front ISO bolts and nuts are usable. None of the rear engine mount bolts are usable - all too short and most are seized. The crankcase top front stud is usable but I have to find a top rear-forgot to order one and it's Whitworth. The bottom two 1/4" screws were not in all the way (good thing) and the wrong threads. I have repaired that. to make a long story short it's ready to go together but I'm still sorting out fasteners.
September 11, 2022 I was too tired to write it up when I finished yesterday. Put the bottom end together and started on the timing chest. Didn't get far because the idler shaft was loose and someone tried to fix it by dimpling - didn't work. After a careful cleaning I installed it with Locktite bearing set (gap filling, high temp, green) and immediately put the cover on to hold it in alignment. Checked it today and that's now fine.
Tried to put the oil pump worm on the crankshaft and the threads are screwed up - I had trouble getting it off the crank that was installed. Rather than mess up the thread on the crank, I found and installed one from another engine. Then I tried to put the oil pump gasket on that there's no way it would go. Started taking the bottom stud out to compare the gasket to the holes in the crankcase and realized that the stud is very bent.
Frustrated I left the engine alone and made the jig to straighten the bottom frame rail on the drive side. That took a long time but worked well. Tomorrow I'll look for a oil pump stud and the two chain adjuster studs – they are missing because it had the non-working auto chain adjuster.
September 14, 2022 The parts order is due here Friday if DHL doesn't screw-up. I've put as much of the timing chest together as I can and I've got the engine rigged to go back in the frame. Luckily I had a set of front isolastic gaiters in stock. I took the internals out cleaned everything and put it back together with the proper grease. The internals were OK; just the gaiters were damaged by the wrong grease.
September 16, 2022 The parts order arrived today! The engine is back in the frame. Now I'll partly build the primary so I can lock the engine and finish the timing side. Then its (the horror) head install time.
September 18, 2022 Not feeling great and have had a lot going on. Still, I made some progress. The engine is in the frame, isolastics adjusted,the primary is together, the timing chest is closed, and the plumbing is done. It took FOREVER to get the timing cover ready to go on! Whatever gasket glue was used it some powerful stuff. I finally got it all off – razor blade (Longgggggg time), acetone, alcohol, lacquer thinner, and finally a steel wool soap pad. It would have made financial sense to throw it away and buy new! Since the head is off, I took the opportunity to accurately find and mark top dead center and 30 degrees before. No excuses now, have to put the head on.
September 19, 2022 The head is on, torqued, and the valves are adjusted. Started putting the rest of the bike back together.
September 20, 2022 I was doing well today, until I wasn't. Look here to see what slowed me down.
September 21, 2022 So much for having these bikes ready for summer - it's Fall now!
September 22, 2022 What a day! Yard guard (mosquito and tick control) came yesterday, today was breezy, and cool. It has been a longtime since I could stand to work in the shop with the big door open! To top that off, didn't hurt myself even a little today – nice change.
I was hurting pretty bad this morning from my fall but got a steroid shot in my foot this morning and toped it off with a 5mg pill – that takes away almost all pain (of course, often causes me to hurt myself).
Got quite a bit done on the bike. I'm back to hoping to start and ride it this weekend – hopefully nothing else get in the way of that!
September 24. 2022 Almost there. Only the exhaust. fuel lines and tank to go. My leg is slowing me down pretty bad though. There's now about twice as much skin missing. Just took a shower and then used every non-stick bandage pad I had. They will be soaked through within the hour. I have a wound care appointment Monday (earliest I could get) so tomorrow I'll have to go get more bandages. Fortunately it's not blood, just water like from a blister - just LOTs of it.
September 26, 2022 Spent a LONG time today pondering the exhaust.
- The bike came with the original pipes and a new set.
- The original pipes fit better but they burned a spot in the paint of the left side cover – the top pipe is about 1/4" from the cover.
- The bike came with two left side covers, the burned one and a good one. I certainly don’t want to damage the good one.
- The new pipes fit OK, but the top on actually touches the side cover.
- The original left-side pipe is cracked - i was pondering getting it welded and re-chromed.
Then the light went on - what if the problem is the left side cover?
The side covers are new and I'm sure aftermarket. The front edge near the bottom is relieved but not high enough so the bottom was being held out. The top rear bracket is somewhat adjustable and needed to move outward to move the bottom inward. The bottom rear bracket is not adjustable but was clearly bent outward a little. Still not sure it's enough but I have at least 3/8" of clearance now which is a massive improvement.
My leg is all wrapped. When I wrapped it myself it hurt for a little while, then quit. This is hurting a lot and not letting up - supposed to stay this way until next Monday.
September 29, 2022 Went back to the doctor and got my leg re-wrapped by a different doctor - it doesn't hurt much now. But, I spent most of the day on my portable O2 machine.
September 30, 2022 I took a lot of pictures for this discussion but most of them don't really show what I was trying to show so I'll talk you through that a little bit and then show the ones that do show something.
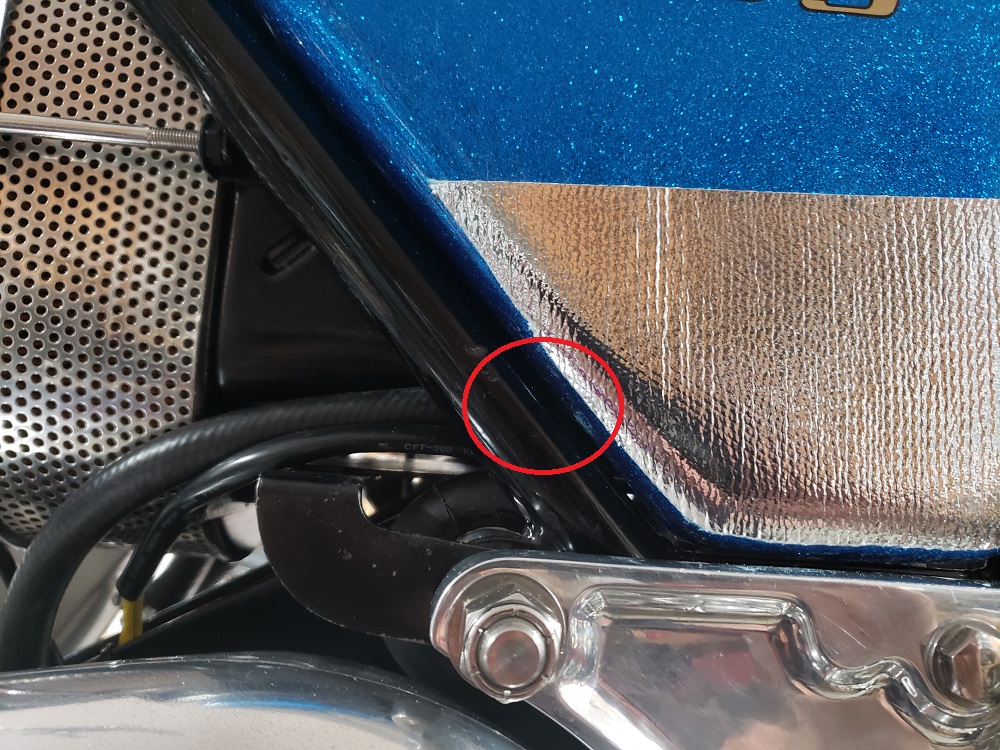
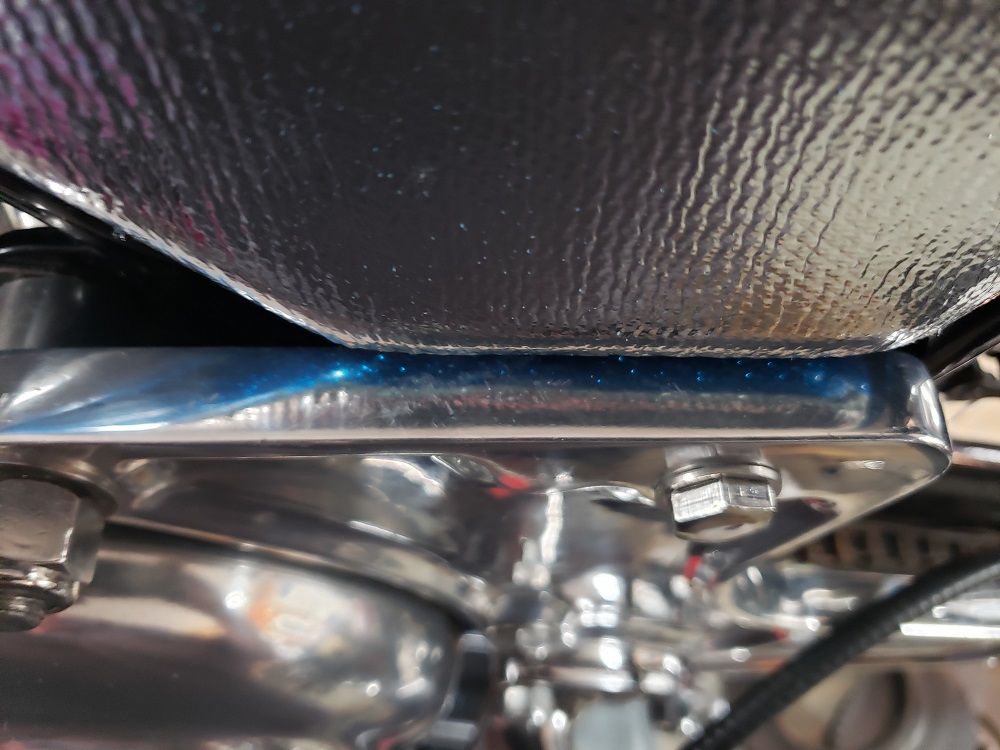
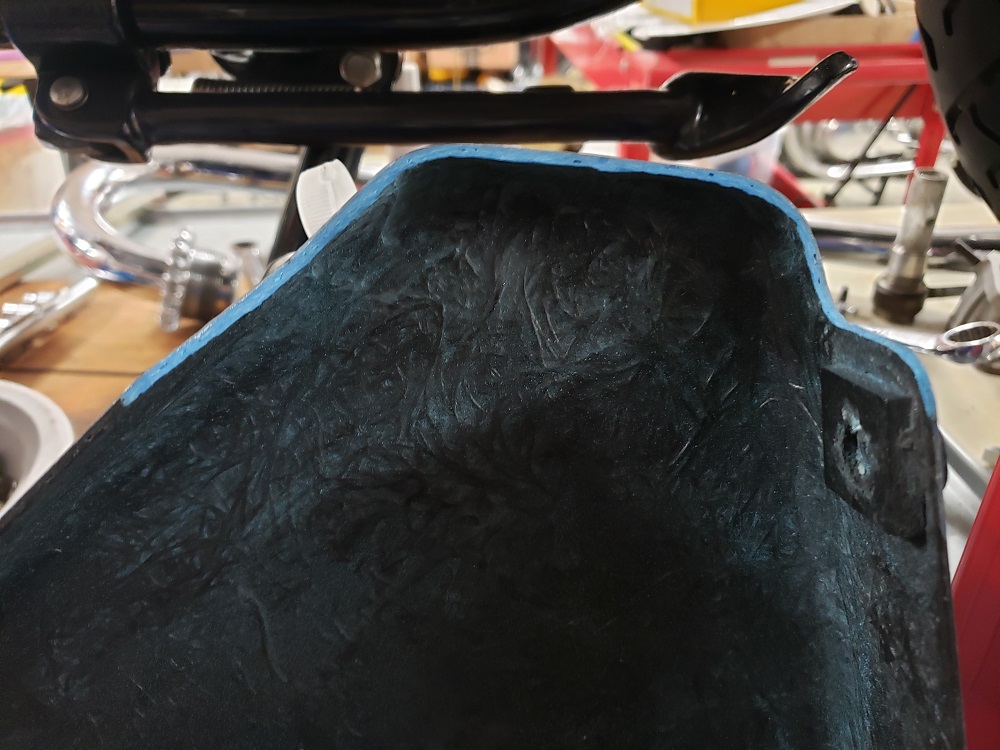
I mentioned before that the exhaust was touching the side panel. This bike came with two left side panels one of which had the paint melted from the heat of the exhaust and the other which is fine. I wanted to accomplish a few things with the damage panel. First, I wanted to put on a heat shield to cover the damaged paint and so that it actually could be used. I've done that so that it doesn't really show and it looks decent. Second, I wanted to use it to test relieving the fiberglass so that the panel wasn't sticking out so far and third I wanted to use it to make sure that everything was OK when I was all finished.
When I started the outside edge of the panel was even with the outside edge of the Z plate and the exhaust would press on the side panel. The third picture shows the areas where I relieved material from the back of the side panel - wherever you see blue I took away material sometimes quite a bit. The first picture shows what the side panel looks like installed with the heat insulator on it in the second picture shows how far back from the outer edge of the Z-plate it is now - quite significant! Also, in the first picture there's a Red Circle showing the breather hose and the leads from the regulator that were holding the panel out one the front side before I relieved it.
These panels are clearly standard, but standard is not good for an S model - it would be fine on a standard like a Roadster for the panel to be sticking out parallel to the Z plate. So now I can use the bad panel as a template to relieve the good panel, but I think I will still put the panel with the heat shield on and just provide the other panel to the owner.
With a side panel resolved it was time to work on the exhaust. The drive side pipe was fine, and I used it as a template to align the timing side. The timing side pipe was simply misshapen. When properly installed with mufflers it went uphill and it went inward compared to the drive side pipe. And, it was still way too close to the panel. I considered trying to go to Muffler shops and see if I can get them to re bend the pipe like it need to be but that's such a difficult thing to do in this area I gave up in the idea and decided to do something that you hear me complain about all the time - I went gorilla. OK let's say civilized gorilla.
I tighten the pipe very thoroughly into the head I bucked it against the frame in two places I held the pipe where it needed to be bent downward and outward, put a big pipe on it, and pulled. The first pull didn't work very well because in my fall the other day I re-tore my bicep tendon to my right arm and that's the only one I could pull with given what needed to be done. So, re-aligned my body alignment and pulled again much harder. Worked out perfectly! If would be nice if I could bend the last four inches in a little but I don't want to press my luck and the mufflers go one fine.
So, this struggle is about over!
October 6, 2022 For a change, good news and better news! Using the first side panel as a template I relieved the second on to also clear everything. I did install the side cover I modified with a heat shield. Then I had a good look at the tank including inside with my borescope. It's Fiberglas, which was worrying me, but it has been sealed. I'm reasonably sure the tank is new (never used). I have a lot of receipts from the previous owner – I'll go through them and see if I can tell more, but at this point, I think it is good to go.
October 17, 2022 Finished up little things like fuel lines, spark plugs, speedo and tach cables, etc. Studied long and hard on the center stand and made a plan.
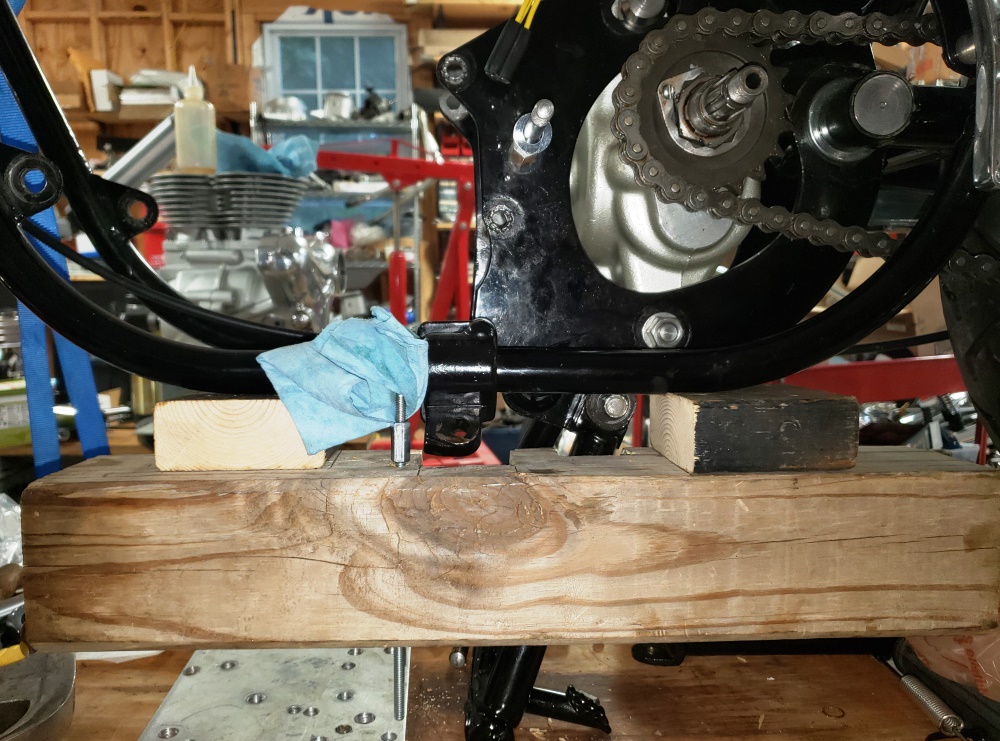
October 19, 2020 I'm good at brazing, not great at welding. In the picture you can see (red circles) where the stops were built up. They will be ground flat and will be individually filed to make them hit the frame brackets at the same time. They need to be between 1/8" and 3/16" taller than before.
The green circles are where the "feet" were built up. The drive side will be mostly ground away and only the filled worn spot will remain. The timing side will be left as thick as and welding voids allow.

October 21/22, 2022 This is war! I welded the correct side, ground the bottom and laid down more weld. No joy. discovered that I could make an additional stop long the pivot. That was fiddly to get right but I did. Look like it might work so I got the bike off the 1/2" plywood it has been sitting on - damn near lost it and the Combat in the process.
I had propped the rear wheel up on a 4x4 so I could get the plywood from under it when it rolled forward off the 4x4 - barely stopped it from rolling off the table and then it tried to roll back off the table where the Combat was sitting. Stopped that and it tried to fall over away from me - caught it and was stuck there for at least 20 minutes holding it and trying to figure out how to get control. My phone was not nearby. So, I held it with one hand, tightened the timing side ratchet strap enough to keep it from falling away, then moved around and got to the drive side ratchet strap. Once somewhat stable I was able to get the jack back under it.
Anyway, several more rounds of welding, grinding, testing, and the stand was how I was trying to make it; but, then damned rear wheel was still touching!!!
So, back to square one. I've probably spent 24 hours straightening the frame, thinking on and working on the shocks and stand - what now? Not sure!
October 31, 2022 With great effort, I dug out another 69S I have and took its center stand off. It looks brand new with no wear. It is worse!
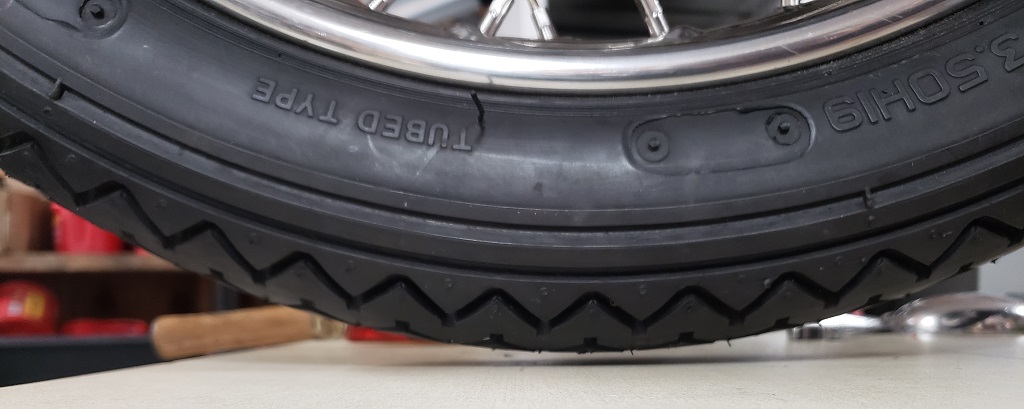
November 1, 2022 The center stand battle turned to all-out war! But then, today, I was reminded of a 1969 Norton Brochure in response to a question I posted about tire sizes. This bike came to me with 100/90x19 tires front and rear. It left the factory with 3.00x19 front and 3.50x19 rear! That means that the rear radius was almost 1/2" smaller and the front radius was almost 1" smaller. So, now I'm on the hunt for tires!
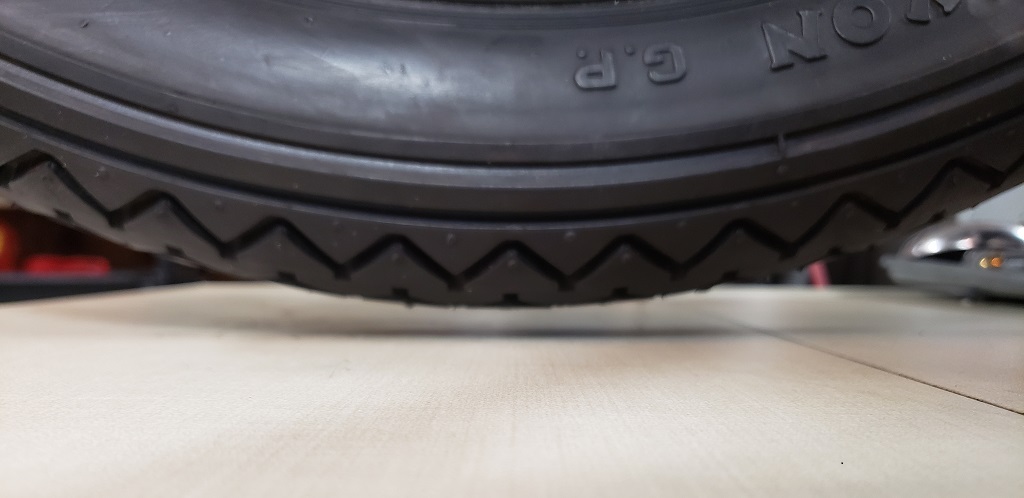
November 3, 2022 It turns out that I had a bitsa bike with the correct tires and the same pretty hubs and rims as this one so they will be swapped.
November 4, 2022 The correct tires are now installed. With the new, unworn stand installed the rear tire is still lightly on the ground - won't turn easily. With the one I've been working on it clears by 1/8" but the stand is slightly elevated by sitting on a thin metal drip tray which is on a thin carpet anti-slip pad. If they weren't there it would probably have 1/32" of clearance. So, I'll do a little more buildup. It does not need to be much higher, but it must be so that on slightly uneven ground that the stand will stably hold the bike.
November 10, 2022 After several more attempts, I finally an OK with the center stand. Nov 8/9 were spent getting the powder coat off. Today I refit it to make sure it's OK to finish. I was planning to power coat it as that is way easier than painting but over time the stops will wear and someone will want to weld more so I'll paint it. The rear wheel now has about 7/16" of clearance. I can't make the stand more vertical as that would make it unstable.
I finished the long battle with the exhaust a little over a month ago. The center stand has taken almost a month. How ridiculous! The other 69S is for sale - I won't do another. I'll stick with 72-74 Nortons and 67 and later Triumphs!
Here's how I feel right now!
November 12, 2022 Big day! Shakedown - runs great. Brakes work fine. Adjusted timing and carbs. Triple tree miss-adjusted - fixed. Had a oil banjo leaking - should be OK now. Neutral a little hard to find but hoping as the clutch and gearbox loosen up that it will resolve itself - should. The damned center stand is still not done. Needs to be painted but more importantly I has it standing too upright and it will roll off the stand while kicking.
November 18, 2022 As you can see by the last entry, only a little more needed to be done. Think again! the center stand is corrected and again ready for paint, went to do that and I'mm out of the paint I use and haven't found any. I used to get it from Amazon, but they have doubled the price to over $20 a can (was under $10).
More importantly, soon after the riding was done a puddle of oil formed on the floor. found one oil tank banjo leaking. Corrected that, cleaned everything and warmed it back up. A puddle again formed, but smaller. Cleaned everything very well and warmed it again. A small puddle formed. Weird! Noticed oil back on the gearbox and finally saw the leak - coming from the air cleaner.
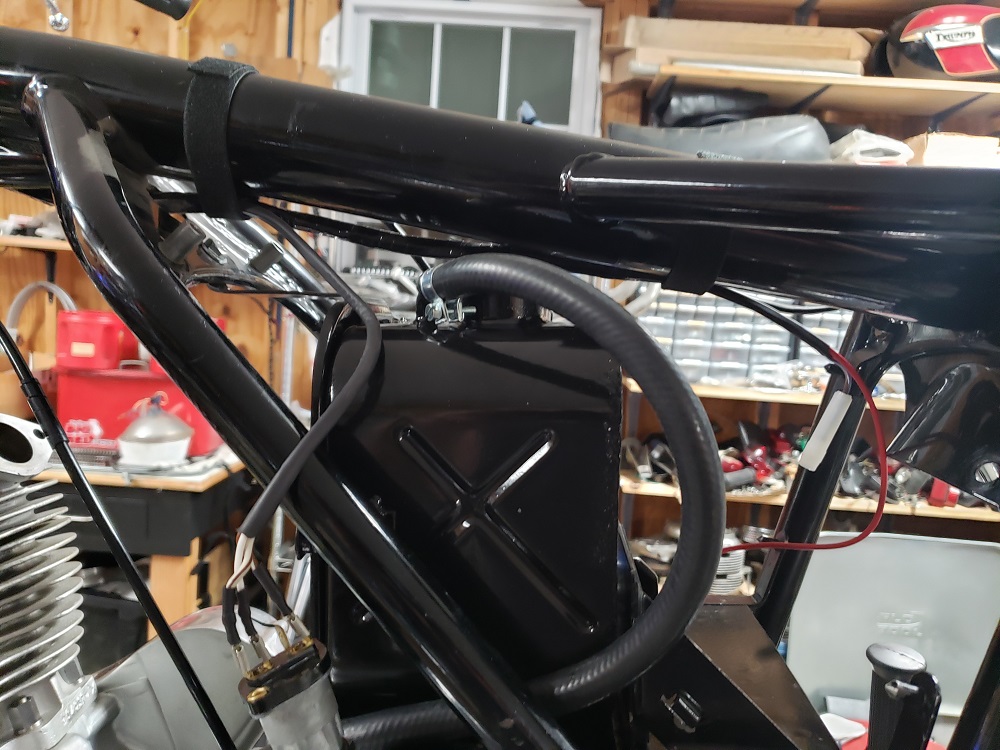
Since I installed a sump reed valve, if wet sumped, the reed value will clear the oil from the sump very quickly. It turns out that the STUPID oil tank engineering points the engine breather line directly at the open end of the oil tank breather which vents inside the air cleaner. So on the first start (wet sumped from sitting) a flood of oil crossed the gap and filled the oil tank breather. It took a while for that to all drain and drip through the filter. There is no straightforward fix. So, now I have to either find a fitting that I can put in the filler neck like the later oil tanks, or remove the oil tank and braze in a tube for the engine beater. A royal PITA. To get the oil tank out a lot of bike including the exhaust, rear fender, and more must come off and there's a lot of wiring in that area.
November 20, 2022 The center stand is finally installed for keeps. I won an oil tank today on eBay. The central tank has two versions, one with the problem I discussed and one with an engine breather pipe not in the froth tower. So, assuming that the one I bought is good, problem solved. It is a bit ugly so I'll have to deal with that but should not be too hard (famous last words). Of course, the back end of the bike and the exhaust are off right now.
November 22, 2022 The oil tank arrived. It has been sand blasted and cleaned out.
November 23, 2022 The oil tank is painted.
November 25, 2022 Gave the tank a carefully cleaning inside and test fitted. The top bracket required reforming to fit correctly but that went fine. It is not mounted. The three pictures below:
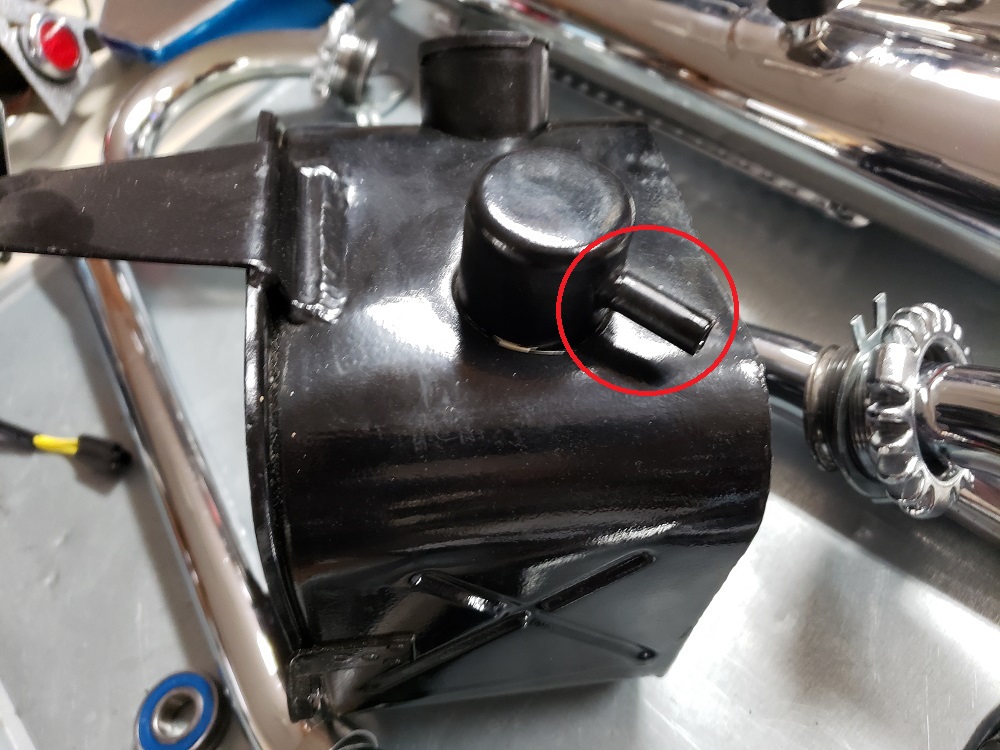
- The culprit! That pipe is where the engine breather connects.
Directly across from in inside the froth tower (top hat) is the open end of the oil tank breather. When the sump reed valve returns oil it shoots into the oil tank breather and out into the air cleaner.
- What a PITA!
- Fixed. The engine breather now goes into the top of the tank, not into the froth tower.
Now I just have to put it all back together.
November 27, 2022 It's a rainy cold day here today. The bike is back together but I need a better day to test.
November 28, 2022 It's basically done. Went for a short ride today, re tightened exhaust nuts, checked for leaks - all good. It was only 51 degrees so a warmer day is needed for a longer run to get it fully up to temperature and inspect everything.
Put the Combat back on the stand. It is a slight leak at the timing cover that I need to fix.
December 4, 2022 Replaced the timing cover gasket today. Didn't find anything wrong with the surfaces. It may be that the leak was from the oil pressure switch. It's all back together and ready to be re-timed with a strobe. Hopefully the leak is gone. Noticed a few drops under the timing cover on the 69S :-(. I'm hoping that is oil I missed while cleaning up after the oil tank change.
December 6, 2022 Everything is back together waiting for decent weather to test it again. Right now, Thursday is looking the best. The weekend is supposed to be clear, but in the 40s.
December 10-11, 2022 Re timed red Combat and both bikes went for test rides. The 69S was fine but was leaking at the rocker feed coming out of the timing cover and weeping at the oil tank feed to the engine. Both were easy to fix. The Red bike was leaking from the left-side banjo and the float bowl drains and the left side was flooding. Not sure how that was happening, I verified the fuel height before installed the carbs and it didn't happen before.
December 16, 2022 Haven't had much time but have been working the fuel leaks and flooding. Both are fixed now. The was a little piece of gasket stuck in the float needle seat - I have no idea how I missed that or how it happened - earlier test rides had no problems.
The banjo surfaces on the AN fuel lines were not smooth. Even though it probably wasn't needed, I changed the plastic filters and the fiber banjo washers to be sure they weren't damaged by the banjo surfaces.
Both bikes need another shakedown ride to get them to temperature and recheck everything. I don't like to call them done unless I come back with nothing to do. Unfortunately, we have a cold spell coming and it could be March before it's warm enough.
March 16, 2023 Well, it's been three months to the day. Both bikes were test ridden today and everything is good.
It has taken so long partly do the weather, partly due to my general health, partly due to the fact that my hip is stopping me from getting on a bike, and recently partly due to me not being able to start one duo to my hip. My hip replacement is scheduled for April 6th. The big problem is my test rider (stepson and Norton 850 Interstate owner) has a new job and hasn't been able to test for me. He came buy today and took these two and the 1970 out for test rides. So, they are officially done.
August 31, 2023 I've been trying since March to talk to the new owner but have not been able to connect with him. I need these bikes gone. I want $14,000 for the Combat and you probably can talk me down some from $11,000 for the 69S. Normally, the 69S should go for more than the Combat but I have a lot less in it. It has a Fiberglas tank so we may need to discuss changing it if you want to ride the bike rather than just look at it.
February 7, 2024 Still here. Maybe I should double the price and list it - maybe people think it is too cheap! After all, there's a "restored" MK3 on eBay right now for $35k and this is much more rare!
February 18, 2024 Just listed it on Access Norton. I'll leave it for a while. If no one wants it, I'll raise the price a lot and post it other places - should fetch $16k-$20k on BAT.
April 13, 2024. Over the last few weeks, I've been working with a guy to buy this bike. We've decided on a few things, have a deal, and things are starting to come together but the Red Combat must be finished first.- While the tires are new, they were produced in 2004! New tires arrived today.
- The tank is fiberglass and will be replaced with steel. My painter has made a sample of the FireFlake paint and it is on the way.
- The timing cover and oil pump will get the AMR upgrade. As soon as I have a table available for the bike, I'll remove them and sent them off. If younger person stops by before a table is available, I'll put them to removing the parts - in my old age, I don't work on bikes on the floor if I can help it!
April 14, 2024 Made some progress today while waiting on parts for other projects. With the rear wheel off I was reminded of a couple of nice upgrades. A 69S should have a bolt-up rear wheel. This one has a later cush rear wheel and the cap of a bolt-up so it looks correct. Also, I replaced the bearings with sealed and installed a single stainless steel rear axle. The tire fought me getting it off. It is a tube-type so they are usually easy but this tire has hardened so it was tough. I was disappointed to see duct tape rather than a proper rim strip - I'll change that. Tomorrow I'll take the timing cover and oil pump off to send to AMR for their upgrade.
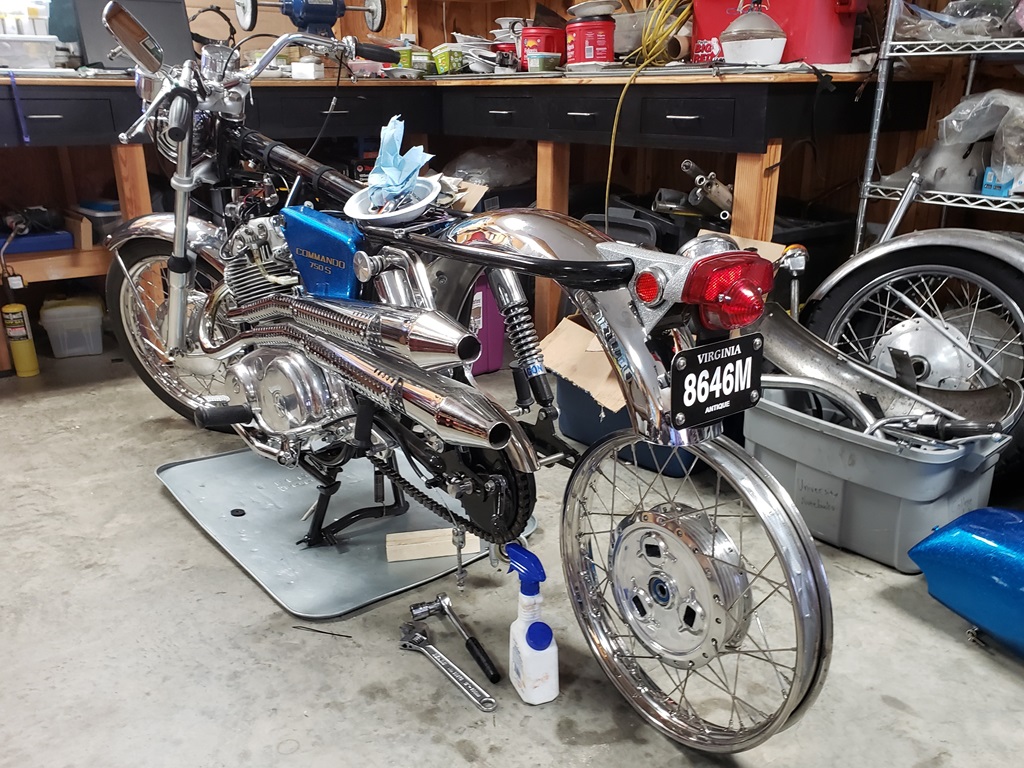
April 16, 2024. It's back together with new tires and the correct front fender. Also found today that the AMR upgrade was already done and I plain forgot. I still have to re-install the Tri-Spark ignition and time it. So, the only thing left now is the tank and side cover painting.
|


|
Copyright © 2003-2024
Greg Marsh Enterprises
8116 Arlington Blvd. #171, Falls Church, VA 22042, (703) 200-4025
|
|