Home
Motorcycle Home
Triumph Home
Norton Home
Contact Us!
1973 850 Engine
and Gearbox For
Export to AU
Shipped 4/19/24
1972 750 Engine
and Gearbox For
Export to FR
Delivered 12/11/23
Two Norton Frames
and Other Parts For
Export to NO
Shipped 10/31/23
|
 | Saturday, May 16, 2026 |
August 23, 2023
I've been discussing building a 1972 Norton 750 Combat Engine and Gearbox and exporting it to a guy in France (FR). We agreed on most of the details today. It will be a stock combat engine but with a 4S cam rather than the combat standard 2S. Also, it will nave a cNw belt drive.
Like the engine and gearbox being exported to AZ, Look Here, I'll document it here. He will be able to follow along with what's in his engine and gearbox and all will see the crating process. I've done a lot of woodworking in my time, but this will be the second engine crating!
I'm in the middle of some other Norton projects so this will fill-in time while waiting for missing things on those projects. Once they are done, this will speed up. The crankcases for this are already done. I need Jim Comstock to get around to my two 750 crankshafts. If he doesn't return them soon, I'll have to part out a bike before I'm ready - I certainly don't want to buy a crankshaft!
People always ask how long things take so like the High Mileage engine and the engine and gearbox for Australia, I'll keep a running total of the hours here. In don't include time ordering parts or updating this page and since the engine cases are already ready, that time doesn't count either. (0 hours)
August 24 2023. I ordered the belt drive from cNw today - I hope they have it all in stock by the time I need it. I also identified the head I will use and will start on it when I have time between projects. I'm going to strip and inspect it to be sure all components are good or if not, I'll figure out what to do.
Once striped it will go to the little machine shop I found (assuming they do a good job on the first one) to have the three stud threaded holes drilled out with the bit I loaned them so I can install thread inserts (3/8" BSF).
The engine I'm working
on was almost done but when I started to torque the rear stud, the stud pulled. Look Here. That's twice this year - never again - ALL builds get those threads replaced from now on! (0 Hours)
August 27, 2023 The machine shop got all holes crooked! Spent most of today, studying the situation and making a plan for all heads going forward. It turns out that the heads are drilled and tapped for 5/8" of thread, the new studs available have less than 1/2" of thread, and the originals only had slightly more than 1/2" of thread - that's why this is an issue! (Still 0 Hours)
August 29, 2023 We decided that the buyer will use the cylinders and pistons he has. Also, he is sending the cradle. (Still 0 Hours)
August 30, 2023 Bought a 73 850 with a spared Combat engine assuming that the seller finds/gets the title. I'll break down the Combat engine which hopefully will give me the crank and tappets needed for this. (Still 0 Hours)
September 4, 2023 Haven't heard about the 850 with a spared Combat engine so I bought a bottom end today. Finally did some actual work on this. Went through my stock of pushrods and selected a good set for this. Then went through my tappets sets. Only have four spare pairs. Two pairs might no be recoverable but the other two cleaned up very nicely. I finished resurfacing one pair and still have to do the other. I do it by hand so I can be sure it's done right and not overdone. Once they are completely done I will test them in a cylinder but I'm 99% sure they will be good. Of course they don't look perfect - they never do unless you buy new or are a dummy and polish them until they are undersized! (2 Hours).
September 7, 2023 The bottom end arrived today. It has several good parts that I won't now have to steal from other bikes in boxes. Took it apart and did a quick cleanup. Still have to measure the big ends but they look fine. The oil pump feels good but I won't know for sure until I service it. The rest of the timing area parts are all usable except the chain and tensioner and hardware. The time on this does not count towards the buyer. Servicing the crank and oil pump, and inspecting/cleaning the other component do as I have to do that no matter where I get the parts. (2 Hours).
September 8, 2023 Took the conrods off the crank and the crank apart. Gave it an initial cleaning. The journals had oil goo on them but no marks that I could see. I measured them and they were both 1.7509" which is the top of the allowable range - amazing! The journals were stained and I wanted to get rid of that so I could be sure there were no marks so I polished them with 400, then 600, then 800, and finally 1000. They look great! Then I remeasured. The timing side was more stained and when polished it was 1.7507 and the drive side was 1.7508 - both great - the minimum is 1.7504. there is some minor rust on the flywheel but that's easily taken care of. I should get the crank all done tomorrow. Can't put the cases together yet because I don't have the 4S camshaft yet. I'm holding my order waiting for a set of 850 pistons to be available for another project - that was supposed to happen today - hopefully Monday. (3.5 Hours)
September 9, 2023 Too many interruptions today - I didn't get anywhere near done all I wanted today. I did get the crank completely clean and put it back together. It's in great shape but has some staining on the cheeks that hurts nothing.
I'll probably have to use some other conrods. They look great but the wrist pins are heavily rusted and I'm not sure how to get them out without damaging the small ends and the small end may already be damaged - can't tell with the wrist pins in! (5 hours)
The cNw belt drive kit arrived today.
September 10, 2023 Finished the crank today - came out great. I did have to use other rods, but they are no charge as the bottom end that I bought included a set - I'll eventually get them free, they are soaking. The engine cases were for another project that I never was able to complete since two of my crankshafts are with Jim Comstock waiting for him to have time to fix them. The cases went through my cleanup process all but the last two steps. I checked/cleaned all the threaded holes today and will give them their final wash, probably tomorrow. I also checked the camshaft bushings and they are good. So, when the 4S camshaft gets here I can put the bottom end together. (10 Hours)
This is what you want to see from a good crankshaft with new shells:
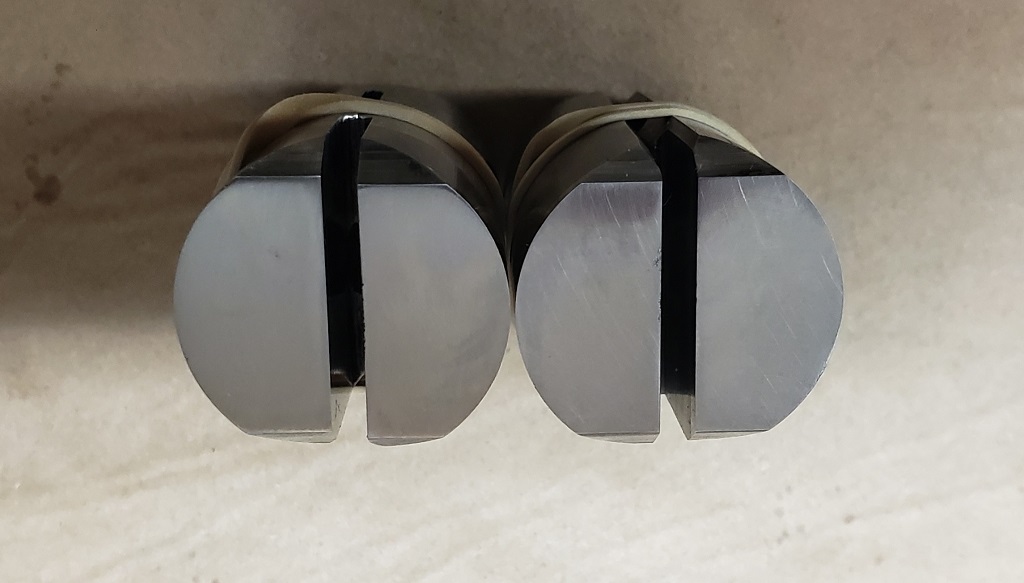
September 12, 2023 I finished resurfacing the tappets today - they came out great and they work well in the cylinders. The picture doesn't do them justice - I can see myself in all four!
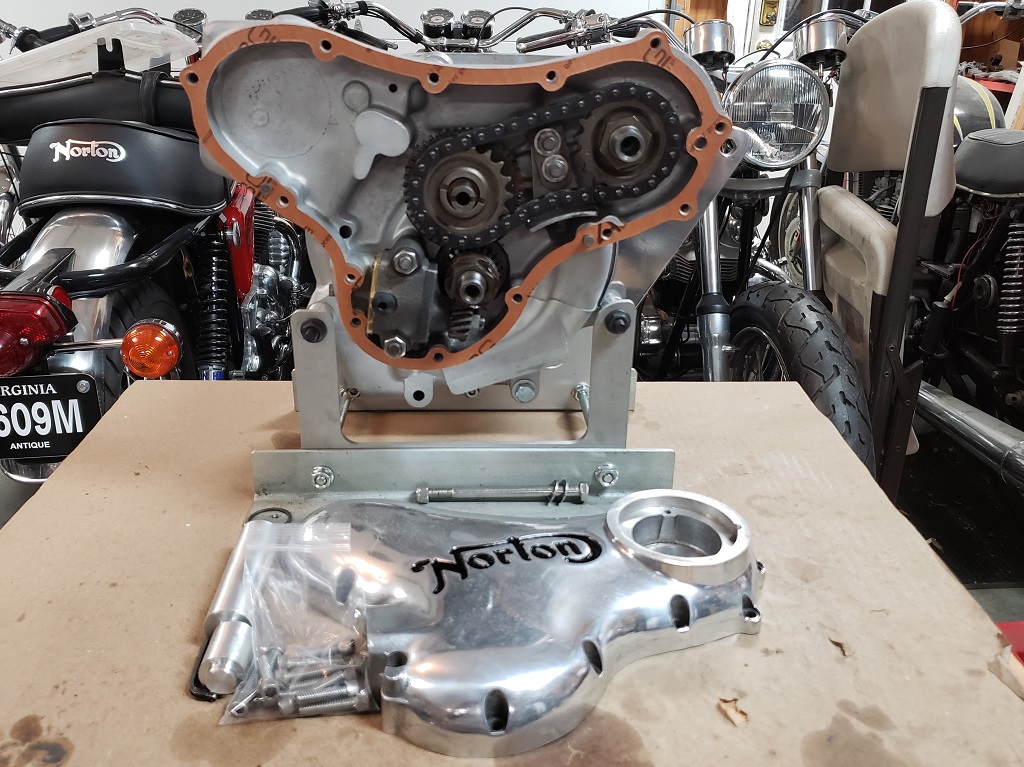
I also did the final cleanup and inspection on the cases and tested a camshaft in them. The camshaft bushings run very smooth and probably would be OK, but I don't like the timing side bushing. These cases have the bushing with no internal or external flange. They take a brass thrust washer on the inside - that would be fine. Behind the cam sprocket, the bushing is supposed to stick out to limit the sprocket from touching the crankcase. That is worn flush with the case. That also would probably be OK, but I don’t like it. So, I'll install the MK3 style bushes. Rather than one-piece, you install one from inside and one from outside and they both have thrust flange. I hate changing them - it is difficult and often reaming is required after they are in. (13 Hours).
September 13, 2023 I've been waiting for a piston set I need for another project to be available before ordering. That happened today and that order includes the 4S camshaft for this engine. Should be here Friday or more likely Monday.
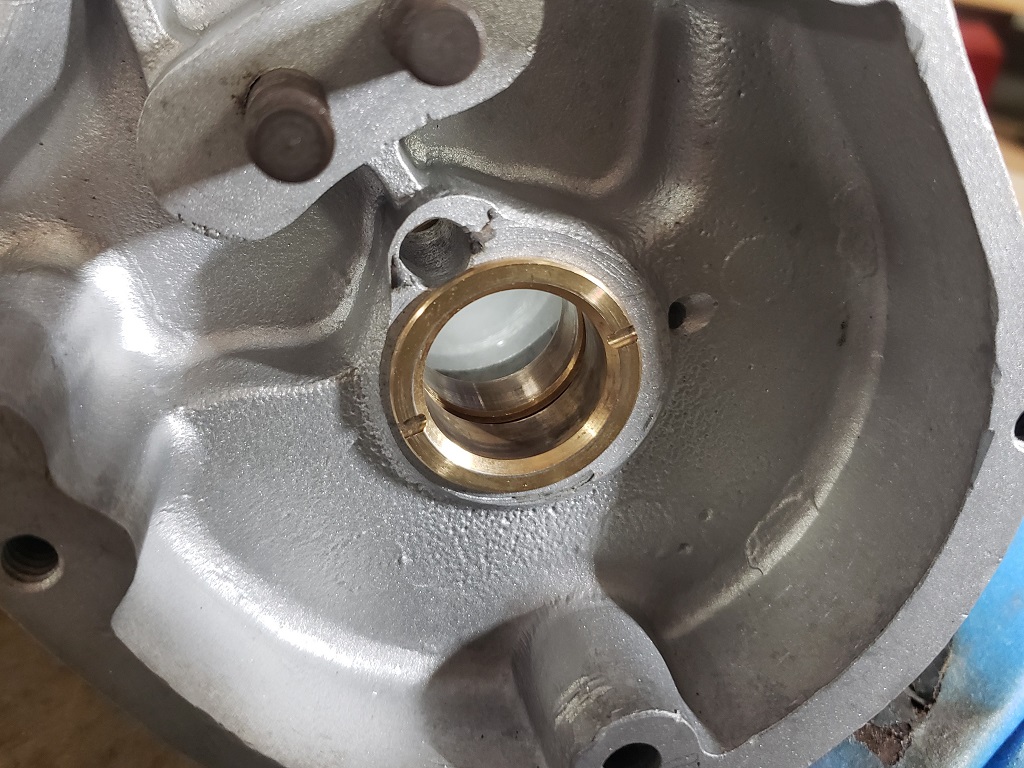
The first picture shows the MK3-type camshaft bushings installed. As usual, the cam would not go in them as the shrink when pressed in so I got ready for the several-hour job of hand reaming them. Then I had a thought. I wondered if my Triumph small-end ball and reamer would be the right size. I was shocked - exactly the right size. There was no way to accurately use the reamer, but the ball - that's another story. When fitting a brass bushing, the method is to press a precision, steel, hardened ball through. It worked like a dream! The cam fits perfectly now and turns perfectly.
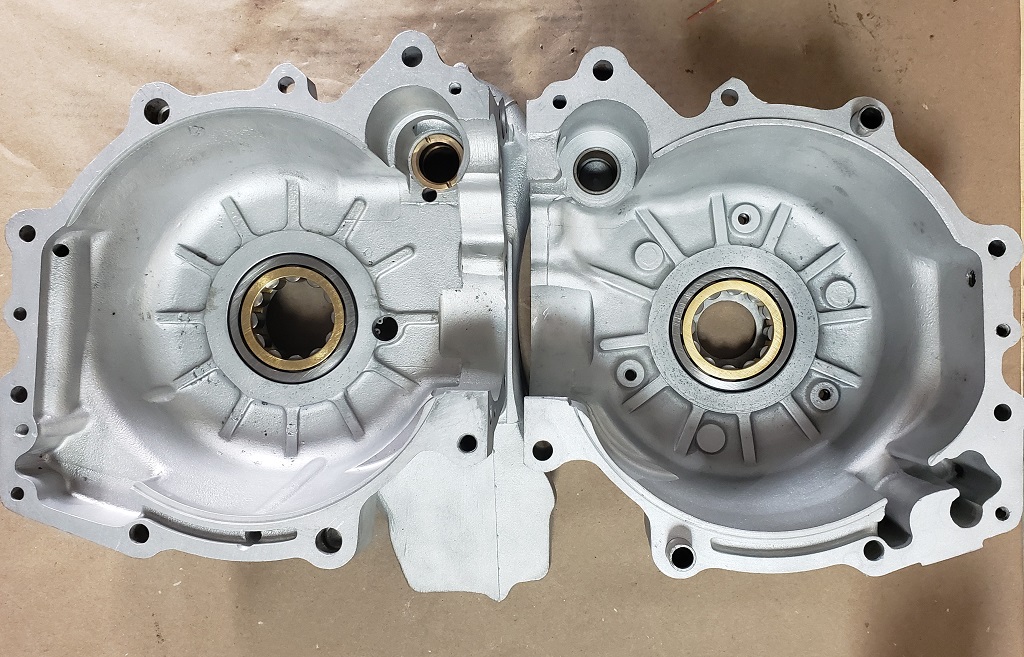
The second picture shows the main bearings installed. Once the cam gets here, the bottom end can go together! (16 Hours)
September 18, 2023 UPS was supposed to deliver today and didn't.
September 19, 2023 UPS delivered today. So I tried a test fit of the lower bottom end. The new 4S camshaft timing side journal is about .002' bigger than the camshaft I used to test the new bushings. It turns but too tightly, so I need to ream the bushings a little. Not a big deal just a little time consuming - this is actually the closest to having new bushings "just work" I've ever had!
September 20, 2023 Score! I bought a set of cylinders on eBay hoping that they would have good bores. I was a bit dubious since they were somewhat rusty on the outside and the seller said the tappets would not move. Took almost two weeks but they arrived today. The bores measure perfectly - absolutely no taper and I checked against new pistons - .0035" clearance on both. The original crosshatching is mostly still there so they have almost no miles. They have no rust but a little staining in the bores. I will hone them lightly to get a clean crosshatch and that will bring them to .004" clearance with no stains.
The tappets would not move but the reason why is that the edges of the tunnels had rust and the tappets were pushed up. Soaked them for a few minutes with WD40, heated the tunnels a little and used an old pushrod to push them out. They are fine.
Unlike the 850 set I finished yesterday for another project; I'll be able to get these ready for paint I about an hour. They were originally silver,
and they have a light coat of black among the rust - all easy to blast off.
I also spent about 30 minutes reaming the camshaft bushings. The cam now turns beautify. Now the bottom end can go together! (17 hours)
September 21, 2023 Upsy-daisy times two! I wrote all about the cylinders I bought. The new owner read it and was confused! Our deal is the engine will be complete except for the cylinders and pistons because he has a set to install - that's what I get for working on so many projects at once!
Next Upsy-daisy, the bottom end is still not together. He has a Seely frame and the bike he's building will be a track bike. He sent me the Seely cradle and front mount.
Since about half of the crankcase bolts/screw/studs that hold Norton crankcases together require the cradle and front mount to be installed there is not good tension on the cases without them. I install the front mount while putting the cases together and then just bolts at the back until I'm ready to marry the engine and cradle.
The Seely cradle is made of thick aluminum. The standard studs/bolts are not long enough - I just placed an order with McMaster-Carr. The good thing is that the parts cost much less from them anyway.
This is now on hold until Monday or Tuesday. I did spend a few minutes making the front mounts look better - can see myself in them, but not good enough to shave. (17 hours)
September 24, 2023. Shipping is weird! McMaster-Carr shipped the bolts ground and UPS tracking said they would be here Monday, so I half expected Tuesday. They arrived late yesterday! I didn't think there was any such thing as Saturday delivery when ground is used! Anyway, this allowed for some progress! Still had a bit of a battle with the Seely cradle. I could buy bolts either 4-1/2" or 5" long. 4-5/8" would be perfect and 4-3/4" would be fine too. I wanted to use NyLock nuts but the bolts are not long enough. Regular nuts are fine - that's what the factory used, I just like the extra security of NyLock. The front mount it on. I want to get the timing side done before installing the rest of the cradle. Also, the front bolt is not an SAE size. I have to figure out what it is because the mounts will be used to hold everything in place in the crate. Everything for the timing chest but the oil pump is ready to go on - I just ran out of steam.
(21 hours)

September 25, 2023 the timing side, except for the oil pump, is together. and I started refurbishing the oil pump. It went smoothly except for the Woodruff key for the cam. The crank and cam use the same key and I used new keys. The key slipped into the crank with just thumb pressure. There was no way the key was going in the cam! Little key, big fingers, and a file. The key started off .1260" thick. When I got it down to .1225" it went in with heavy thumb pressure. Once all that was done, I started refurbishing the oil pump. I wasn't sure at first that it was good - it was very gummed up with old hardened oil. A little time with WD4 and a brush and it all came apart - no internal rust and everything looks fine. The outside has some minor rust but not where it matters and that will come off easily. I still need to clean some more and then will do the normal servicing and testing but I expect it to be a good pump I'm very happy that the screws are good - they are expensive!
(24 hours)
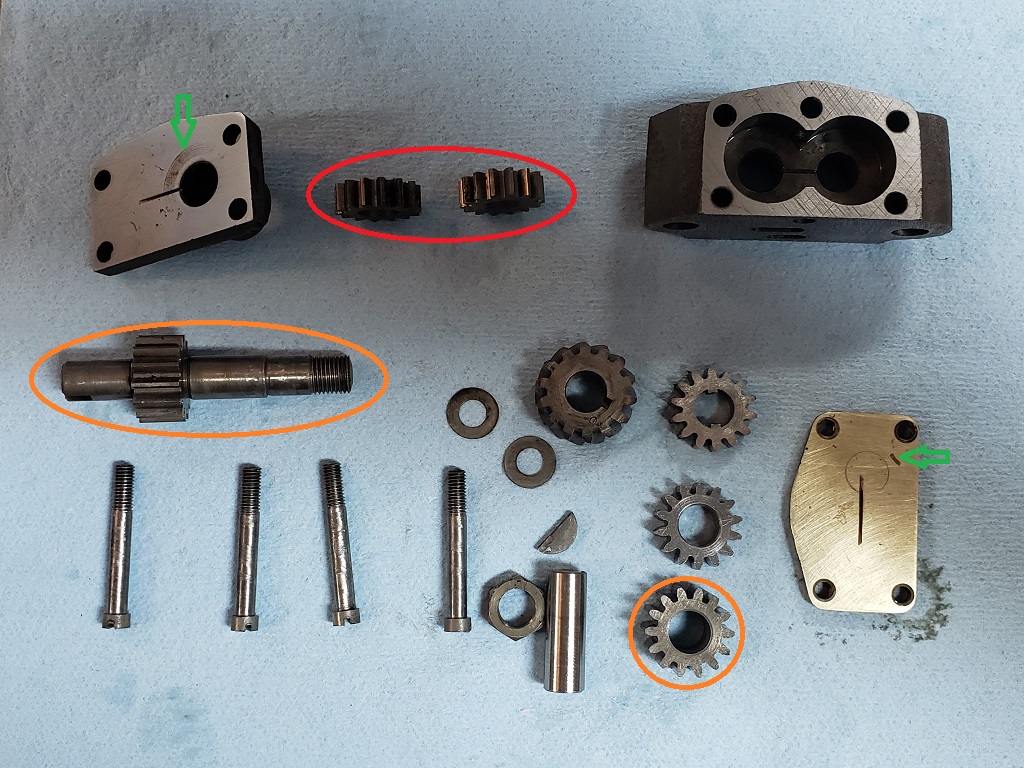
September 26, 2023 The oil pump service gave me a little trouble but it is now an excellent pump. After thoroughly cleaning and inspecting I realized that the two gears circled in red were bad so I found two good ones in my oil pump parts stash. Then I did the service of the top, bottom, and body. There are two spots pointed to by green arrows. The spot in the top cover is only a stain and the one in the bottom is not in the gear area so they are both fine. The two circled in orange would have worked OK but each had a tooth with a small chip, so I found two good replacements.
The timing side is together except for the pump and cover. I'll buff that and then install. (26 hours)
September 28, 2023 Finished and installed the oil pump and set the cam chain tension. Spent a little time cleaning and polishing the timing cover. Didn't go overboard - this will be a track bike. (28 hours)
October 18, 2023 Since I last wrote, I finished the bottom end and forgot to update. I've been busy trying to get projects done and as usual hurting myself. The Norway project crating is almost done and that's been a bit of a nightmare. The High Mileage 850 project started on the first kick and was running well except for a very high idle (cable problem), but then the fuse holder started smoking. That bike has had two long unforeseen delays - should have been done at least two months ago. And, so on.
I did spend a little time today cleaning up the cradle for this bike so the engine and gearbox can go in it - that is once I can find a flat spot in the garage to work on it. (31 hours)
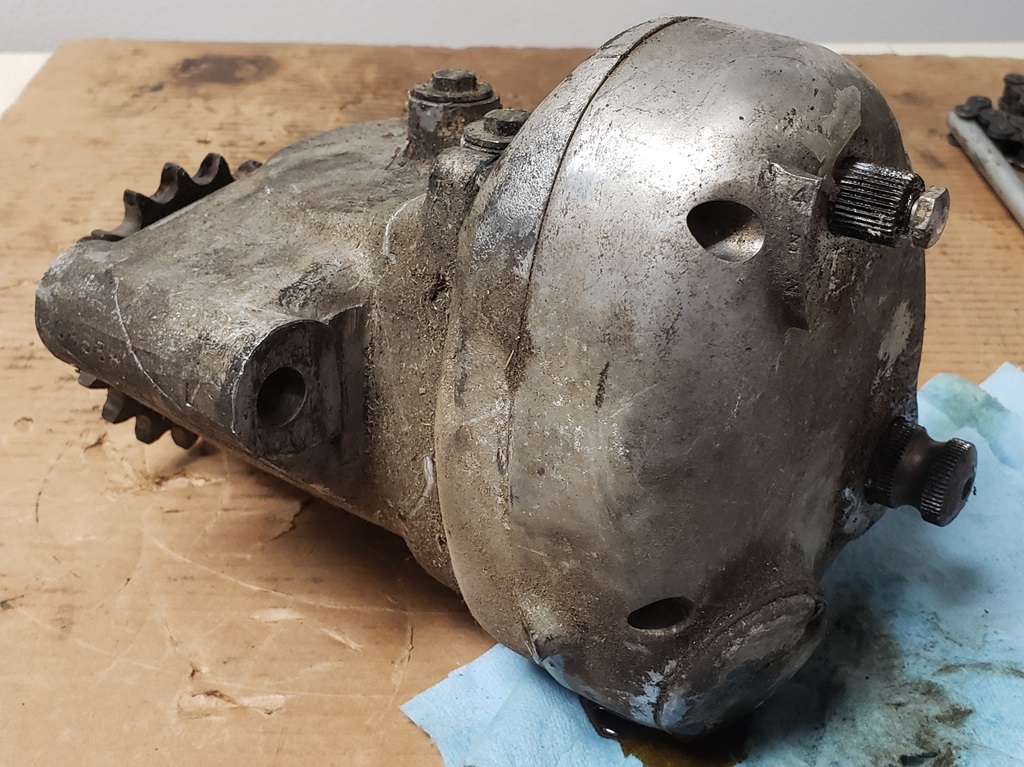
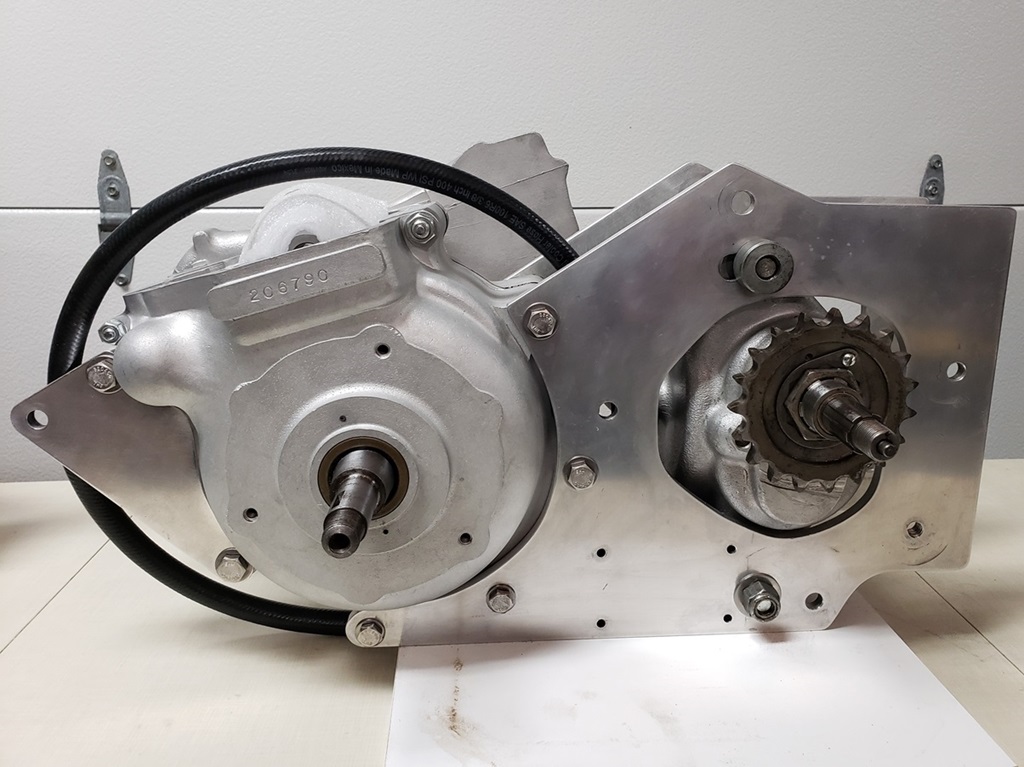
October 29, 2023 People do weird things! I got work today on the gearbox. The good news is that it has a lot of new parts and almost all parts are good. The outer over came off without much difficulty and then my heart sunk. It looked like homogenized oil and water inside - something I've seen plenty, but I was puzzled that I didn't see rust. Looking closer I realized that the last person had slathered everything with Lithium grease as they were putting it together.
So, no rust but a LOT of cleaning to do - you don't want Lithium grease mixed with gear oil! In the picture, the majority of the grease is already wiped off.
The next thing was red Loctite on the timing side bearing/clutch actuator ring. The ring was clearly new. My special tool for removing them looked brand new - now both are junk. Heat/try/heat/try along the way damaging the retainer and tool! I finally got it out without damaging anything else.
The case is all stripped now waiting for cleaning. The inner cover has some damage on the sealing surface at the top/back where some
gorilla used metal tools to separate it. I'll have to study that some to see if it is usable.
(36 hours)

October 30, 2023 Now I'm in inner and outer gearbox cover hell! I mention that the inner cover was attacked by a gorilla. On close investigation, the damage means it will leak. I could surface it so it would not leak, but I think I would have to take off too much metal. Also, the kickstart return spring post is very loose.
I have one more complete gearbox for a matching numbers, titled bike. I decided to take the parts from there so I can keep moving. The outer cover is damaged beyond the repair at the kickstart - the bushing was left out! The kickstart stops are both very damaged - they are replaceable but I have to order the parts and hope my press is strong enough. On top of that, the gearbox was run with little tor no oil for some time - it STINKS of burnt gear oil and components that don't usually wear are worn!
Now I need two inner and three outer covers!
(38 hours)
November 1, 2023 Well, gearbox hell is partly over! I bought a engine and gearbox for a good price. They arrived today (much sooner than expected). When I unpacked the gearbox, my first thought was Oh Crap! I started cleaning it so I wouln't get as dirty taking it apart. I slowly started smiling! Once some of the dirt was off the outer cover I started being able to just make out my image. When I took off the outer cover, everything inside looked new. When I took off the inner cover I was really smiling. The only issues the gearbox had: bad timing side main bearing, still had a layshaft ball bearing, and the last guy in used a lot of gasket sealer on the gaskets - that will be the biggest PITA of all. I don't need the internals, just the inner and outer covers and the outer cover shift mechanism. Just to be sure, I put the inner cover on the gearbox case and it went on like they were machined together - that often is a problem but not here! (40 hours)
November 2, 2023 The gearbox parts all clean, the outer cover is polished and the outer cover internals are installed and tested. Decided not to do the full beautification process on the shell and inner cover - they look good and this will be a track bike, not a show bike so save the four hours of labor. The two mainshaft and one layshaft bearings are installed and the internals are ready to go together. (42 hours)
November 3, 2023 Today was mostly a bust. I was getting ready at 3pm to finish building the gearbox when the phone rang. Every time I got off the phone it rang again. Six different people kept me tied up until 6:45pm. I did get the gear selector quadrants installed and timed and the sleeve gear in too. If people will leave me alone it won't take long. It a funny thing. Most of my life I've talked to and watched old men learning how to do things. Now that I'm an old man I expect to do the same for young people. Nope, it's old people asking me for help - several that are older than me. There's even one guy who works on British bikes for a living that asks me a lot - at least he asks over email and doesn't call a lot. I don't have much in the way of social interaction so I don't mind helping people, but it would be nice to have some free time from it! (43 hours)
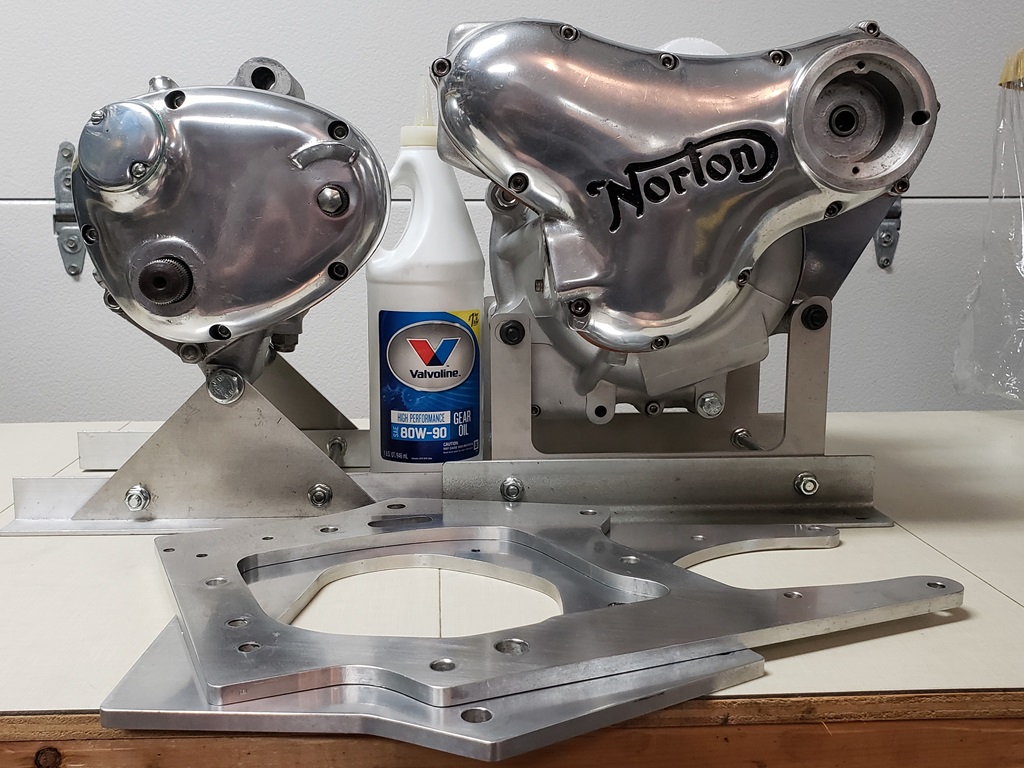
November 4, 2023 Today wasn't bad on calls, only three. The gearbox went very smoothly until the very last thing to do! More on that in a minute. the picture shows the gear oil I used. Every internal parts was either soaked or dipped in it. Once everything was together, I turned the gearbox every which way while putting tools away and cleaning up getting ready to marry the engine and gearbox. It's now draining which is a requirement for shipping. When I build a gearbox, I put in the bearings, then quadrant and selector, then the sleeve gear, and then the sprocket. Putting the sprocket on before the mainshaft goes in makes it much easier to tighten it. The sprocket nut lockwasher requires a 2BA screw as does the little inspection cover. I only had ugly ones so I put off the lock washer and continued putting it together. Once all done, I went in and got those three screws. Well, something just had to go wrong! I could not get the screw in the sprocket - it's not rocket science - it's
something I've done many times! The hole looked too small, but how could that be. It was a brand new sprocket that I got when I bought someone out. It's wasn't from AN or RGM so I have no idea where it was from. After fiddling a LONG time, including trying a 2BA tap - it's wouldn't start either, I took the sprocket off. I thought maybe when made it was drilled and tapped from the back and not fully tapped. No, the screw would not start from the back either. I tried 10/32 screws - also too big. Then I tried the one 8/32 screw I had - it fit! I might understand if someone made the sprocket with metric threads, but SAE 8/32? Anyway, I don't screw customers with crap like that. I had another OEM sprocket in good shape but with some rust. I cleaned it up and installed. Of course the screw was a 20-second effort then! I wanted the engine and gearbox together today - oh well. I'm embarrassed that I spent 2.5 hours on that damned sprocket so that times is not in the hours.
Two issues are stopping me from putting the engine in the cradle. I have two pressure relief valves somewhere that I cannot find and I have to do something about the breather. I'm hoping one of the donor engines has the cNW 72-style breather as I hate to install the worthless OEM one (if I even have one). (47 hours).
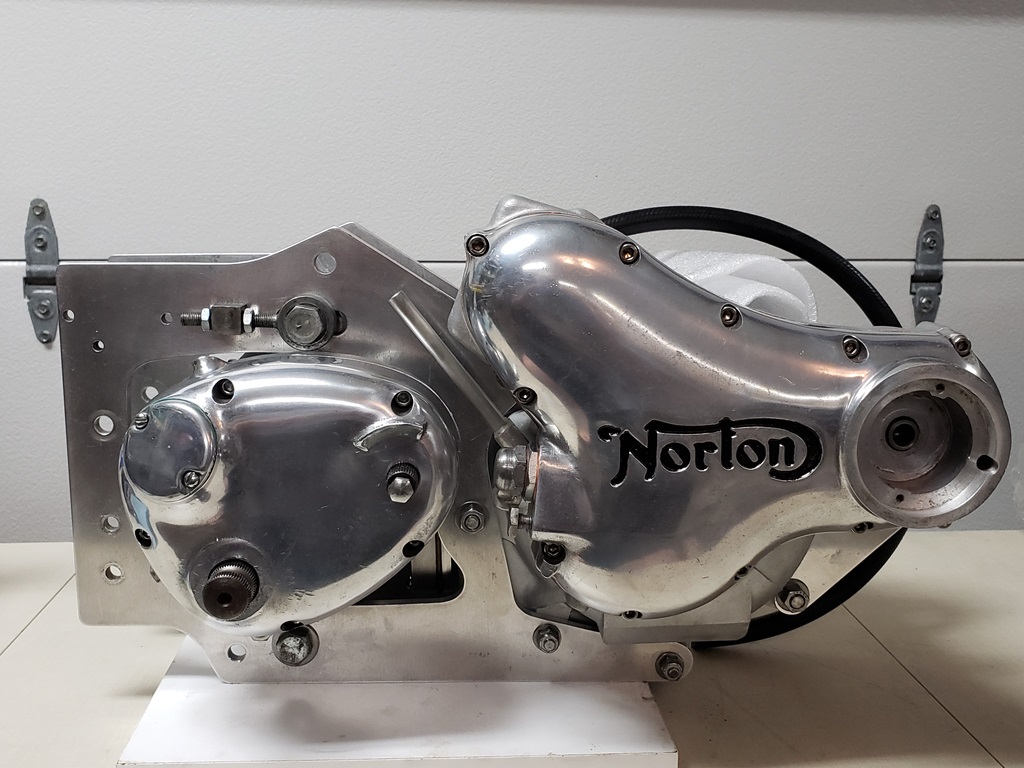
November 5, 2023 Did a lot of little things then started my Seely cradle education. I had a ugly engine oil junction so I blasted and re-plated it. Never found the new pressure relief valves but did find on with a bad body and no shims but otherwise good and I had the body and shims in stock so that's done. Looked high and low for a 1972 OEM (piece of crap) breather. I guess I either gave or threw them away. I did find an engine with half of a cNw 1972 breather and I had the other half I got from someone I bought out; so, score for the owner. A free $240 reed valve breather! The black hose is from the breather - they are hard to install once in the cradle.
OK, let's have a marriage ceremony! For a while it felt like a shotgun wedding. I connected the cradle to the engine but didn't torque anything because it was lopsided. It took a while to realize that the front bolt boss for the crankcase was a little below the sides of the cradle - sure would have been nice if they has extended the bottom down
1/8"! OK, next issue - can't put the gearbox in with the engine in. Probable would not be a problem with any engine but a 1972 as the 1972 OEM breather or the cNw breather is in the way. That's actually no different than the standard cradle problem with 1972, but I was fixated on the Seely cradle being the problem. Once I figured out to put the gearbox in and then the engine it was not much harder than a standard cradle as long as you elevate it because you must straighten before tightening. I had to buy longer than standard bolts for the engine to cradle and they all worked out fine. The later type top gearbox bolt and slotted nut also worked fine. The bottom gearbox bolt is too short, but it should not be hard to find one that will work.
Once together, it was possible to figure out how I'll crate it and to visualize the sizes and other things. The crate will be approximately 24" long, 16" deep and somewhere in the 16" to 20" high - need to figure out how to pack the head with no cylinders. The front ISO mount is perfect to lock that end in place and there are two holes in the back in a great place to lock that end. Those will be able to keep it from moving in any direction. I was worried that the primary would need to be packed separately but it turns out that it will be no problem. (51 hours)
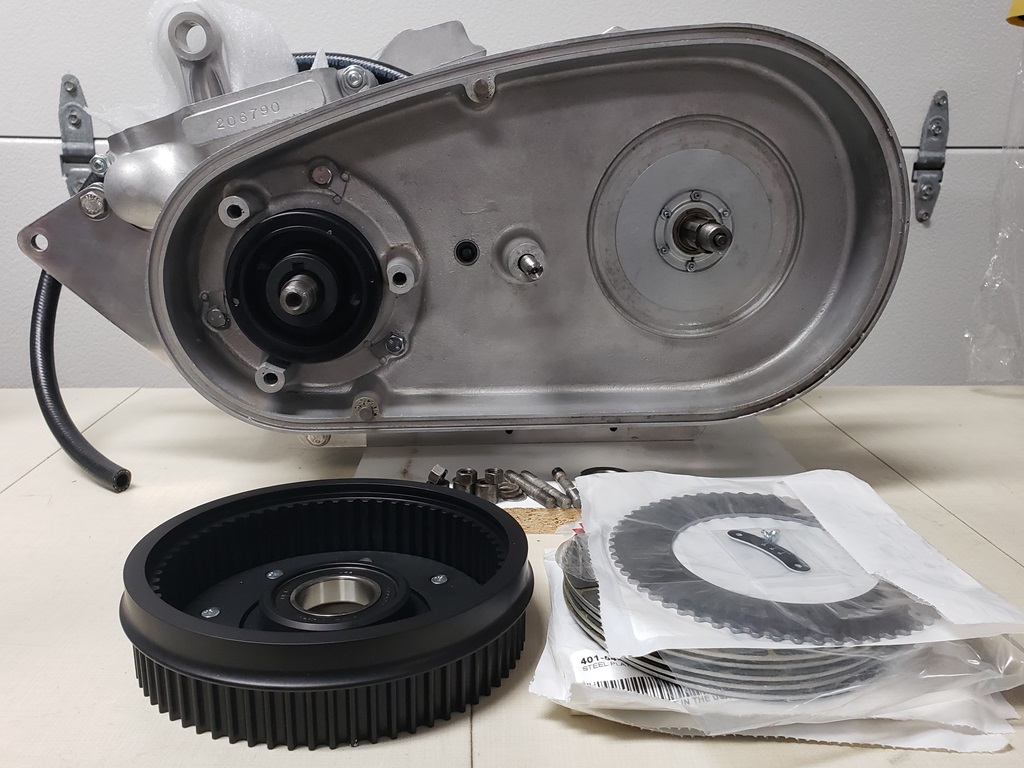
November 6, 2023 It must be oldtimers disease! Planned to install the primary. Unboxed the belt drive, laid everything out and then said to myself - where the hell is the inner primary - did Matt forget to pack it? Then after about 10 minutes looking around to see if I inadvertently laid it somewhere while unboxing the light finally came on! It's the e-start kit that comes with an inner primary, there's no need for a new one for the belt drive kit!
OK, no problem, I have some. The first one I grabbed was like new. For a moment I wondered why I took it from a bike - then I noticed the broken mount for one of the stator studs - this time I took it where I should have when I removed it - the recycle bin. OK, I have more. Yes, the ugly, the uglier, and the ugliest. All three came out of an old barn, all three had the sliders for the high gear seal stuck and completely rusty. So, I gave all three a bath. None were good enough to use even for a track bike and all had to have the sliders changed. So, eeny, meeny, miny, moe and chose one. Then drilled out the spot welds and then to the blast cabinet for about 20 minutes with glass abrasive and then 15 with glass beads and then 25 at the buffer and all evidence of ugly gone. The new sliders are drilled for 4-40 screws and nuts and will going on tomorrow. I lost the before and after pictures but will get a after tomorrow - too tired right now. (54 hours)
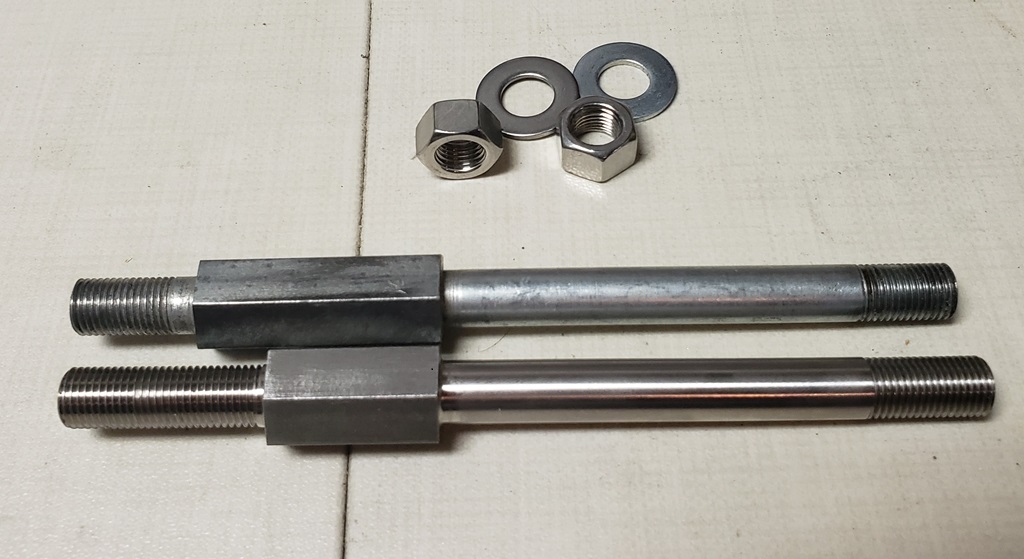
November 7, 2023 Got a proper bolt for the gearbox bottom and installed it. Then tried to install the inner primary to measure the shims needed for the center stud. The Seely cradle thickness strikes again! There was no way it was going one. Here again, I wish I had a lathe - it's a five minute fix with a lathe. Then I remembered that I have a cNw adjustable center stud in stock! The picture shows the standard stud, and the way Norton should have made them! The cNw version is WAY better than putting it on, measuring for shims, finding shims, and finally assembling.
In the second picture you can see how I replaced the sealing disks. Those are 4-40 screws and nuts installed with red Loctite (the only thing I ever use red Loctite on!). OK, now it's time to just put it together; or it would be if I could get the clutch center out of the original clutch! The belt drive kit comes with a new clutch basket but not the clutch center. I'll press it out tomorrow. They are just a snug slip fit
but over time they stick and a rubber hammer is not enough! (56 hours)
November 8, 2023 Not a lot done on this today. Have to the heart repair man this morning - no now problem - still ticking. Then this afternoon the leg repair man (wound care). They replace the multi-layer wrap in my left leg - probably will be healed next week. Right leg is back to good enough.
Pressed out the clutch center, cleaned up the shaft and push it in the clutch basket then installed the front pull and clutch. The clutch is torqued and the belt is adjusted. I may have to touch-up the belt adjustment once the rotor goes on. It couldn't go on because every used on I have and a loose center unless I find another, I'll have to use a new one! The clutch isn't put together because the pushrod seal I have is missing the O-ring :-( (58 hours)
November 9, 2023 I got a steroid shot in my foot this morning - Superman mode will initiate in the next few hours. Right now, I'm worn out. I remembered a few minutes ago that I bought a lot of rotors a month ago, five of them, for very little. I expect a couple of duds, but I should have at least two I need now. I'm just hoping my brain kicks in with the rest of the wonderful side effects steroids cause - that might enable me to remember where I put them! Probably no work today.
After I wrote that I went to recliner and put my feet up. Almost instantly fell asleep. Then 30 minutes later the steroids kicked in. No headache, shoulders don't hurt, of course, foot doesn't hurt, can breathe much better and am wide awake. Immediately found the box of rotors - score:
- All five came with the curved metal shields the they come with new.
- All five passed my magnet test. Each of the rotor's magnets should hold the rotors weight when attracted to a thin round screwdriver.
- The centers are not loose on any of them.
- The first one is for a Rocket 3 or Trident. Too thick for a Norton, but just right the Trident I have in boxes that is missing a rotor!
- The second one is quite old - no timing marks.
- The other three are all appropriate for a Norton.
- Date Code Oct 1990 - nice but a few nicks - one on the center. I would use it but not on a customer bike overseas. On one of my own to a local customer I wouldn't hesitate.
- Date Code Dec 1971 - nice but a few unimportant nicks.
- Date code Dec 2000 - perfect other that a few stains. Also, it is the "welded center" type. The centers are no actually welded - that was a Lucas marketing term to denote that the center cannot come loose. The older type alloy was simply molded around the center but these have "wings" as a part of the center. The current genuine rotors form Wassell are the welded type and even higher quality.
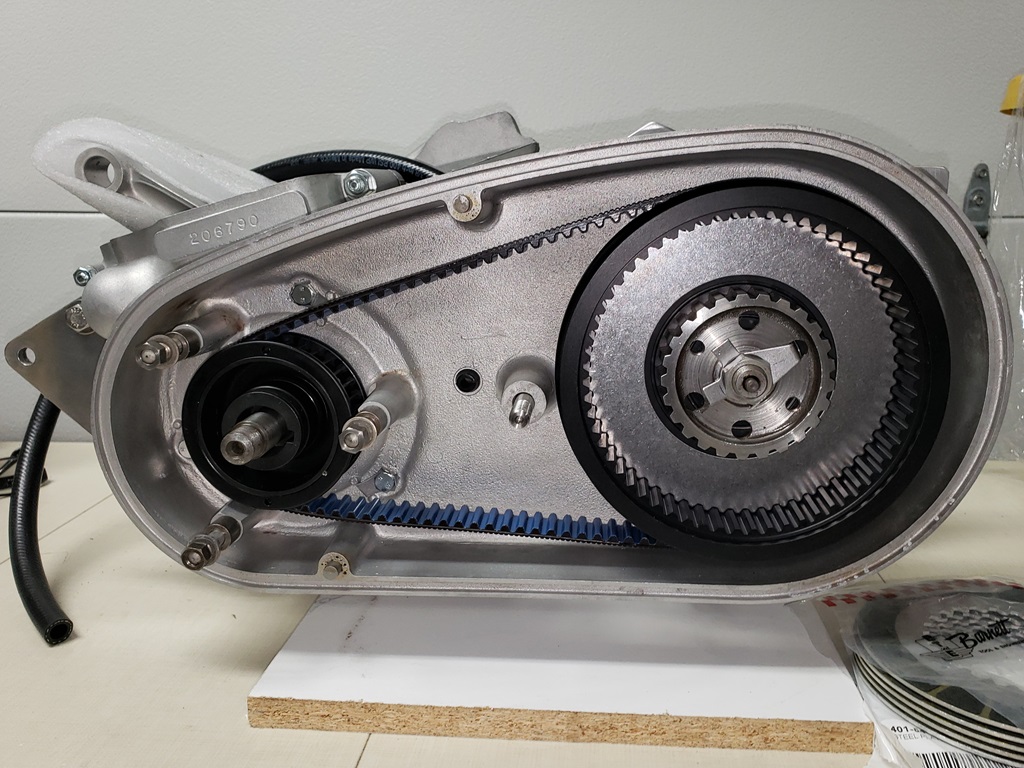
The rotor is installed. I had a almost new stator I removed from a customer bike who decided that he wanted three-phase after the fact. The rotor and stator are installed with at least a .009" gap all the way around. with the front pulley now tight, I rechecked the belt - was fine. Matt's instructions say to make it +/- 1" in the middle of the bottom run. the measurement is actually the same in the e-start kits but checked a different way. I wasn't positive if he meant the overall up and down deflection should be 1" or 2" so I checked with him - it's 1" so from relaxed, you push it down, rile a ruler but it and ensure that when lifted up it reaches 1". The belt looks loose and is supposed to be!
When I cleanup the outer primary cover I need to replace the degree indicator with the one that came with the kit. Since I have the timing side done, I can't get to the cam to use my old faithful Triumph degree wheel that mounts the cam and since I've already torqued the rotor nut and I don't have another shake-proof washer, I can't use my Dunstall degree wheel on the rotor (should have thought of it before tightening the nut and installing the stator). Never fear, I have another way to use the Dunstall wheel. All I need a degree wheel for is to accurately find TDC (no cylinders installed). Once I have TDC, I'll use the clever AN tool to check the marks.
The O-ring I need will be here tomorrow so I can finish the clutch. The customer decided to use the Jim Comstock refurbished head I have - excellent choice! So, after the clutch, and finding TDC, I think it's only the primary cover and the engine/gearbox build will be done. (59.5 hours)
November 10, 2023 The O-ring arrived and I finished the clutch. I also found TDC and checked the OEM marks on the outer cover I chose for this bike - off 4 degrees. Remove that degree plate and loosely install the cNw plate - off 43 degrees so I file the holes into slots a little at time and kept checking. the marks will now be perfect when I instill them. Need to finish cleaning, sanding and buffing the cover. Not trying to make it perfect just presentable. I also figure out what material I need to crate this on and the one for AU. When I bought the plywood for the NO crate I worked it out to have enough for these and only charged them for about 60% of the plywood. This one and the AU one will be about 20% of the plywood each and then the dimensional lumber and hardware. It's supposed to rain most of tomorrow and I don't cut wood inside - too much dust to mix with motorcycles! (62 hours)
November 11, 2023 I screwed up - big time. Originally, there was to be no primary installed. then we agreed on a cNw belt drive and the buyer sent me a link to the ignition he plans to use. Looked interesting but I didn't read the fitting instructions. I wondered about it a little before working on all I've done with timing and the rotor/stator but did not check. The ignition does not need and conflicts with the stator/rotor/rotor spacer - you remove them. Since the cNw belt drive incorporates the rotor spacer and is even about a 1/4" wider than the front sprocket+rotor spacer, it looks like the ignition is not compatible with the cNw belt drive. I've asked the owner to check with the ignition maker on Monday, but I'm 99% sure I either have to not provide a primary or provide a standard chain primary. In either case, the inner primary will stay on and the hours for all the primary stuff after installing the inner primary have been removed and the project is on hold until I know what to
do. Expensive lesson - now I have a used cNw belt drive, a used Barnett Clutch pack, and a lot of wasted hours!
November 12, 2023 I bought the rest (I hope) of the lumber and hardware for the crate, cut out several of the parts and figured out everything but the height. The crate will be 24" wide, 18" deep, and I'm not sure yet how high. (64 hours))
November 14, 2023 Get started on the crate. Broke the measure twice, cut one rule and got stuck short of wood. (66 hours)
November 15, 2023 Doctor and wound care appointments today, did get more wood but that's on me.
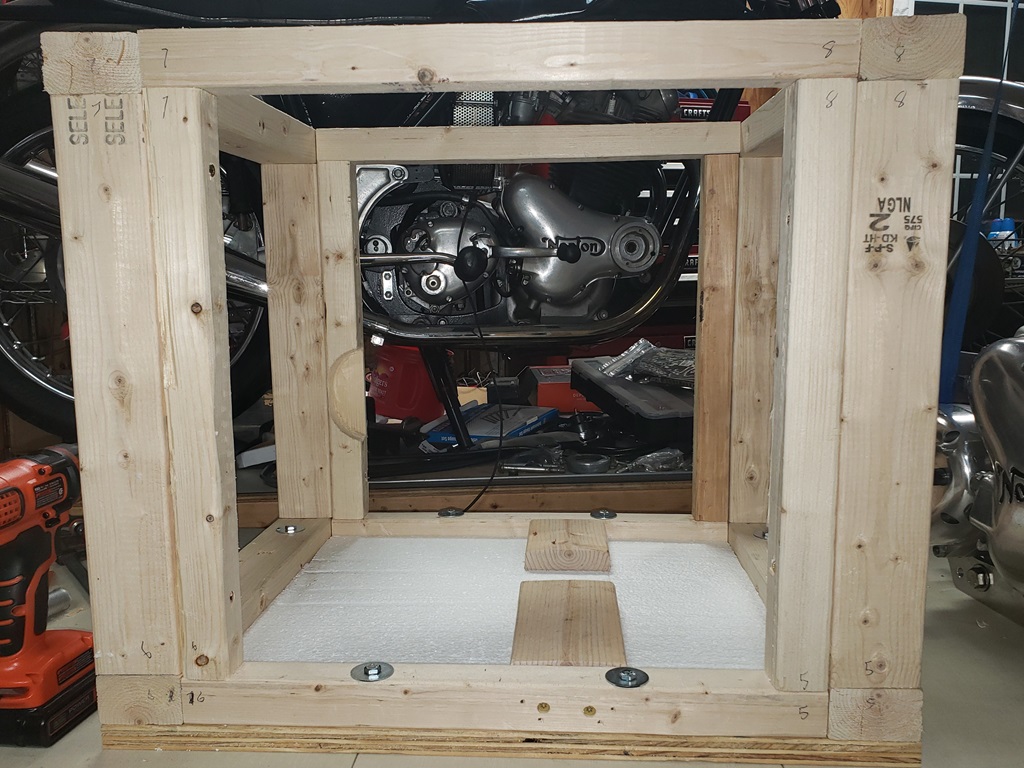
November 17, 2023 Oops! Now we're back to needing the primary as I have it and needing a TriSpark ignition installed. It turns out that the ignition the buyer wanted won't work with the belt drive, is not very well respected, and had no decent tech support. So I restored the hours and we're moving on. In the meantime, the framework for the crate is almost finished - sure glad it isn't really as the picture shows - it's all straight and square. The cradle will sit on the foam at the bottom between the two bottom boards. The front and rear mounts will connect to two upright boards that are not yet installed (need everything in place to determine exactly where they and their holes go). To uncrate, all black outside screws must be removed, eight inside screws must be removed, eight bottom bolts must be removed. At that point the front and rear sides will come away and once the bolts thorough the cradle are removed the ends can come away. Then the unit will just be sitting there ready to
be picked up. The crate will be marked for which side is up, but even if the carrier screws up, nothing should move. (68 hours)
November 18, 2023 Installed, timed, and tested the Tri-Spark ignition. Also finished the clutch. There's something new every day! I tried for 20 minutes to do the simple task of putting in the giant O-ring that keels the diaphragm spring in place. It simply would not go in all the way around. Then I looked at it carefully and it was not properly made! They are supposed to have bends that allow the ends to lay flat and make it the same thickness all the way around - this was just flat so it was extra thick at the ends. Got another and it was in within 30 seconds! Only a few things to do now. I need to install the cylinder studs and nuts and make a cover since the cylinders will be installed later. I need to polish the outer primary cover - it's rough but it's the best one I have. Once that's installed, the engine can go in the crate and I can construction the cradle lockdowns. Then finally, I'll skin the crate. (70 hours)
November 19, 2023 While gathering the cylinder base studs/washers/nuts, my right knee collapsed -don't understand how/why as i was walking in a straight line and I've never had any trouble with that knee. On the way down, my left knee which is not great went sideways, my right toes folded and I hit the floor on both knees. Took a very long time to get up. Two toes dislocated and one possibly broken. Skinned knees, ankle probably sprained. Not sure I'll get anything else done today :-(
November 20, 2023 Walking like a 90-year old to protect my knees but I am getting things done. Installed the base studs. I didn't have any of the 750 version of the two stepped studs. The only difference in the 750 verses 850 version is that the end that screws into the crankcase is longer so I ground down two 850 studs. All are installed with blue Loctite. Made the crankcase opening cover. To be sure no flecks of wood come off, I painted it. It will go on tomorrow along with some foam sheets that will lock the conrods and therefore the crank in place. For each stud there will be
one or more generic washers and then a proper washer on each stud. The primary cover is buffed - not beautiful but decent - looks better than the one on my rider. I plan to finish the cradle lockdowns tomorrow, box the head and figure out how to fix it in the case and maybe put the power unit in the case to stay. (73 hours)
November 21, 2023 What a miserable day. Had my ortho appt. today - 8 miles away, took 50 minutes to get there. Then the doctor has two emergencies this afternoon so I just got home - four hours to drive a total of 16 miles, get x-rays, and spend five minutes with the doctor. Hard rain, very heavy traffic as is normal for this week each year.
The good news is: My knees are somewhat better today. He figures they will be back to their normal in 1-2 more days. He says he sees it pretty often. I sharp knee pain makes some muscles in thigh and butt shut down momentarily and down you go. He says I have bad arthritis in my right knee but otherwise it is very stable. He says I have much worse arthritis in my left knee and my knee is very loose. The left one hurts me several times a day but I know what does it (for instance, going down stairs) so I'm very careful and I hang on. I'm going to at least take his advice today and stay inside resting - it is cold and miserable outside!
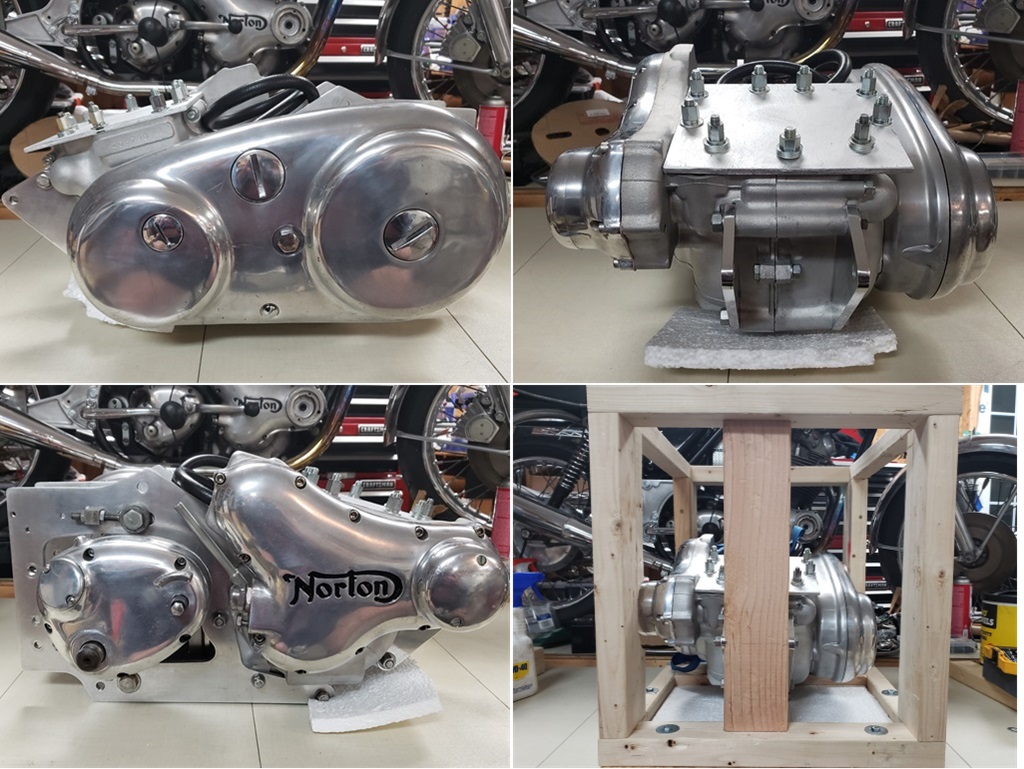
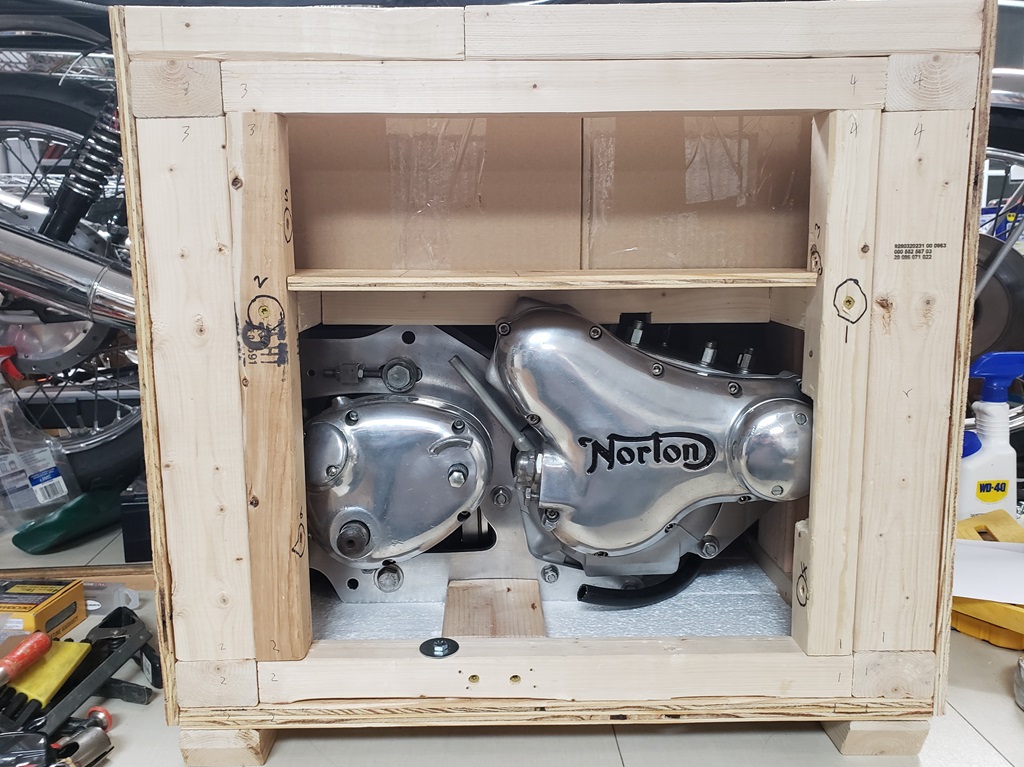
November 22, 2023 The engine, gearbox and primary are finished and in the crate. The bottom right picture shows the front of the engine locked in place - that was a PITA. I figured a much easier way to accomplish the same on the rear - that's for tomorrow.
I also need to figure out how to safely put the head, carbs, and other parts in the crate. The available space is looking small but I'm sure it's big enough - I spent enough time measuring! (76 hours)
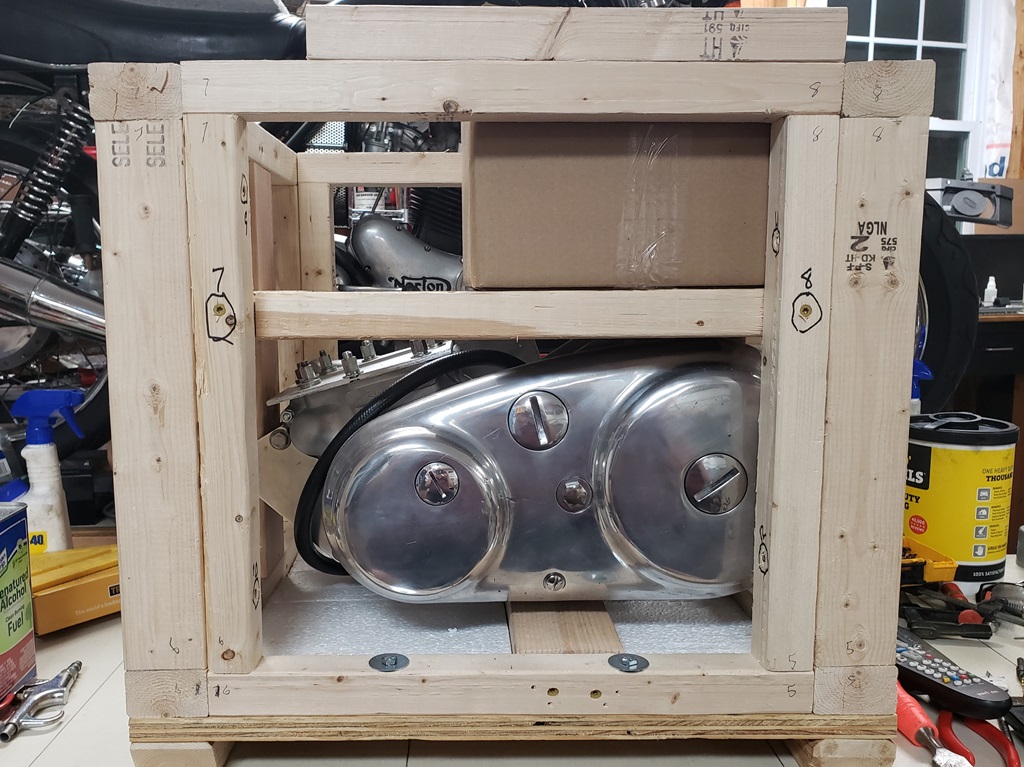
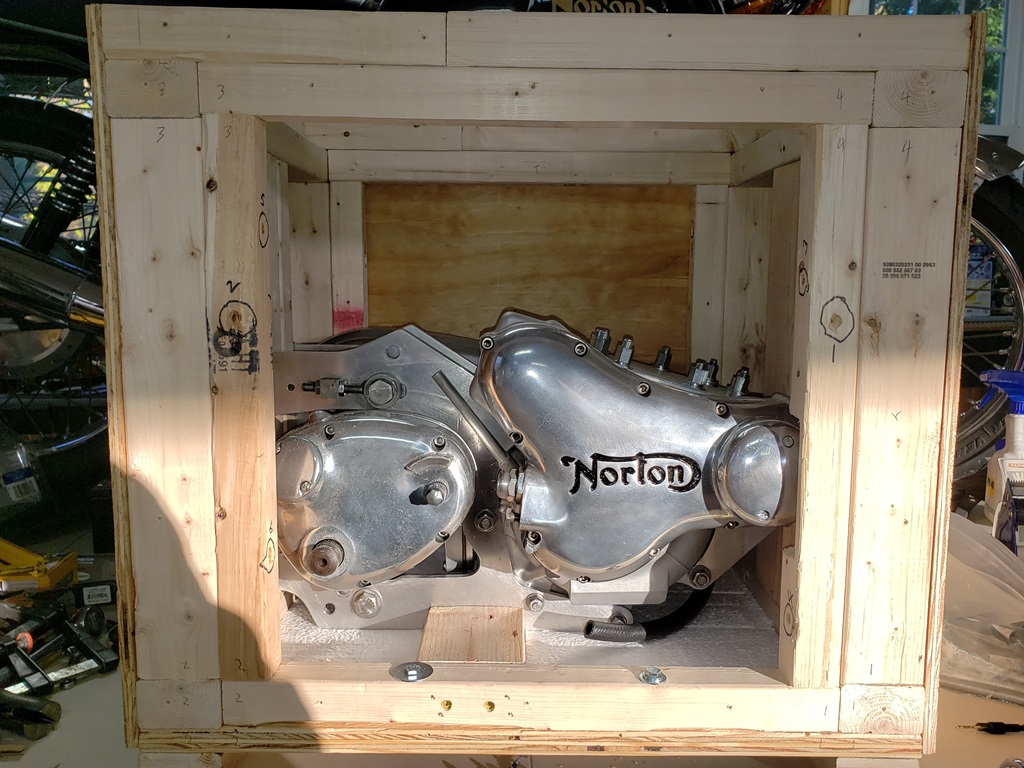
November 23, 2023 Oops! Spoke to fast! Finished locking the power until into the crate and then started on the head. I could wrap everything in bubble wrap and let sit on the power unit but didn't seem like a great idea. So, I added a shelf. That took 1-1/2" of the space I had so now the crate isn't tall enough. Not a big issue - I can added a board on
top of each side. this added more screws to be removed. I've circled all screws that must be removed to remove the sides. So, it's now:
- Remove all black screws from the sides and top.
- Remove the boxes on the shelf. You will see a special bit to use to remove the inside screws.
- Remove all circled screws on the inside.
- Remove the front and back cradle bolts (2 bolts).
- Remove the eight bolts holding the frame sides to the bottom.
- Remove all four sides and the shelf.
- At this point the power unit can be lifted and carried wherever needed.
The head is in the box shown. There will be another box with other loose parts. (79 hours)
November 25, 2023 Apparently I forgot to save yesterday update. No matter, I'll combine with today. The side panels and top are cut out and the sides and back are on for good. Made a custom box to fit beside the box shown in the previous picture. When through the restored carbs I have. They came with three bikes I got when I bought a guy out. The set I choose has been sleeved and modifies so the pilot circuit can easily be cleaned. It is jetted correctly for a Combat engine. It has 220 main jets and I would have liked 230 for E10 gas, but I'm out of stock. It will run fine with 220s, but might now reach maximum speed. The Comstock rebuilt head is missing the intake and exhaust covers so I need to find a set and clean them up - then the head can be finally packed. The carbs and manifolds are packed in the smaller box. There is a yellow Tri-Spark box. That has the various instruction sheets and it's where the owner will find the special bit needed for the inside screws.
Assuming I don't do anything stupid tomorrow like falling, it will be a big day. The crate will be closed and weighed. I tried three times today to hurt myself a little and succeeded all three times! This morning, there were no holes in my legs. First a piece thin of plywood fell against my left shin 1/2" x 2" skin missing. Then I dropped a clamp and took a small chunk from my right shin. Then I got tangled in the vacuum hose - didn't fall but put another scrape on my right leg! (83 hours)
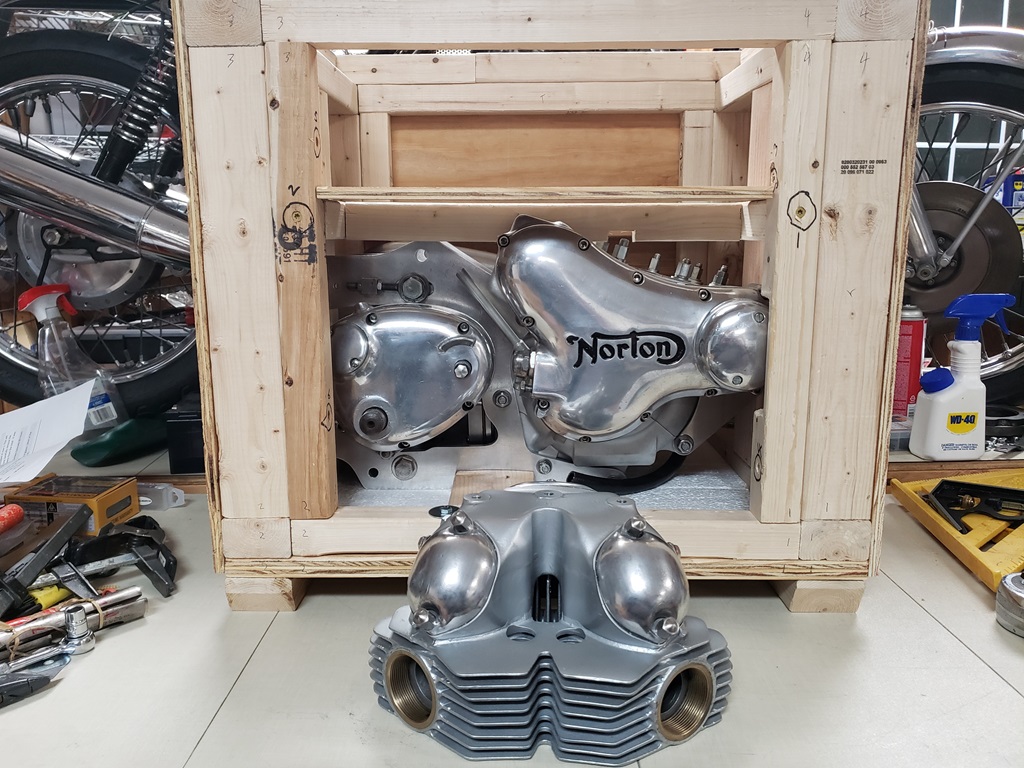
November 26, 2023 Finished except for shipping. The first picture shows the head ready for packing. The second shows both cardboard boxes in place. The bigger box has the head and the smaller has everything else. Once uncreated the small box must be opened and then the yellow Tr-Spark box inside it. The plywood shelf in front of the boxes was there for anything that didn't fit in the others but everything did - it is now full of paper packing. The missing bottom bolt has been replaced - the fender washer stuck out and interfered with the front so it now has different washers.
The target was to have the crated power unit weight 150lbs or less so it could got standard UPS. Didn't make it - it weighs 166lbs. (87 hours).
November 27, 2023 Plan B! Started looking into shipping today and it was going to be a PITA expensive thing. The light bulb went on that I wish had gone on much sooner - ship the head and parts separately which would get the weight under 150 pounds and make the shipping easy. Owner was happy with that so I took the top off, the two boxes out, put the top back on loosely and re-weighed. 142 pounds! I then took the front and back off so I could get the shelf out. I'll re-weigh again as it will probably be around 140 now.
So, both the crate and a box with the other two boxes will go UPS Worldwide Expedited, will take about 5 business days, and will cost less that half of freight. Particularly good because I can use my discounted shipping broker and UPS will pick it up and deliver it door to door. I just wish I had thought of it before - the crate could have been about 8" shorter and a good bit less work to build. (89 hours)
November 28, 2023 OK, the shelf is removed and the sides and top are back on. I rigged it for weighing so it lifted straight and it came in at 141.9 pounds once it quit moving (lifted with my engine hoist and a scale). So, I'll use 142 pounds when buying the shipping label for the crate. I found a box today at my supplier for the other two boxes - 20x14x8 and it is 25 pounds packed.
Unless something comes up in the shipping process that I find worth mentioning, this will be the last entry here (93 hours).
BTW, for those watching the hours, they have been rounded down to hour/half hour each day and they are only hours that should be chargeable (senior moments excluded). I've actually probably put 120 hours into the project. That said, I'm quite a bit slower than I once was so I'm capping the chargeable hours at 80 (original estimate was 70 hours).
December 5, 2023 The crate and package left today at 5:30PM via UPS Worldwide Expedited. The crate was 142 pounds and the box was 25 pounds, Of course we were chaged for pickup and special handing but they sent a little guy in a truck with no lift gate and no ramp. At first the guy told me he wasn't allowed to take over 70 pounds. Then I explained the UPS Worldwide Expedited to him and showed him the UPS label stating 142 pounds. He relented but didn't have a way to get it in his truck. So, I helped - paying for that now. I can lift much more than I should lift!
December 11, 2023 The crate and box arrived today about noon without a scratch. That's a relief.
|


|
Copyright © 2003-2026
Greg Marsh Enterprises
8116 Arlington Blvd. #171, Falls Church, VA 22042, (703) 200-4025
|
|