Home
Motorcycle Home
Norton Home
Export Projects
Contact Us!
The Rebuild from Hell
Updated
01/22/19
1974 T150V Refresh
Updated
07/12/24
1970 T120R Rebuild
Updated
05/05/24
A Trident Rebirth
Sold 7/4/2024
1970 T100R Rebuild
Sold 6/1/2019
1971 T120R Rebuild
Sold 6/22/2017
|
 | Monday, October 21, 2024 |
March 17, 2019 A customer got a really good deal on a 1970 Triumph Daytona (500cc T100R) and had it delivered to me to get
it on the road. From the pictures and description, it seemed like it only needed wiring, cables and a few other things.
It turns out that it needs more than that, but it still is an excellent deal.
It appeared from those pictures that the front wheel was installed backwards. Actually the forks are on the wrong
sides and more importantly, they are not Triumph and not even British. The owner would like a disc brake. I
have a selection of front end parts. If I have enough parts to make sense, I'll install a Triumph disc front end,
otherwise, a later Triumph drum front end. The Triumph 500s should always have the steel, black sliders, but he's
not as worried about making it "right" as being able to ride and stop.
The picture shows the bike with the tank, side cover and seat removed for safe keeping.
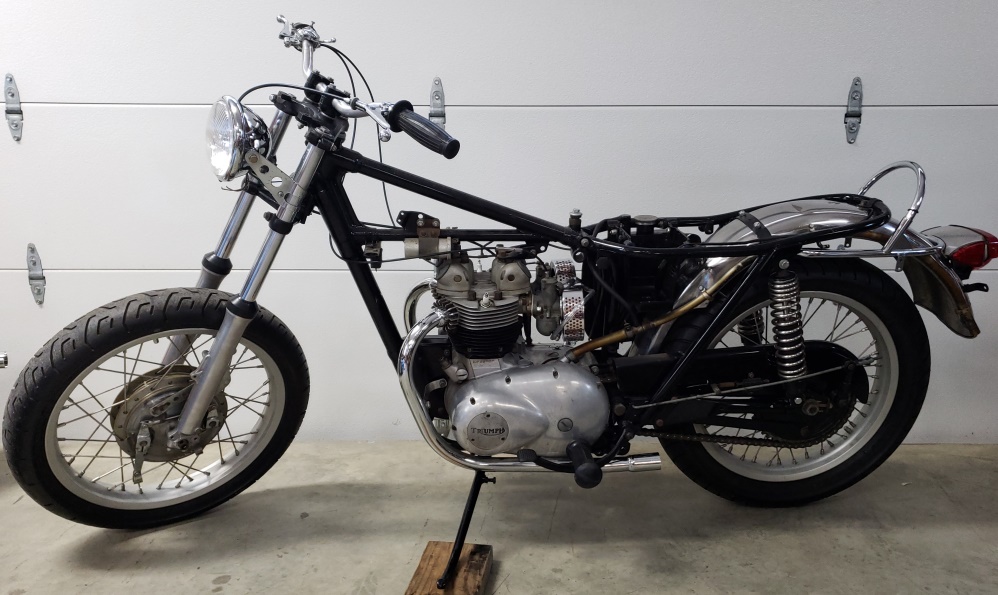
March 18, 2019 After I took the exhaust off I put it up on one of my mobile tables (which displaced the 1974 Norton 850
I'm rebuilding.)
First up, the rear end.
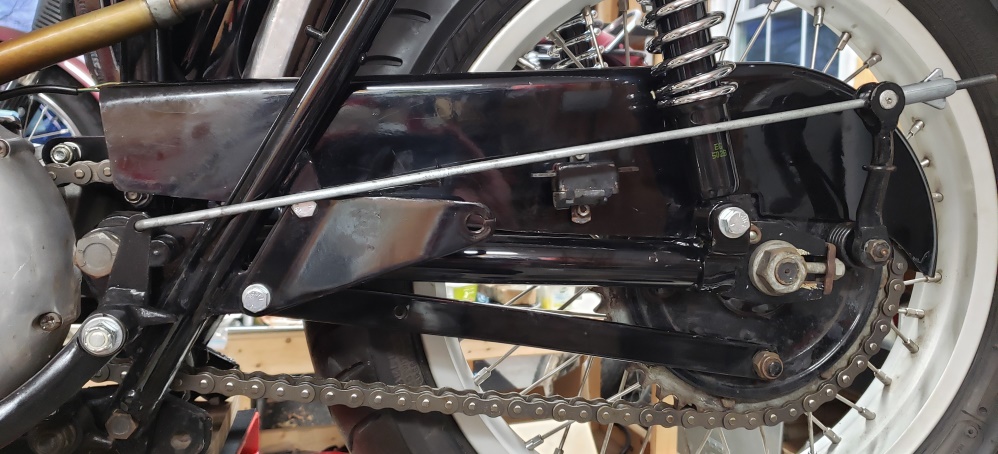
The rear shocks had VERY heavy springs. I'm big and the springs didn't give when I sat on the bike.
The owner is normal size and would be very uncomfortable with those shocks. The bolts were just stuck through the
frame and shocks - no nuts! More importantly, notice the the rear brake rod is bent and rubbing on the bottom of the
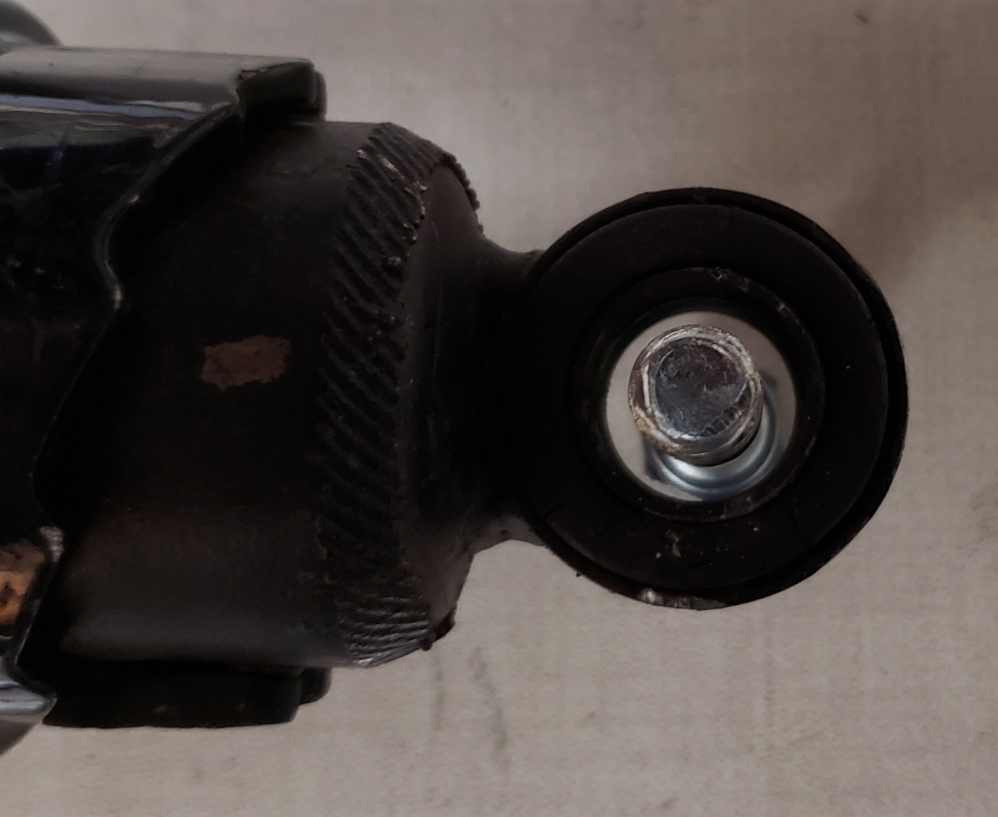
shock. That's because they are not the right shocks. Even more important than that, look at the second picture.
The eye in each end of the shocks is way bigger than the 3/8" they are supposed to be.
The third picture shows the new, correct shocks properly installed.
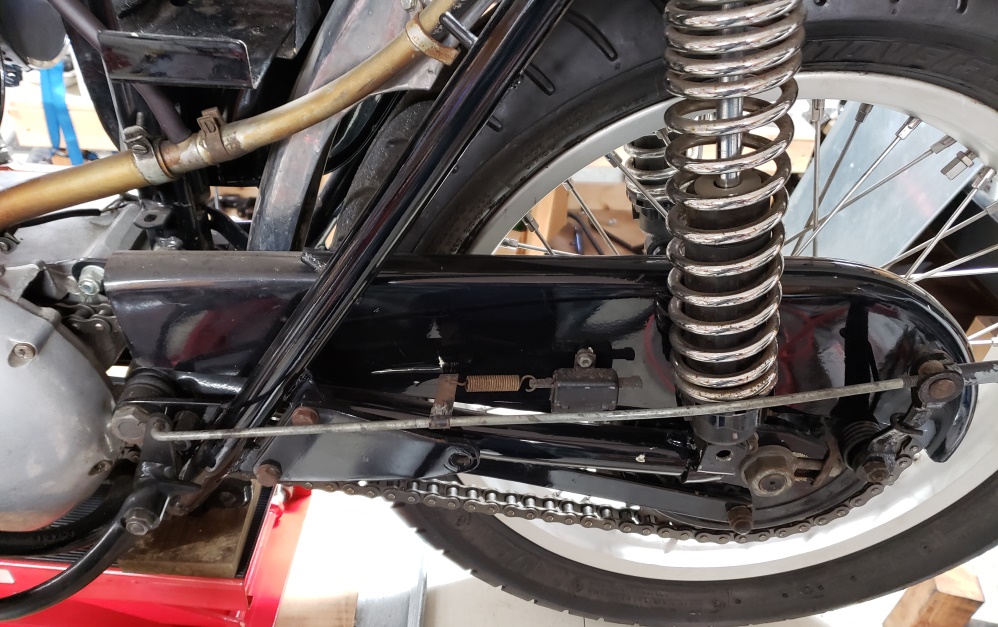
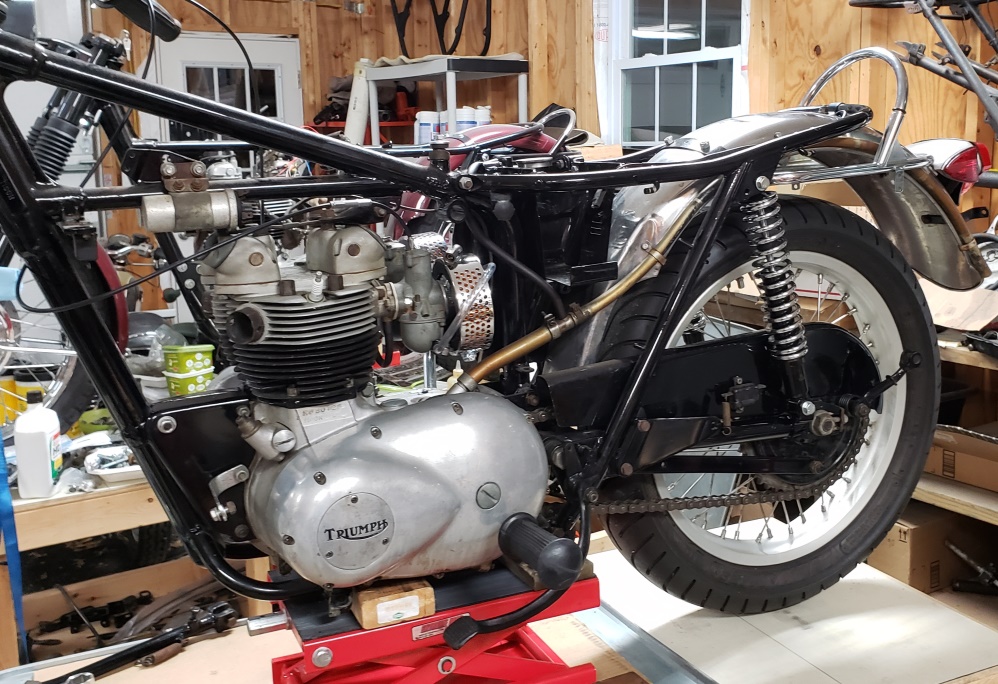
I still have to straighten the brake rod and re-install it. While working on the rear end, I noticed that the rear chain
has almost no slack with the adjusters all the way forward - a new chain will probably be required.
I started on the front end. I removed the front wheel and noticed in the process that the triple tree is VERY loose in the
steering head. Fortunately, the bike was not ridable - that was a terrible tank slapper waiting to happen!

March 20, 2019 Finished taking the front end apart and investigated the idea of a Norton front end because I have most of
the parts for that. I think it might work if I can find the right size bearings races or tapered roller bearings.
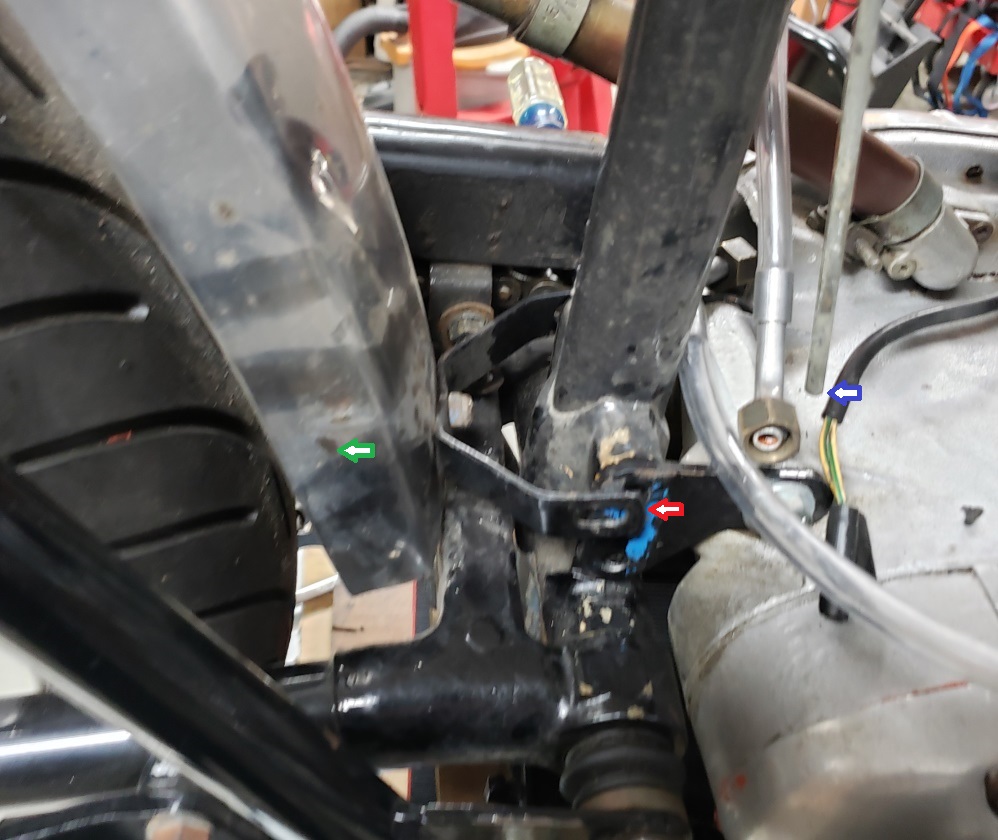
Also investigated the oil tank. The bottom was leaning in way too much and was pushing on the rear fender (near the
green arrow) and battery box. That's a recipe of disaster. Since the top mounts and the battery box mounts
needed the rubbers changed I took the oil tank out. That's when I realized that the bottom mount was as homemade
mess and installed backwards. I don't have one but I have one ordered.
The red arrow shows where the mount goes and where two studs hold the rear motor mount. One of those studs was correct
but the other was a metric bold instead of a stud. Fortunately, I have the right stud. As long as I'm there,
I'll powder coat the mount. Another things that that was wrong at the red arrow is that the rear fender mount
was in the bottom hole and too close to the swingarm - the top stud goes through.
Notice the blue arrow. That's the rocker oil feed pipe. They are always sold too long and need to be properly
routed and then cut to length. A short piece of rubber hose goes from that pipe to a pipe on the bottom of the oil
tank. It should sit next to the frame pipe. It's terribly formed at the top and obviously wrong at the bottom
- I thin it is savable.
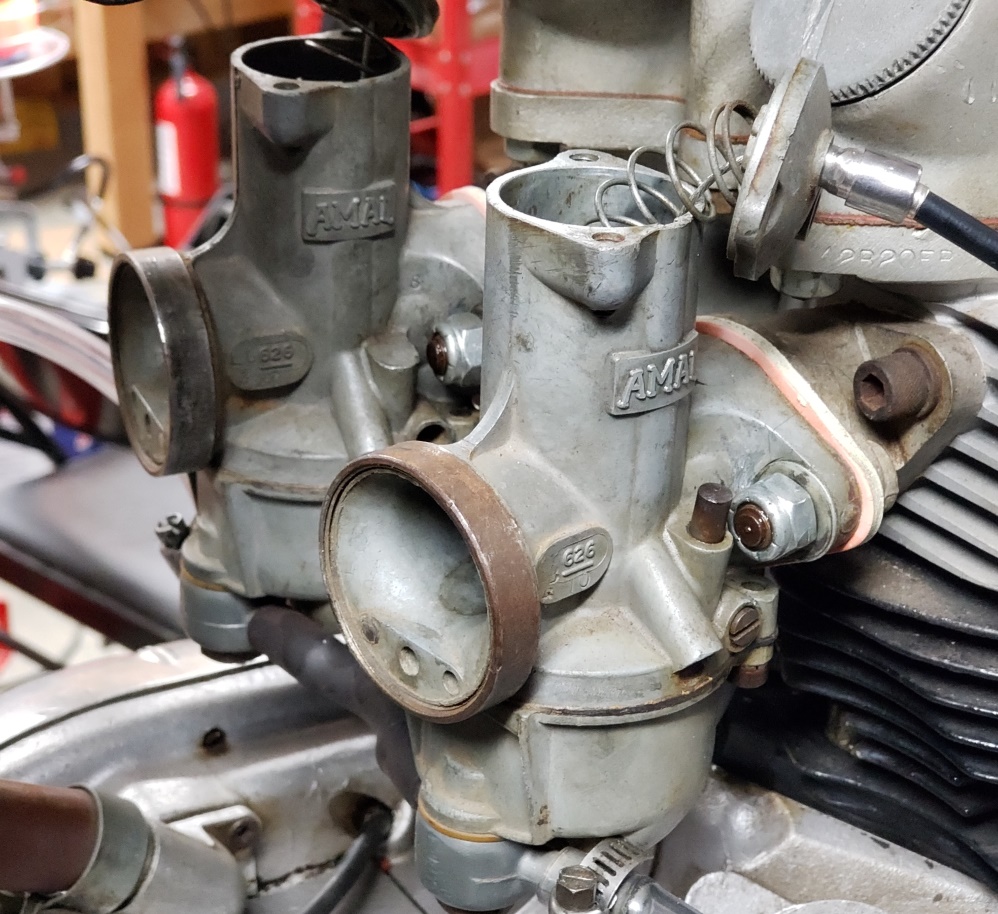
March 21, 2019 While waiting for parts I decided to take a look a the carbs. First up, take the brand new air cleaners
off. They are beautiful, but one problem - they are for 900-series carbs, not 600-series carbs! Fortunately,
I have lots of the correct inner parts so it's not a big deal.
For the second bike in a row, we have an over tightener - I don't know why people over tighten!
Then I tried to take the slides out - they would not come out. Over tightening anything on an Amal carb is a problem.
These are destroyed - the tops were over tightened, the flanges were over tightened, and the bowls were over tightened!
I thought the cables were in backwards - it turns out that both ends of the cables are carb ends - the throttle won't
work that way! The twist grip is new and good quality but was missing the ferrules - fortunately, I have some.
Decided to check the rocker clearances. All four had no gap at all! It was very difficult to get the nuts loose - they were
very overtightened. Once I did, I had to take all four adjusters out and chase the threads. Fortunately, the threads
in the rocker arms were OK.
March 26, 2019 Besides continuing to search for and buy parts, the work below to the next data was all down over the weekend,
then I got busy on other things.
Here the rocker feed has been reformed to run where it should. It's still too long, but the oil tank has to be
installed and the hose conned to see how to run it and where to cut both the metal line and rubber hose. It's
important that the rubber hose no be rubbing on anything.
The engine and new bottom oil tank mount have been powder coated and installed, the oil tank is installed, and the hoses
are all properly run.
The rocker feed line has been shortened and the hose installed. The hose is tie wrapped to the frame so it cannot
rub. You can't see it in this picture that that's the only place it touches the frame.
The battery box is installed with all new grommets and the battery is in place. I have to be sure that the seat won't
interfere with the battery. Many after market seat pan do not have the correct relief in that area.
March 27, 2019 the oil pressure switch came in today and it fits. It's hard to tell if they will until you have
them. This bike's timing cover is correct and has 3/8"-27npt (tapered) threads. Later covers had 3/8"
unf threads and there's no way to tell which cover it has without removing it.
March 28, 2019 Straightened and cleaned the rear brake rod and realized there was another problem when I started to install
it. The brake pedal would barely move. The assembly is supposed to be: brake pedal, spring washer, flat washer,
locking nut. It was put together: washer, spring washer, brake pedal, washer, locking nut so the spring washer was
completely crushed. Also, when the frame was painted so was the rusty pivot. The brake pedal had clearly been
driven on and the locking nut was put on with red Loctite. So, a big wrench and a lot of heat was needed to get it
off.
Once apart, I blasted the pivot bolt and re-plated it. The I cleaned the rust out of the brake pedal, greased it,
and properly assembled.
Still need to restore the brake switch bracket, check the switch and replace if needed, and find a spring.
April 2, 2019 Found a completed T140V front end to install but soon realized that it uses tapered roller bearings and there
is no size that works. Ordered a set that had a 0.025" too large an OD and planned to have them turned down.
Then asked if anyone had done it on the TriumphRat forum. One guy made rings to use the standard bearings. Another
told me to used a T150V bottom triple tree and everything would simply both together - how embarrassing, I should have known
that! Anyway, I have a 74 T150V in boxes.
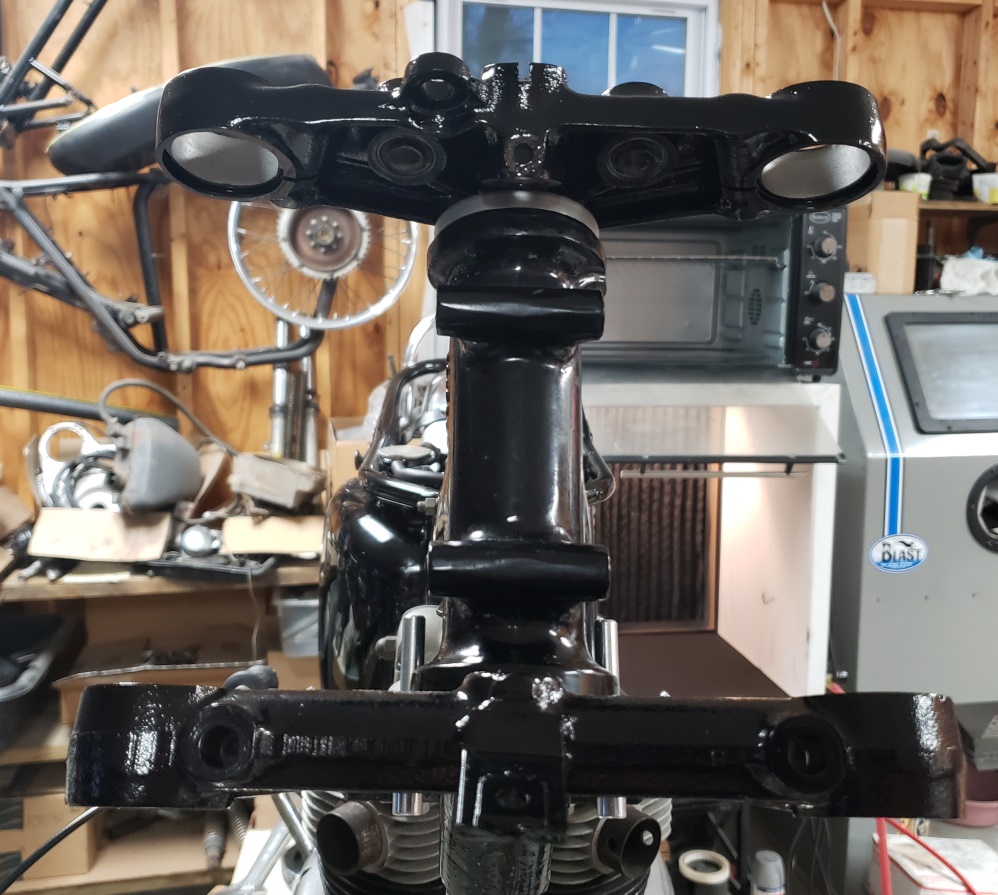
The bottom triple tree was powder coated today. The top took forever to get the metalastic bushes out, but one done,
I blasted and masked it for powder coating - that will be done tomorrow. Also cleaned and inspected the bearing races.
on of the ones in the steering neck was wrong so I replaced that. I have new metalastic bushing coming and need to
figure out what to do about the rusty chrome fork ears. I'l probably use mercuric acid to remove the chrome and
powder coat them black. The forks I have seem to be good but I'll know for sure when I take them apart to clean
and replace the seals. The caliper needs new pucks and I need a master cylinder and hoses.

April 3, 2019 The triple tree is finished and installed. This time I took the top out of the oven and had the metalastic
bushes in the freezer and they were still very hard to drive in! After installing, I started to install the steering
lock when I realized that the locking lug has been cut off the frame. So, I'll have to find something to fill
the hole - wish I had realized - I would have powder coated the inside.
Started on the forks - they are in decent shape but I need new seals and o-rings.
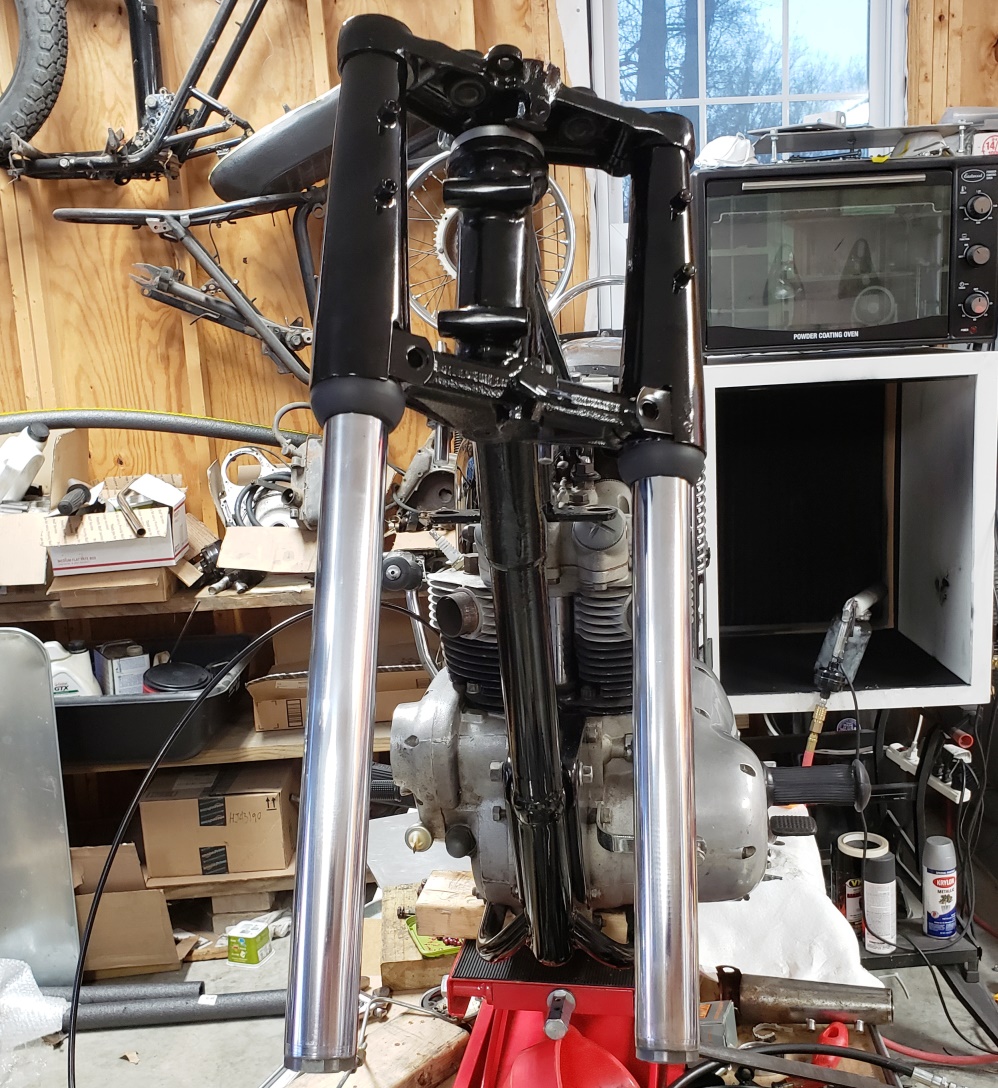
April 5, 2019 The T140 Forks are apart and inspected - they are in great shape and I have all the expendable parts ordered.
The chrome portion of the T150 fork ears I'm using are quite rusty so I decided to powder coat them black - that will
look correct for a 1970. The black portion of both sides were bent - I beat them back to straight and they will look
prefect once powder coated. I cleaned the chrome portion in an acid bath, then sanded, and then sand blasted.
That didn't actually remove the chrome but but got them smooth and rough enough for the powder coating to work.
Then I coated them. The left one is great. For the first time ever, I didn't get good coverage on a part;
so, the right needed to be redone. I tried just doing a second light coat - bad idea. It is a mess so I have
to find something to strip them and do it again.
The parts for the caliper are ordered and I'm looking for a master cylinder - I don't have one to rebuild.
I have the front hub and disc, I have to figure out if I have a rim and spokes.
April 6, 2019 Powder coat is VERY hard to remove. I went to Make Do Po this morning to get some strong stripper.
They no longer sell it. Pep Boys still had the good (deadly) stuff for $17/quart but what could I do. It took
five hours to softened it enough that I could get it off. Once clean, I sand blasted it again and it's now beautiful
and installed. The rest of the fork parts are ready to go on, except for the seals which haven't come in yet.
The actual fork ears ears are ready too, but I'm waiting for the rubber mounts to come in.
I sand blasted the various hardware for the forks and will re-plate them. I thought about powder coating them, especially
the hydraulic hose brackets and might still once re-plated if they don't look good. The metal hydraulic lines
were clogged as always happens when they sit around for years, but they cleaned up nice and I got them open and freely flowing
so that will save some money.
The fork tubes look dull in this picture, but they are not - they are nearly perfect
April 5, 2019 The T140 Forks are apart and inspected - they are in great shape and I have all the expendable parts ordered.
The chrome portion of the T150 fork ears I'm using are quite rusty so I decided to powder coat them black - that will
look correct for a 1970. The black portion of both sides were bent - I beat them back to straight and they will look
prefect once powder coated. I cleaned the chrome portion in an acid bath, then sanded, and then sand blasted.
That didn't actually remove the chrome but but got them smooth and rough enough for the powder coating to work.
Then I coated them. The left one is great. For the first time ever, I didn't get good coverage on a part;
so, the right needed to be redone. I tried just doing a second light coat - bad idea. It is a mess so I have
to find something to strip them and do it again.
The parts for the caliper are ordered and I'm looking for a master cylinder - I don't have one to rebuild.
I have the front hub and disc, I have to figure out if I have a rim and spokes.
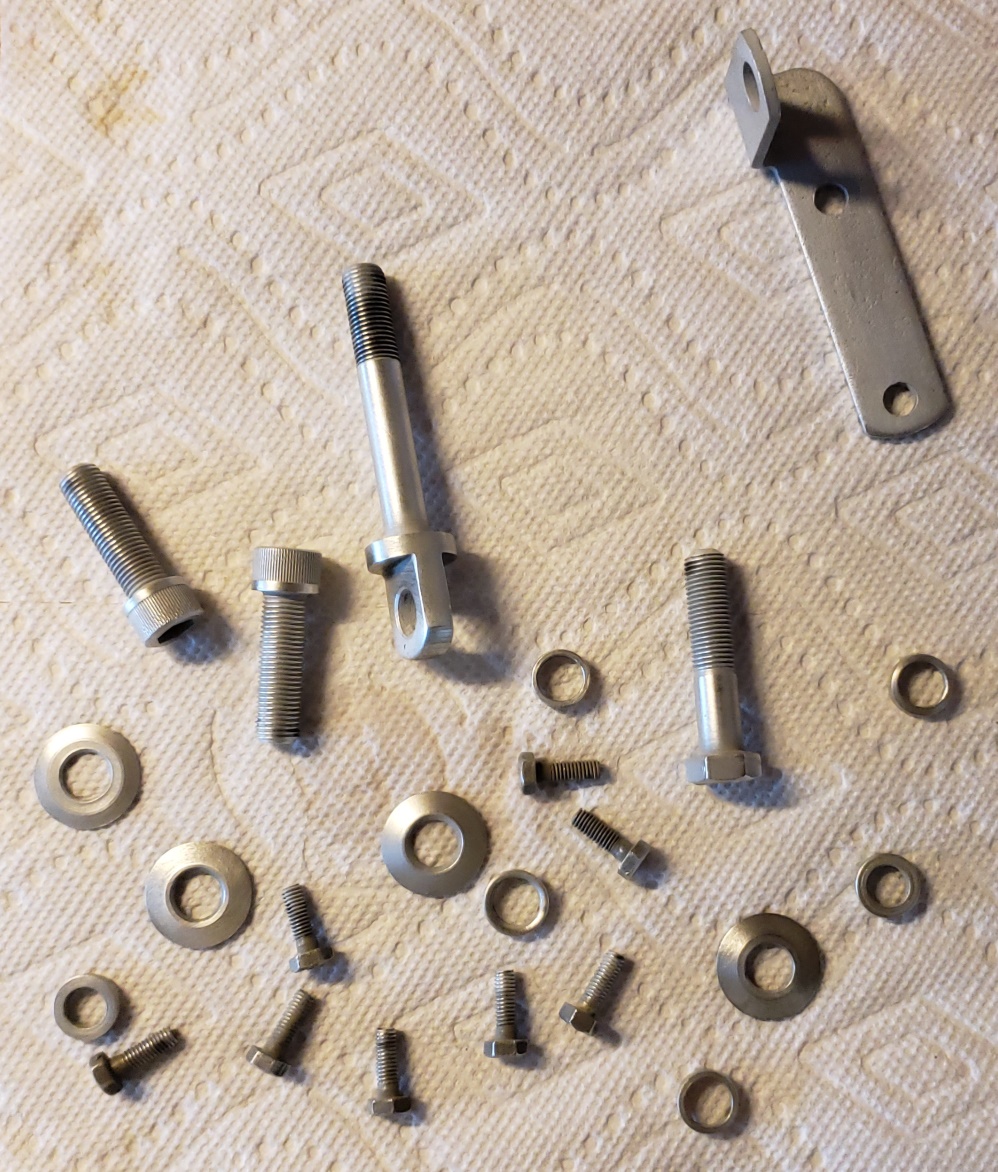
April 7, 2019 I've re-plated the small front end small parts I blasted yesterday. For any women reading, yes,
I do use the kitchen sink! Think of it this way: the stainless steel sink is cleaner once I'm done than before
I start! It takes a lot of time, but saves a lot of finding and paying for parts. The bracket at the top right
was rust pitted and the pits show through the plating so I'll powder coat it. The little screws are from two front ends
- only four are required but since I was doing it, I did all I have. They are very hard to find screws. The
rings and conical washers are for the handlebar "P-Clamps" which rubber mount the handlebars.
According to my inventory, I have the rubber parts to mount the fork ears - anyone know where I put them?
April 8, 2019 I still haven't found the rubber parts to mount the fork ears, but the seals an gaiters came in.
The forks went together nicely and they work fine. The drain screws are a rusty mess so I've either got to find
some or re-plate them. The rest of the parts for the P Clamps came in too, so I can mount the handle bars. I'm
trying to get a deal on a rim and spokes to build the front wheel. I started on the caliper today. Still don't
have a master cylinder - working on it.
April 11, 2019 Lots of parts ordered and little things done. The new front rim and spokes arrived today. The
new master cylinder and some small parts are arriving tomorrow. I bought a new caliper because the cost of the used one
and the new stainless cylinder is a lot more than a complete new one.
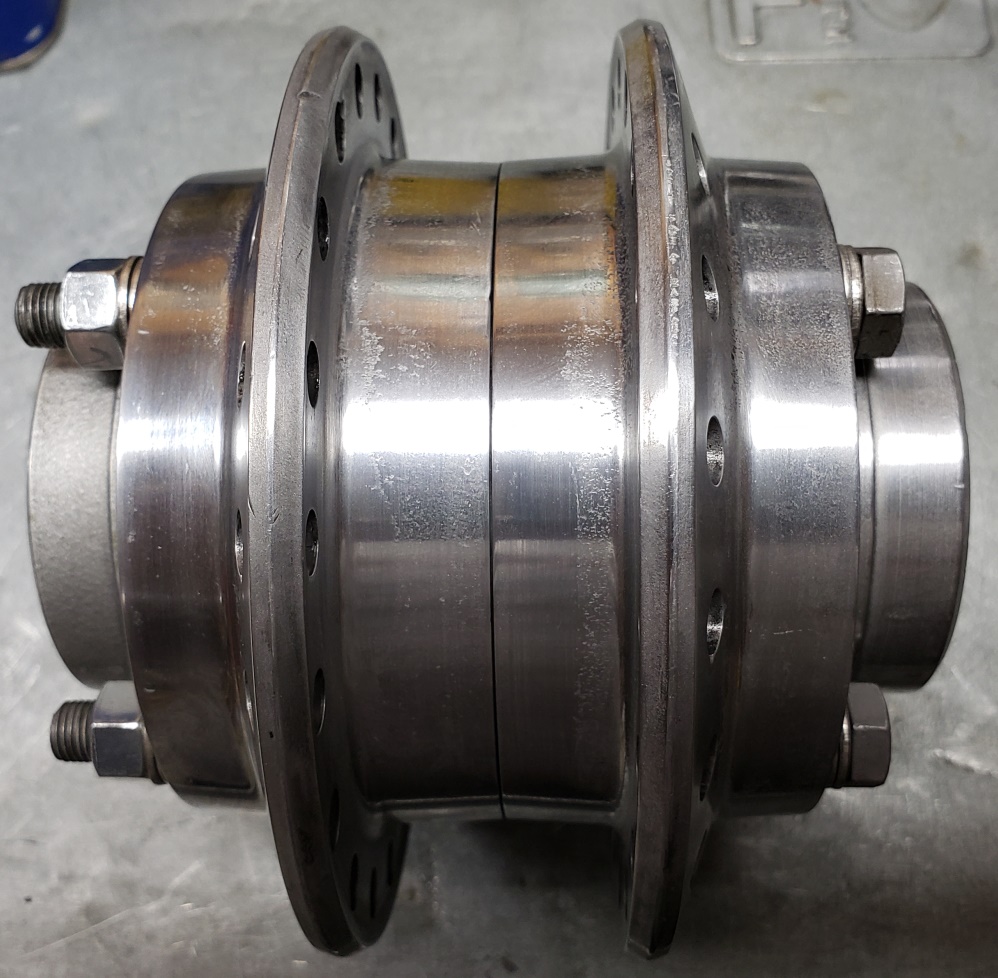
The front hub is apart. I have the bearings in stock, but the hub needed other attention. I was from a T140
and was painted with a wrinkle silver paint. About 80% looked good, but the paint was off the rest and the center seam leaked
and it was full of muddy rust sludge from the bearings. So, I cleaned it and stripped the paint -- it was hard to
get off! Since it was never polished, it has been hard to polish. One side it pretty good but the other side
still needs a lot of hand sanding.
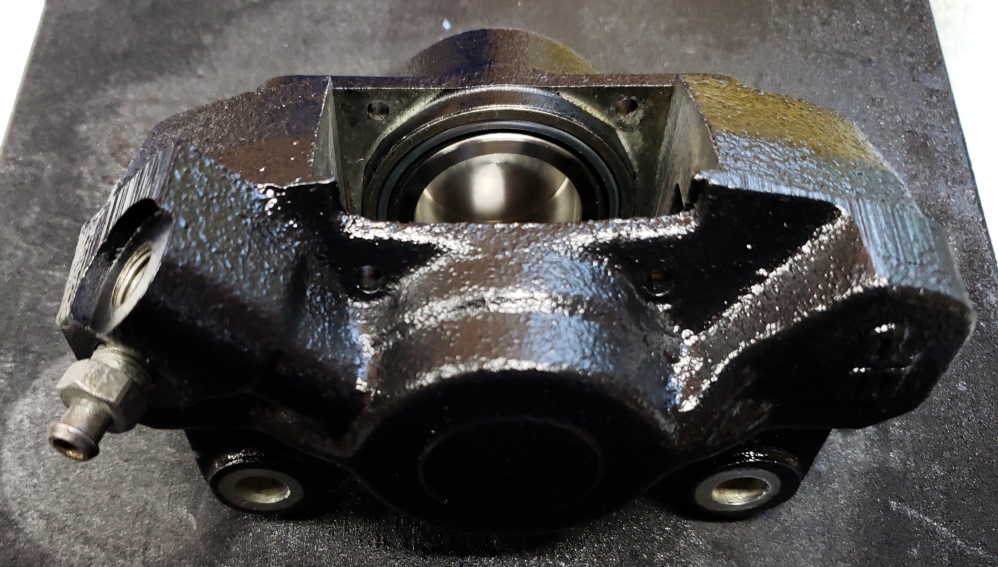
While the paint remover was working, I started cleaning up the caliper. Internally, it is excellent. The outside
is almost good enough to use as is, but I will paint it. Since I'm installing stainless steel pistons, there's
no reason it will be apart again so a few extra minutes now makes sense.
Hopefully tomorrow I'll have the hub polished and the caliper painted. Once the hub is done I can build the wheel.
The only major things left after the wheel and caliper are the carbs, front fender and wiring. The front fender that
went with the front end is in terrible condition so I need to find one.
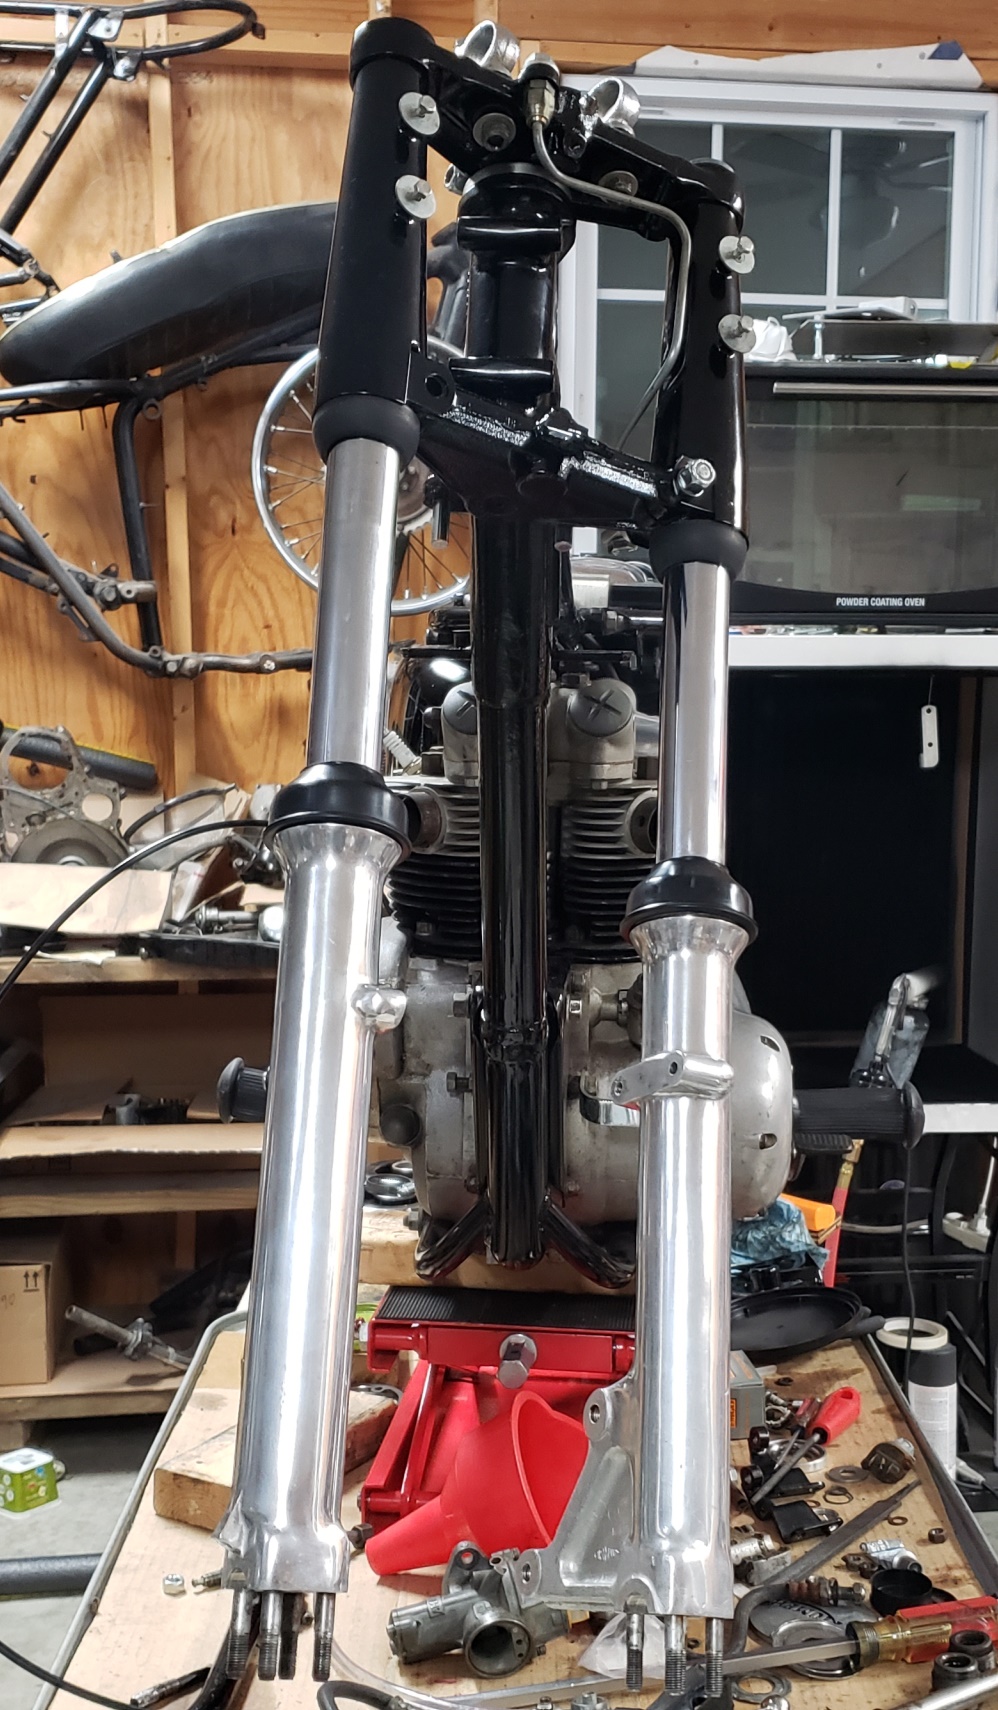
April 12, 2019 Several parts came in. The fork ears are mounted now. I've spent over four hours on the front
hub - it will have to be good enough. The are made of cast aluminum and this one has a lot of small inclusions.
It's interesting that the T150 hubs were polished and the T140 were painted. Maybe they saved the better castings
for the T150s and painted the others for the T140s. If I knew where to get paint like they used, I would consider
painting them but the masking would be a PITA. I suspect that the originals were painted and then machined so masking
was not needed.
The picture is a closeup. From more of a distance, it looks pretty good.
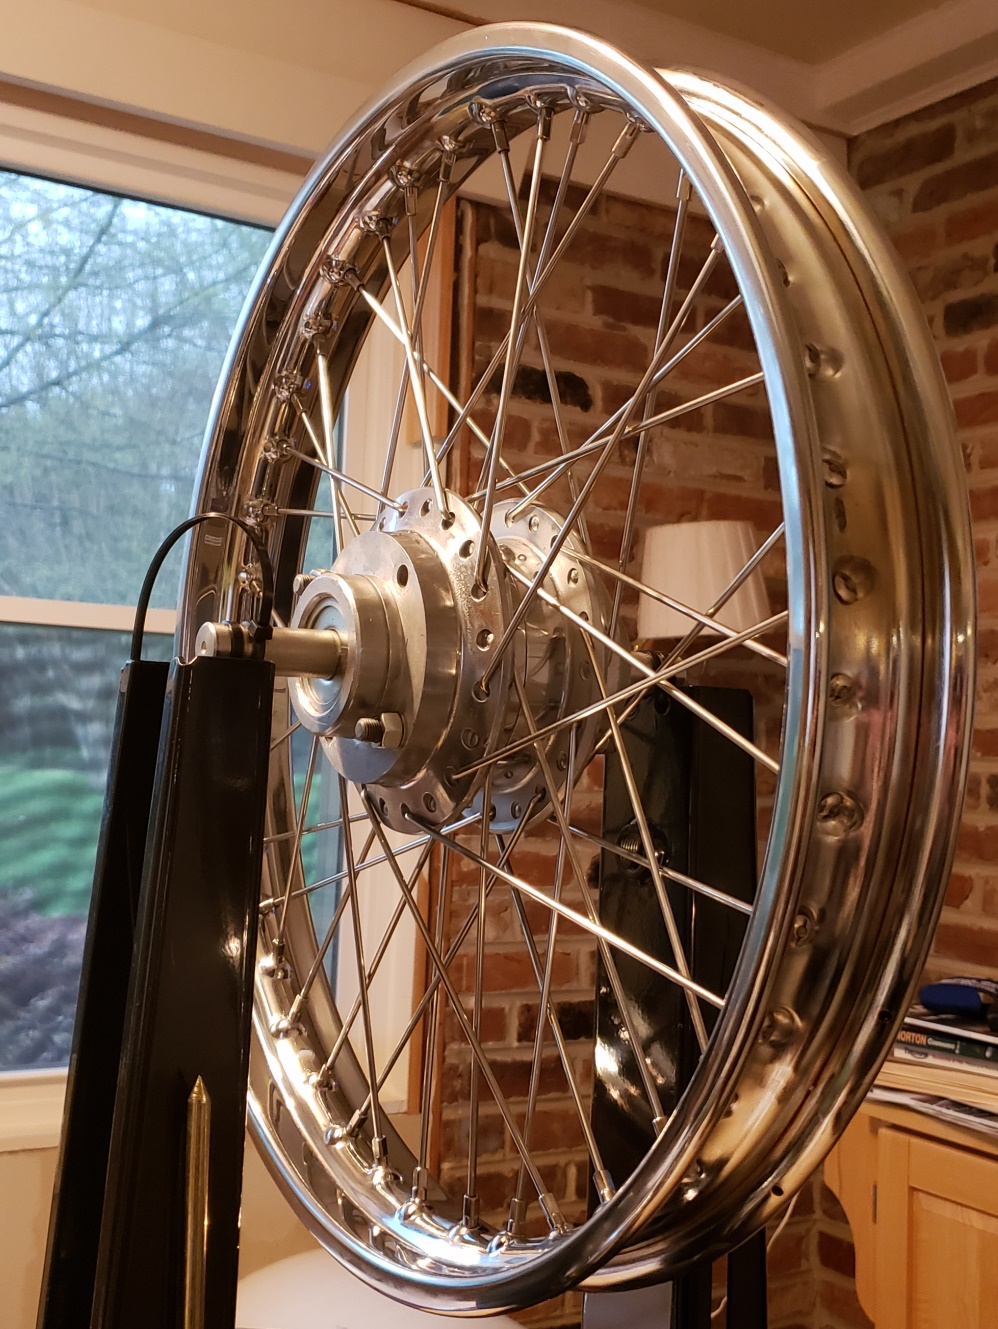
April 14, 2019 Tax weekend got in the way, but the front wheel is built and trued. Hopefully tomorrow I can mount
the tire and balance the wheel. Still need to finish the caliper - it's been too humid to paint it.
April 15, 2019 The hits keep coming! I planned to take the new tire from the front wheel that came with the bike and
put it on the new rim - the tire is an 18". So, I've ordered a tire.
I did mask and paint the caliper. I'll put it together with the new pistons and seals, re-mask and paint over
the bolts that hold it together so it all looks fresh. I have a Triumph caliper cover that I powder coated with sparkle
silver that I'll install - all the chrome ones I have are rusty.
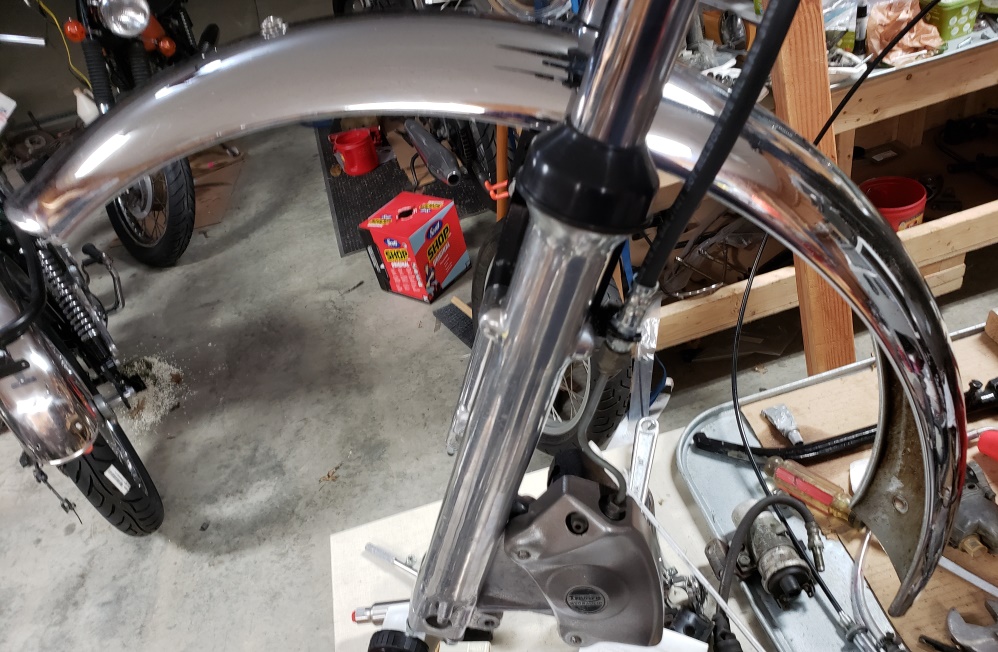
April 17, 2019 The caliper is done. The picture below is just before the pads were installed. The second picture
shows the caliper installed and the fender too. The fender was a rusty mess with a big dent. I beat out the
dent, used fine steel wool and WD40 to get rid of the rust, and then I used chrome polish. It's a long way from
perfect, but looks good. I still have to figure out what to do about the rear fender stay.
The tire came in and is mounted. I wanted to have wheel installed, but although I stored the disc carefully, it got
some surface rust and I forgot that the center was not painted when I sent it to be turned so I have to work on that.
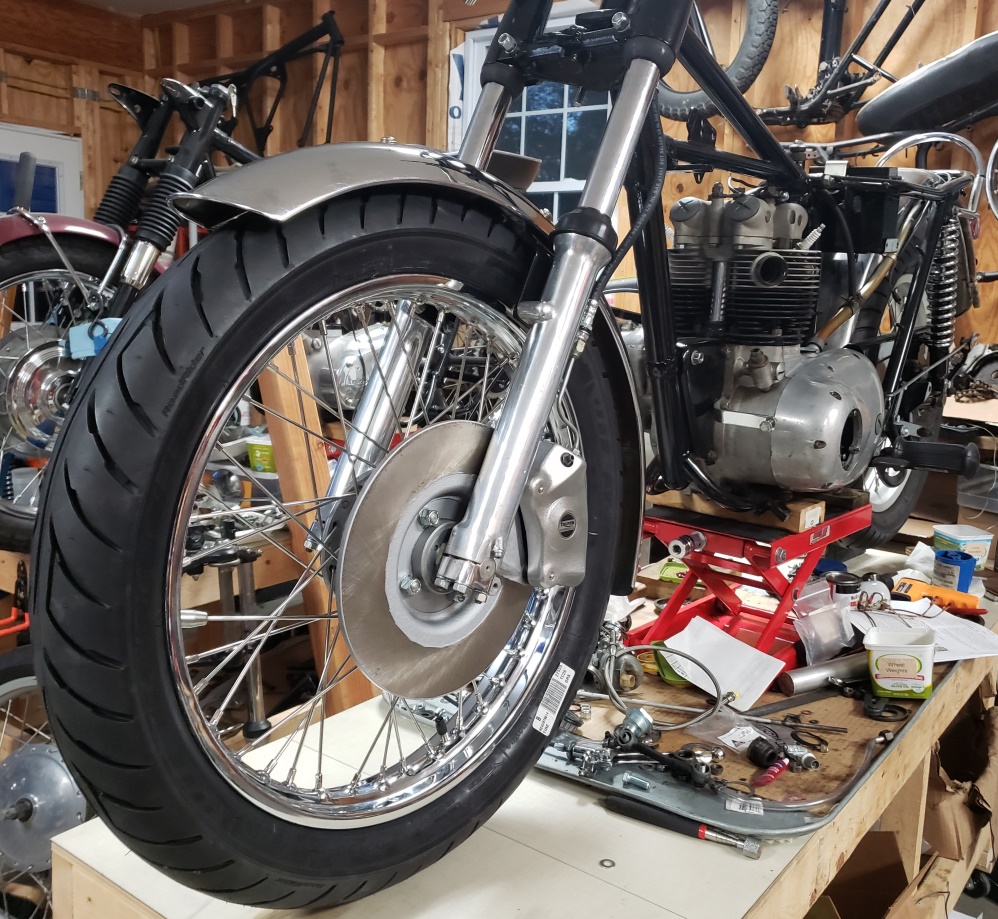
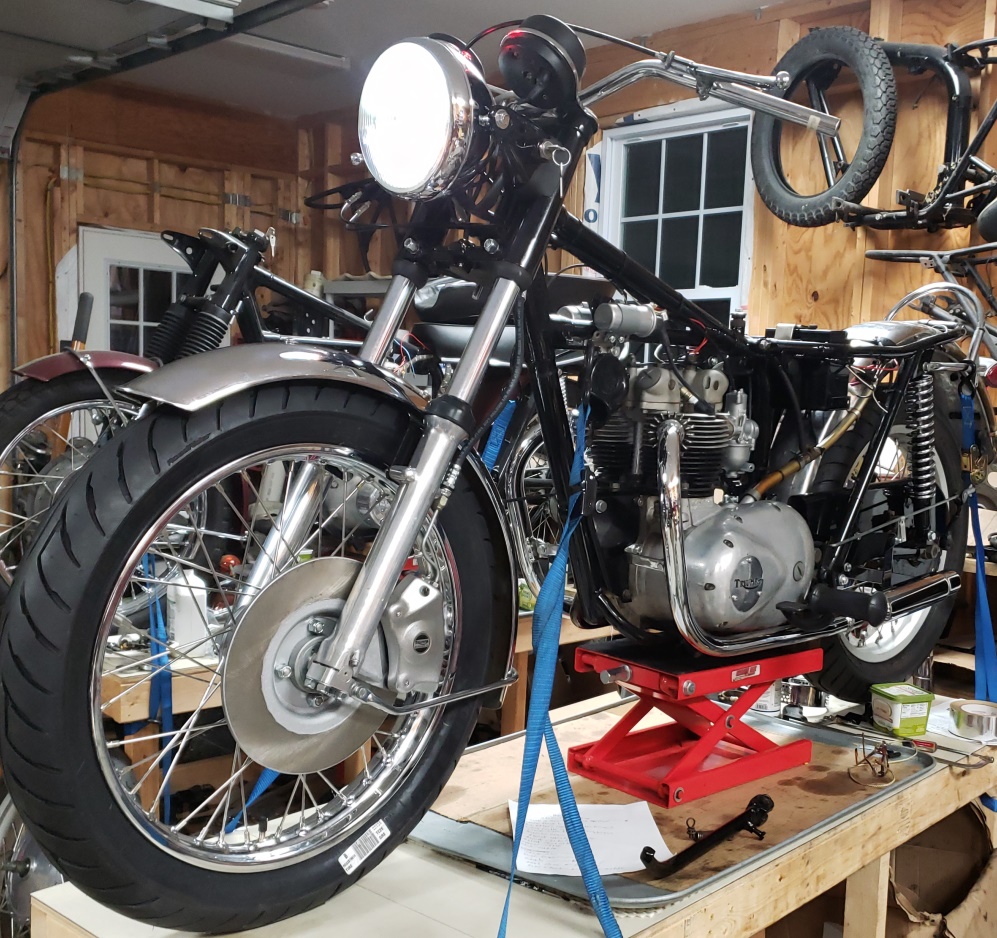
Here's what the front end consists of:
- T140 Forks, caliper, hub, and top of the triple tree
- T150 Bottom of the triple tree
- T150 Disc
- T160 Front Fender
- New rim, spokes, and master cylinder.
April 18, 2019 Cleaned up the disc and painted the center - it still has some discoloration, but that will go away as soon
as it's used.
Another first. The front hub wasn't as free on the axle and it should be and it was slightly binding. I took it
apart twice before I figure it out. I was starting to believe that the axle was bent but I triple checked it and could
find nothing wrong. Then I thought the bearings were somehow going in the hub crooked, but I couldn's see how
that was possible. Finally I rechecked the brand new bearings - the disc side bearing was bad! Fortunately I
have a stock of those bearings so I put a new one in and it's working perfectly now. The wheel balanced with only
one small weight.
One of the bottom fork caps is cracked - a common occurrence. They can be used that way, but I don;t like it so I'm
getting a set of billet caps. At least that won't slow anything down. I tried to cleanup the bottom fender
stay but the rust is too bad in one area. If I can't find one, I'll sand blast it and paint it silver like
a Norton.
April 22, 2019 Stopped at every turn! I restored a right-side handlebar switch console so I could mount the master
cylinder and bleed the front brake. I have to do that before installing the headlight, but the shortest hose I have
to go from the top of the triple tree to the master cylinder it too long. I have one being made. I have the
headlight ready to go on and I have all wires run, but I ran out of bullets so I can't terminate the wires - they are
on order. I should be able to wrap the wiring harness tomorrow - all splices are done and all turnout locations are
located. The PODtronics regulator is mounted and wired.
I still need carbs and I wrote Amal asking them to pull a rabbit out of their hat; but, of course, Friday and today were
UK holidays which explains why they haven't gotten back to me.
I have a read fender stay coming - I hope the shipping estimate is wrong (next month) and I hope it fits!
April 23, 2019 Amal finally came back to work and they found me a set of premier carbs - they will probably are Monday or
Tuesday. The hydraulic line shipped today. The fender stay is schedules to be here tomorrow. The LED headlight
bulb arrived today and the headlight beam unit should be here Friday.
I almost forgot the horn! That would have been a PITA is I finished the wiring without it! Fortunately, I didn't.
Rather than install a normal (quiet) Triumph horn under the tank, I installed an aftermarket louder horn under the coils.
Triumph flip-flopped a lot on where the horn goes. On my 500, I have one on each side connected to the passenger pegs
and using a relay. That's not ideal for many reasons, but it was the only way to be heard back then.
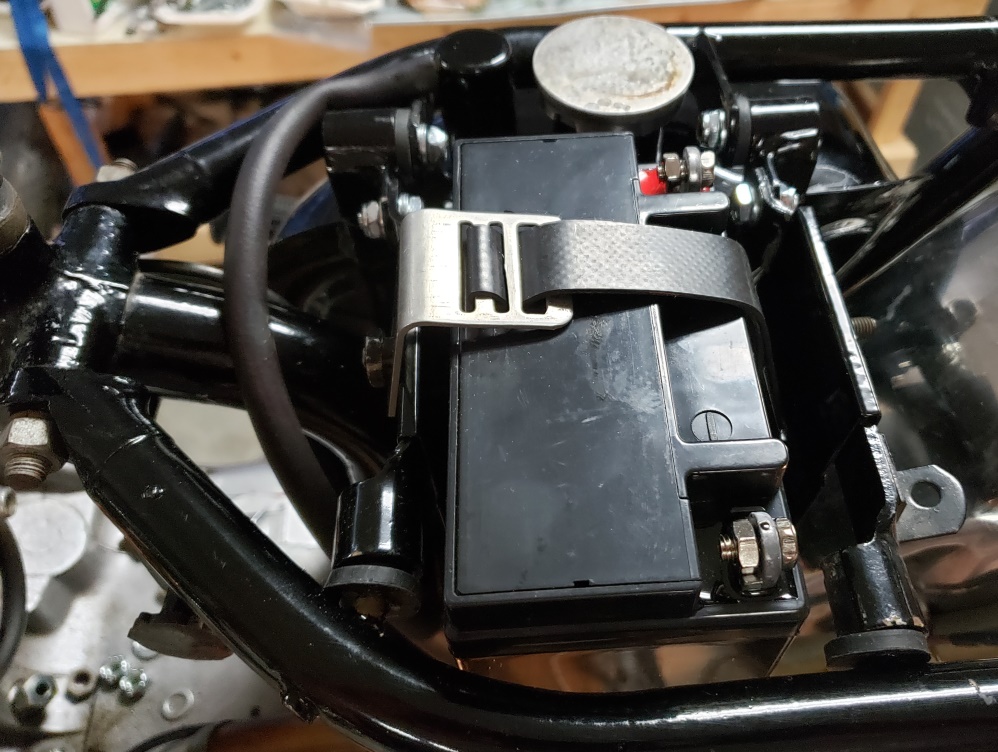
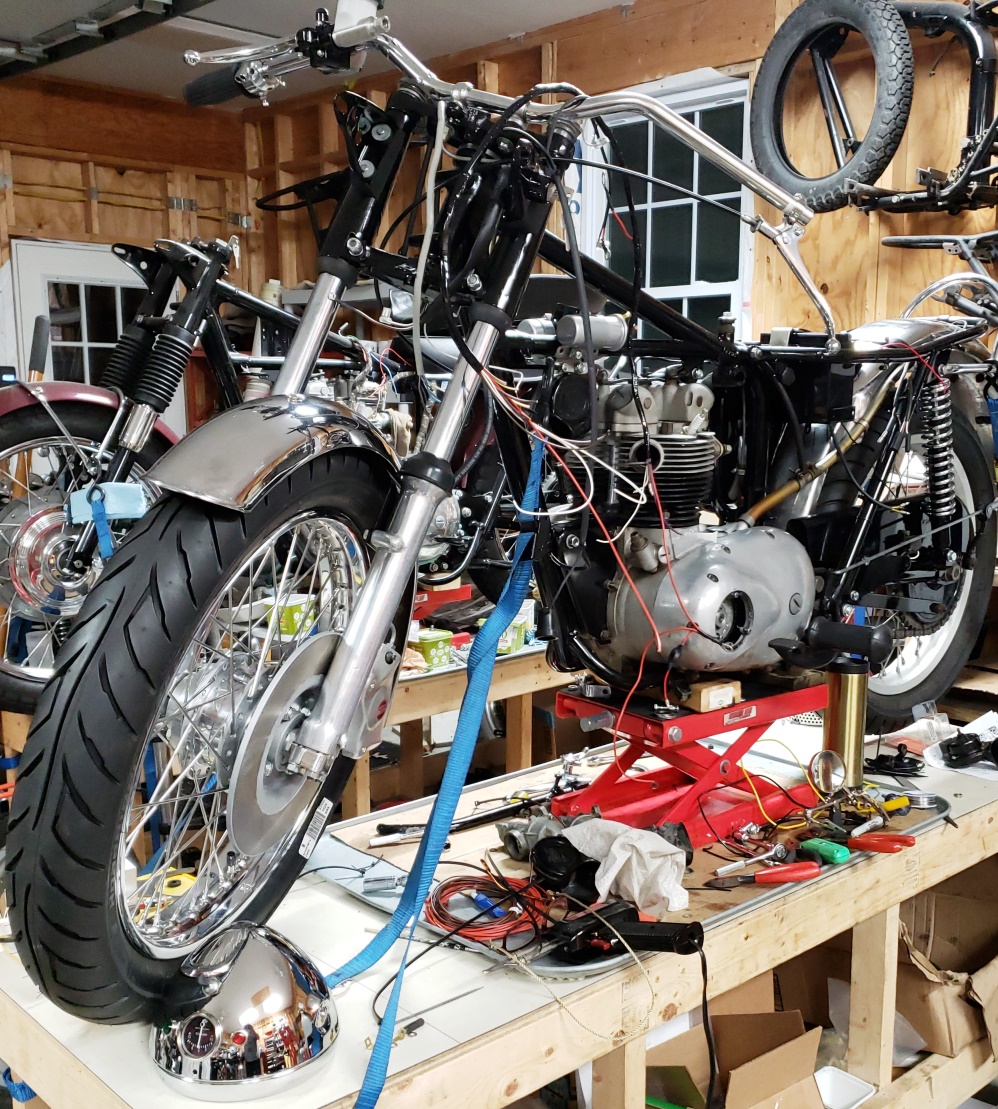
I normally test every circuit and get every length right before wrapping the harness. The time, since I'm stuck
waiting for things, I finished the harness as far as I can. The battery end is complete except for two bullets.
The headlight end is mostly unterminated as you can see in the picture. All connectors to the coils, Tri-Spark, Oil
Pressure switch and stop light switches are complete. Once the front brake is finished, almost all wiring work will
be in the headlight.
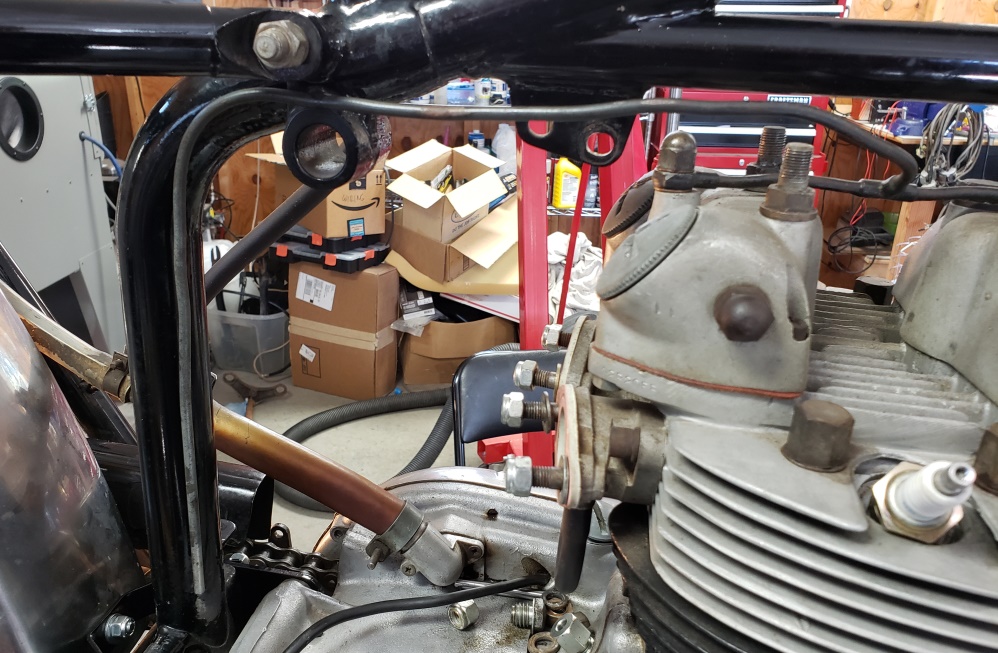
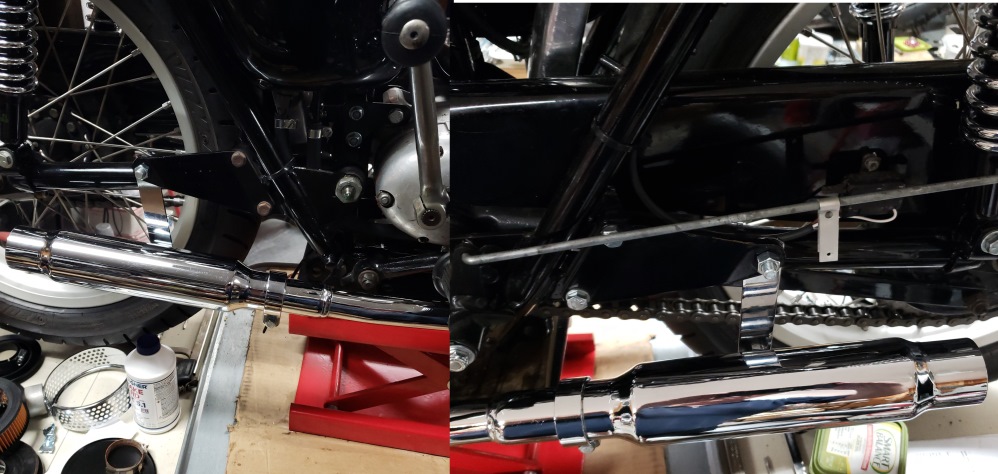
April 24, 2019 The rear fender stay arrived and it fits fine. Put the wiring harness in place and needed to make sure
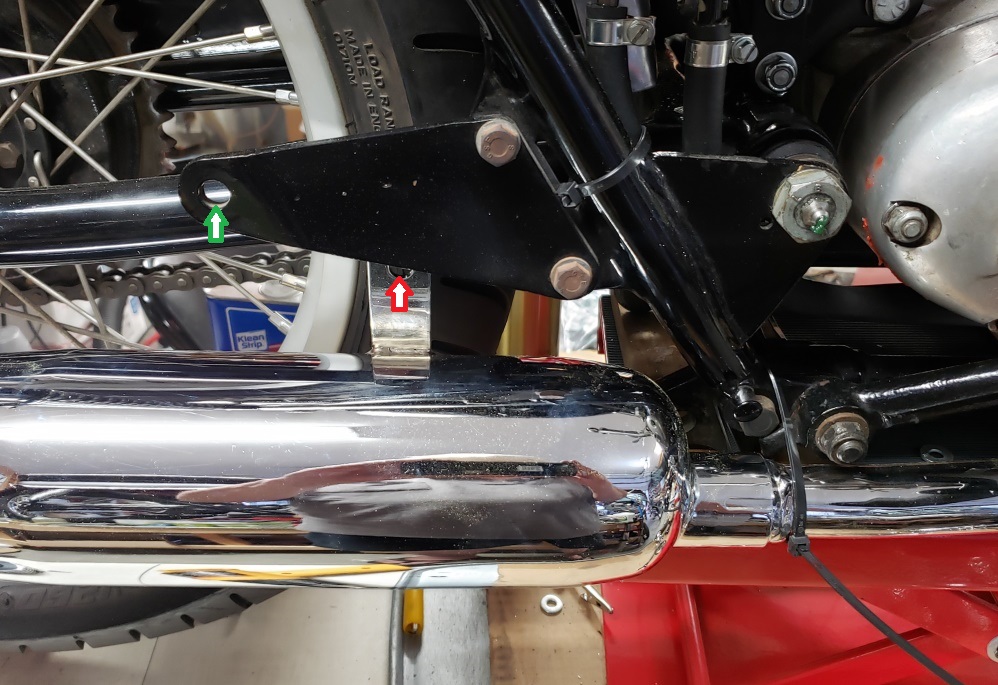
that the wires to the oil pressure switch and especially to the Tri-Spark could not touch the exhaust, so I tried to install
the timing side exhaust. The mufflers are definitely right - I have a new set that matches the ones that came with
the bike exactly. The exhaust pipes are too short! The muffler bracket hole (red arrow) is supposed to line
up with the passenger peg (green arrow). When you list the muffler back and raise it up, the exhaust only entered
the muffler a little It would probably clamp on, but would leak. I may be able to make a bracket to make the
pipes usable - we'll have to see since I can't find a better set.
April 25, 2019 This bike now has something Triumph never built into a 500cc bike - a working front disc brake. The new (expensive)
hose arrived today and fit perfectly. The banjo bolt brake switch works fine to.
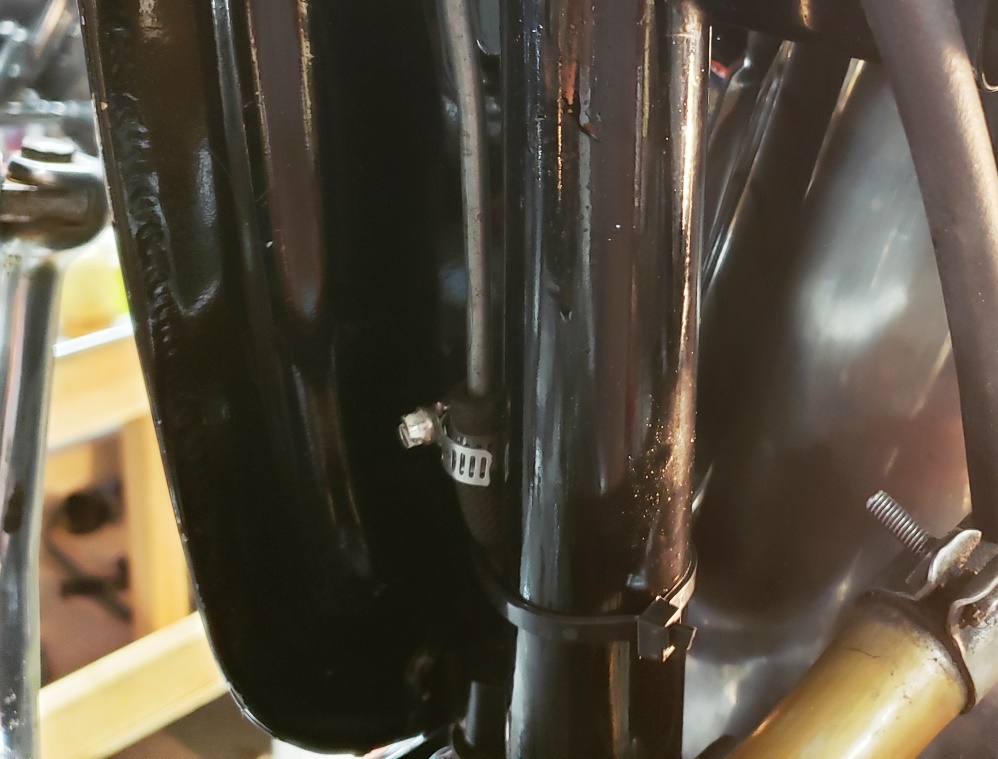
Of course, there has to be a problem or two every day. While installing the wiring harness, I routed the clutch cable
and tried to test to be sure it wasn't binding. It was frozen solid. Thinking that the clutch plates might
be stuck together, I removed the adjustment plug in the primary cover and removed the adjustment screw - still frozen solid!
I said to myself - get on with it, you'll have to take the outer gearbox cover off and inspect :-(. Step one of
that is to remove the clutch cable. That's when I realized that the cable was frozen. But, how is that possible
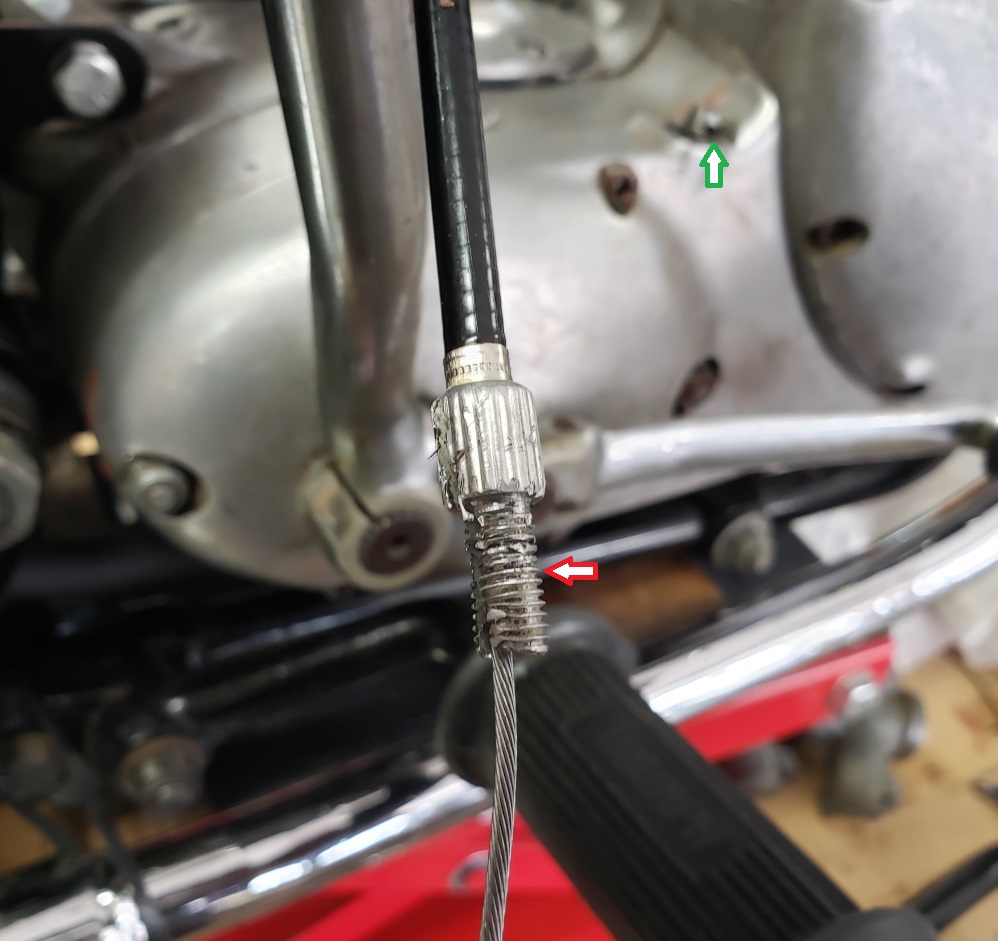
- the bike came with a brand new cable installed. Once I got the cable out (hard to do with it frozen) I saw the problem.
See the green arrow in the first picture - an abutment screws in there. See the red arrow. A ferrule is supposed
to go into the abutment and the cable into the ferrule. The pictures shows the thing the gorilla who worked on this
bike tried to use for a ferrule. The threaded part (not supposed to be threaded) was forced into the abutment.
The cable was forced into the "ferrule". Forced is too weak a word - I ended up carefully hacksawing it
lengthwise to get it off. Fortunately the cable wasn't damaged and I had a proper ferrule and rubber boot in my
stash. The clutch actuates properly now and it does disengage the engine - I just hope it doesn't slip - I didn't
bargain for engine/gearbox/primary work!
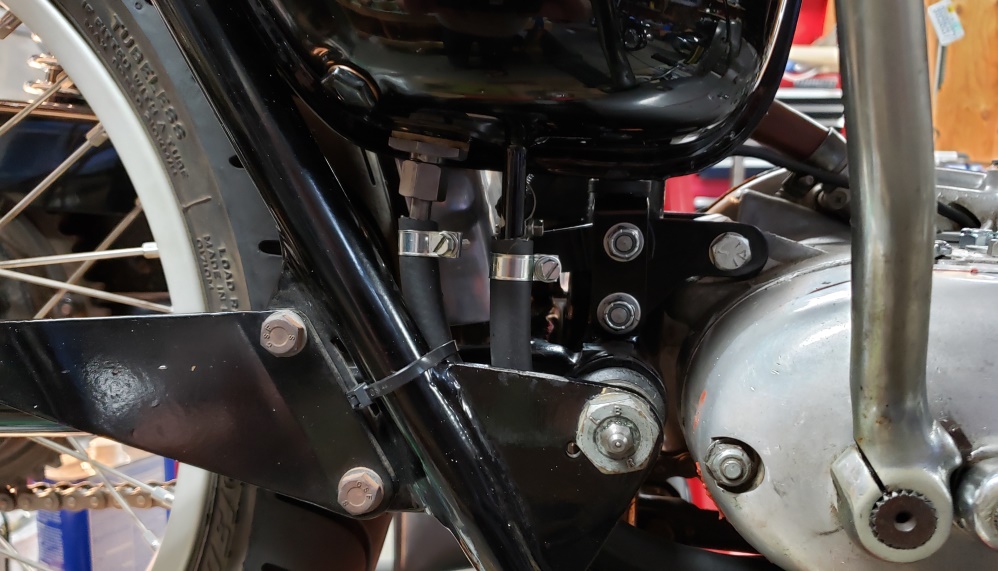
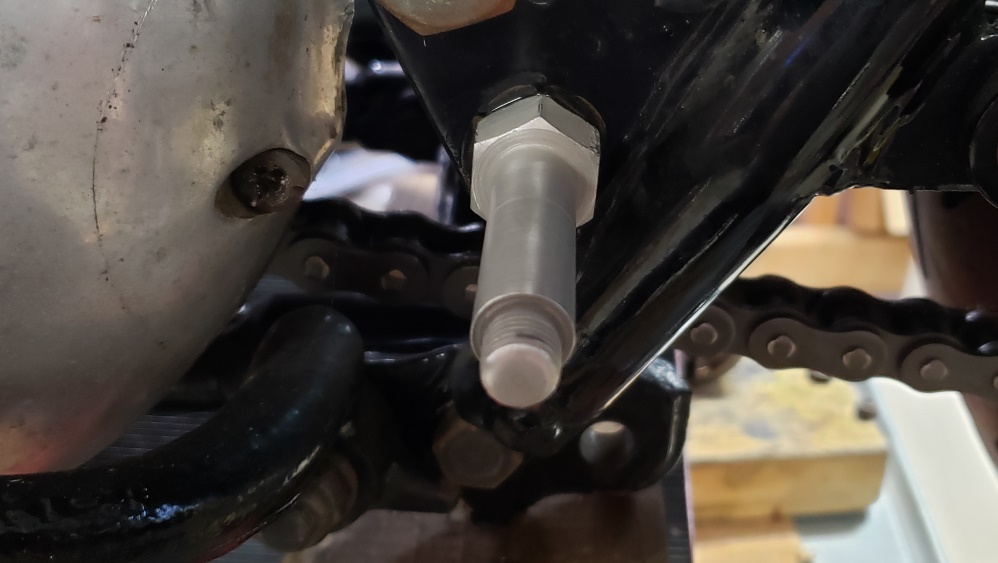
The next problem is minor. The forks are wider on a disc front end. The normal non-disc spacers (red arrow second
picture) are not wide enough. In fact, there are 1/2 as wide as the need to be. Right now the headlight is in
place using two standard rusty spacers on each side. Also, the standard chrome bolts are too short. So, I've
orders all that.
The wiring in the headlight is as complete as I can make it until my order gets here. To most, it probably looks like
there's a lot more wiring to do, but there's not. The remaining wires either hook together, to the light socket,
or to the lighting switch. I am embarrassed to say that dyslexia got me. There is a white/brown wire running
from the headlight back to the PODtronics negative side - it should have been brown/white. I could eliminate that
wire and just connect the negative of the PODtronics to the white wire in that area, but I like a separate wire for charging,
ignition, and lighting. It wouldn't be any issue whatever except that white/brown is the oil pressure switch color
and that's in the headlight as well. No biggy, I'll mark the wire so anyone working on it knows something
is different.

April 27, 2019 Lots of parts came in yesterday so I expected to be nearly done today but ran into some silly problems!
The wiring is done and tested. Just needed to mount the speedo and tach and route the lighting wires for them as well
as install the pilot light and close up the headlight. First problem - no pilot light bulb. Went to several
auto parts stored before I found one.
Then, the wires for the speedo and tach were the wrong color and the bullets were too small so I spliced in the correct
wiring and tested. The bulbs are not changeable and they are LEDs - nothing wrong with that. So, I tried to
mount them in their rubber cups - no way! They are knock-off Smith's instruments and are a smaller diameter and
deeper than the real thing. They would work fine on a standard T100R front end, but not on the front end installed.
After a lot of fiddling, I gave up and got out a real Smiths speedo and tach - expensive problem! Next, I had to dig
though my junk and find two good sockets for the instrument lights. The harnesses I have are all for the standard
mount which includes frame grounding so I had to cut two up and make them for these mounts including adding ground wires
and the instruments are rubber mounted.
Then, the new chrome instruments brackets I have require a special washer under them to work with this front end.
I ended up making those.
So, today was mostly a bust and I'm over $2900 in parts costs! This is why I generally don't do custom - it's
costly enough simply rebuilding!
April 29, 2019 Lots of things done yesterday and today, and a few more problems. The carbs are installed and I found
a pair of adapters and front plates for the air cleaners. Those have been blasted and painted. Remember earlier
that the throttle cables had the wrong twistgrip ends. I planned to simply put the correct ends on - can't, the
cables are too short. I have another new set, but I have to change one end because they are for a 650 and the "stickout"
is too long due to the larger carbs on 650s.
The replacement fork bottom caps came in, but the hole pattern was not exactly right so it a fiddly correcting that.
The wiring is done except that the brand new LED bulb is no good! The high beam is fine but when you put it on low
beam the high beam stays lit and the low beam flashes no and off so I'm sending it back - too expensive to put of with
than nonsense. I have a halogen-type LED bulb coming to try to adapt. I could not believe it yesterday.
I have everything done but when I closed up the headlight, the fuse popped. The headlight bulb socket was touching
the lighting switch. Also, the warning lights were being knocked crooked. It turns out that the after-market beam
unit is deeper than the original and Genuine Lucas for the the standard-type bulbs are no longer available since move have
switched to halogen. Fortunately, I had an original beam unit i one of my bikes.
Now for the exhaust. I thought I had figured out a way to use the exhaust but it doesn't work because the kick
starter hits the muffler. So, I'm still studying on that. It appears that the EMGO mufflers have the mounting
bracket in the wrong place and the exhaust pipes (don't know where they came from) are too short.
May 2, 2019 Things have been slow working out parts, and being almost unable to walk due to ankle pain. Got a shot
of steroids in the ankle today so got a lot done. The mufflers simply won't work with the exhaust pipes.
So, I ordered a set of universal Shorty mufflers and installed them - that took quite a while but they look good. The bike
didn't come with passenger pegs so the mufflers are simply bolted on now - I'll look for some to restore in my junk.
The Triumph-type mufflers are glass packed straight thru as are the shorty mufflers. I'm sure they will be a little louder,
but most like that anyway.
The billet fork bottom caps came in and of course, the holes weren't exactly right! After plenty of fiddling,
they are installed and that safety issue is resolved.
The throttle cables are made, the carbs are installed, and they are synced. The hose between the two banjos is installed
as well. Still have to install the air cleaners.
I sent the LED headlight bulb back for a refund and found and installed a different type - it works properly. On low
bean, one set of LEDs is on and on high-beam, all are on. It's very bright and white - it's on in the picture.
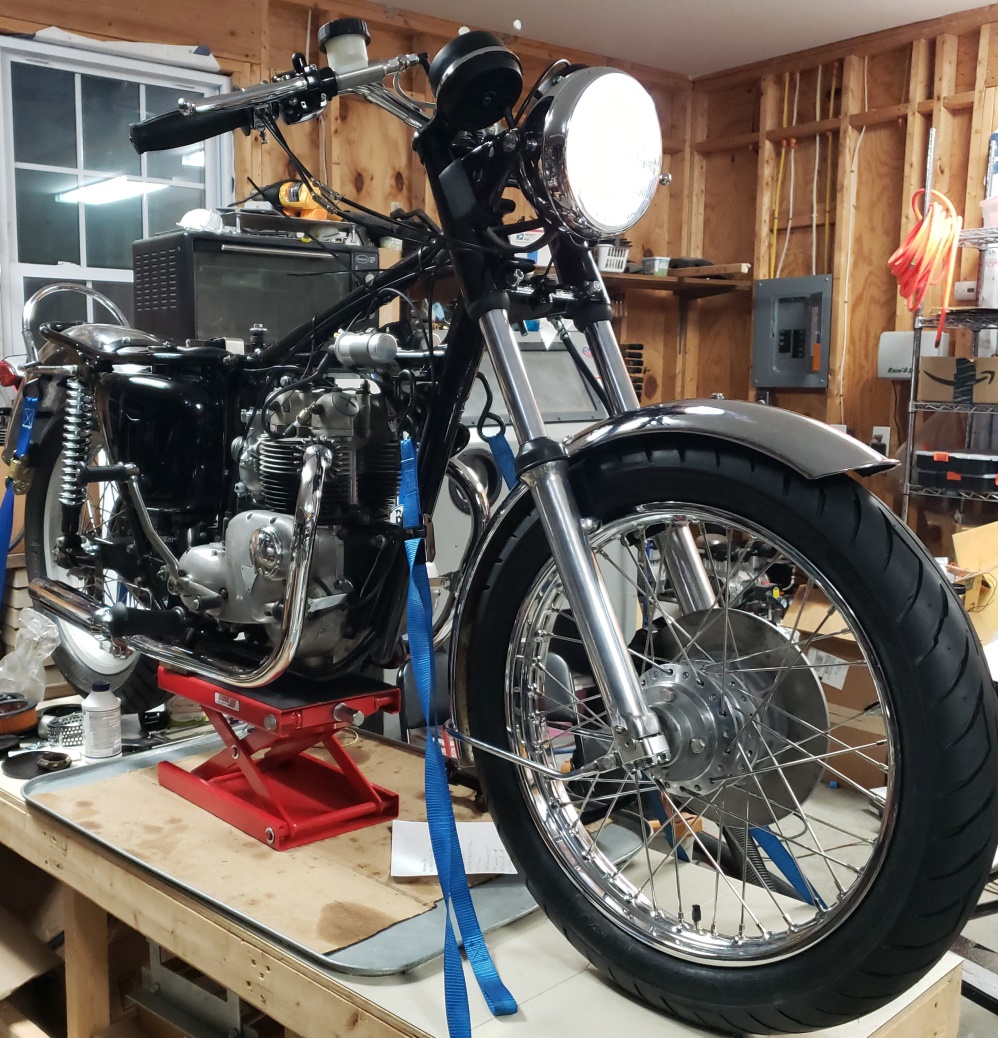
So, here's what's left before it comes off the stand:
- Passenger Pegs - found a set, I blasted and painted them, can go on tomorrow
- Done, May 4, 2019
- Rear Brake Switch Spring and Adjust the Switch - Done, May 3, 2019
- Spark Plug Wires - found a set of resistor wires so I'll use those and
non-resistor plugs - Done, May 3, 2019
- Install Air Filters - Done, May 4, 2019
- Finish tying down the wiring harness and cables - Done, May 3, 2019
- There is a tiny hydraulic leak in the worst spot - where the new hose meets
the metal hose between the top and bottom of the triple tree. I have to fix that which means getting the headlight
back out of the way - Done, May 4, 2019
- Install the speedometer cable and tighten up the mount - the cable was no
good, restored one I had - Done, May 4, 2019
- Install the tachometer cable and tighten up the mount - Done, May 4,
2019
- Find a new spring and pivot bolt for the side stand, and install -
Done, May 3, 2019
- Install a hand grip on the right side of the handlebar - Done, May
4, 2019
May 4, 2019 - It's off the stand. My stepson and the owner came by and helped. Still a little more to do:
- Adjust and tighten the handlebars - adjusted to the owner's liking,
May 4, 2019
- Adjust and tighten the controls - adjusted to the owner's liking,
May 4, 2019
- Adjust and tighten the headlight - Done, May 4, 2019
- Check the oil level in the tank, Done, May 4, 2019
- Install the tank and fuel lines - Done, May 4, 2019 Both petcocks had
their screens torn off and the main was missing its tube, so I had ot replace both.
May 5, 2019 - Almost there:
- Check the rear chain and if too short like I suspect, replace it. The
chain is too short so it must be replaced
- Done, May 5, 2019
- Figure out something for a mirror. The master cylinder has a provision for a mirror, but it needs
metric threads and none of the mirrors I have will work.
- Do something about the seat - it is ugly, but I've had no luck finding things to make it better. That length
seat was only used for two years. Update, May 5, 2019, I took the seat apart. The foam is OK. The problem
with the seat is that it is a cheap cover, installed wrong. I'll see if installing a quality cover makes it better.
The length is the only concern with that. Also, there are no rubber buffers so I need to resolve that.
- Start it up:
- Immediately check that the oil pressure light goes off and that oil is returning to the tank
- Adjust the idle speed and mixture - they are probably very close already.
- Check that it is charging
- Double check all lights
- Go for a test ride and hope that the engine doesn't need anything!
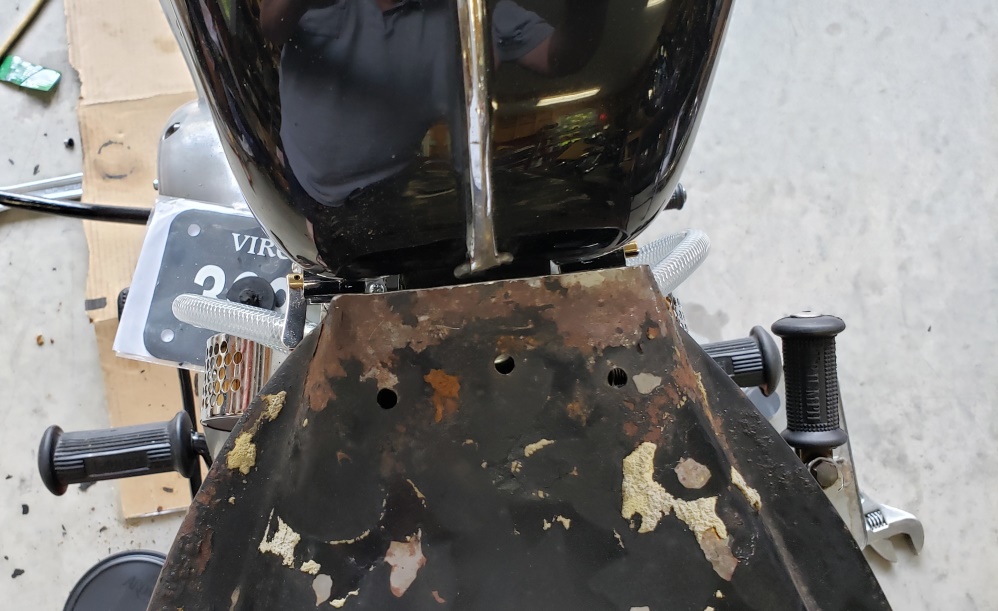
May 6, 2019 I figured out the mirrors (I hope) and they should be here in a couple of days. The seat needs its own
blog! Before working on the cover I wanted to install the rubber buffers since it would be easier uncovered.
I did that and then did a test fit - what a mess! The seat pan was twisted, hit the battery, and hit the back of the
tank! For some reason, someone beat the battery relief out of it and bent the front lip down. After a couple
of hours of twisting, bending, and beating, I got it to sit OK on the frame but then I realized the the front hinge is wrong.
I have a selection of hinges so I can probably resolved that. Then I realized that the latch did come close to working.
A lot of bending and that's almost there. It appears too short due to a bend right at the seat pan but I don't
want to bend that so I'll open up the hole enough so it will latch. I have to get some modeling clay so I can
determine the gap to the battery. I think is it OK now, but better safe than sorry.
May 7, 2019 Received the mirrors - they will work fine, but one is defective so back it goes. Spent three more hours
getting the seat pan to work properly! Found a pair of hinges that make it sit properly, beat the twist out of it,
beat it some more and got battery clearance, and then the big problem. I tried and tried to get it to not touch the
trim strip on the tank. I couldn't leave it that way because when covered the seat wouldn't close. So,
I beat, bent, formed and beat some more and finally gave up and cut off about 1/4". Unfortunately, I don't
have the tools needed for proper panel beating so I have to do it on a folder up towel on my thigh. The underside
of the seat won;t look new, but it's pretty good. Once it was fitted, I striped the paint from the underside -
it had been repainted over rust and loose paint so it was flaking. I blasted all the loose paint and rust from the top of
the pan and painted it. I still have to paint the underside before recovering. I wish I had a powder coat oven
big enough - it would be much quicker.
May 8, 2019 The seat pan is fully painted now - just have to give it time to harden up.
Decided it was time - one kick - started and idled at about 600 rpm! I do love Tri-Spark and Premier carbs.
Blipped the throttle and there was no hesitation at all so the mixture is good. Oil is returning to the tank. Kind
of foamy and brownish so I'll have to change it real soon. The oil pressure light did not go out so that has me
somewhat concerned. Since oil is returning there no doubt that the crank is getting oil. Could be a bad switch,
could be a stuck open pressure relief valve, or maybe even electrical (I'm using an LED for the indicator). I
didn't take time to troubleshoot that because I had a gas leak to resolve and a rooky wiring mistake.
When I turned the ignition off, the bike kept running. When I pulled the fuse, the bike kept running. I wired
the PODtronics on the switched side of the system so it was providing power. I did that because I was worried about
leakage current through the PODtronics running the battery down - didn't think that through well enough! Even
with the original bridge rectifier and Zener diode, there is leakage current. I measured the PODtronics at 0.5ma so
0.0005 amps. A 7amp hour battery could supply that for about 14,000 hours - batteries lose charge faster than that!
The bike doesn't have a kill switch for two reasons. 1) I don't like running the ignition through a 50-year old
normally closed switch. That's a good way to find yourself walking. 2) A 1970 is not supposed to have the Lucas
switch consoles or turn signals. I had the use the console on the throttle side since that's what holds the master
cylinder on. The other side is just a clutch lever. So, there is no available normally closed switch.
May 9, 2019 The wiring is corrected. The seat pan is painted. The replacement mirrors arrived and of course,
one was bad - fortunately, I haven't sent back the first set yet, to I have two good ones. All but on gas leak
is fixed - one of the new petcocks is bad so I have to take the tank off again and replace it.
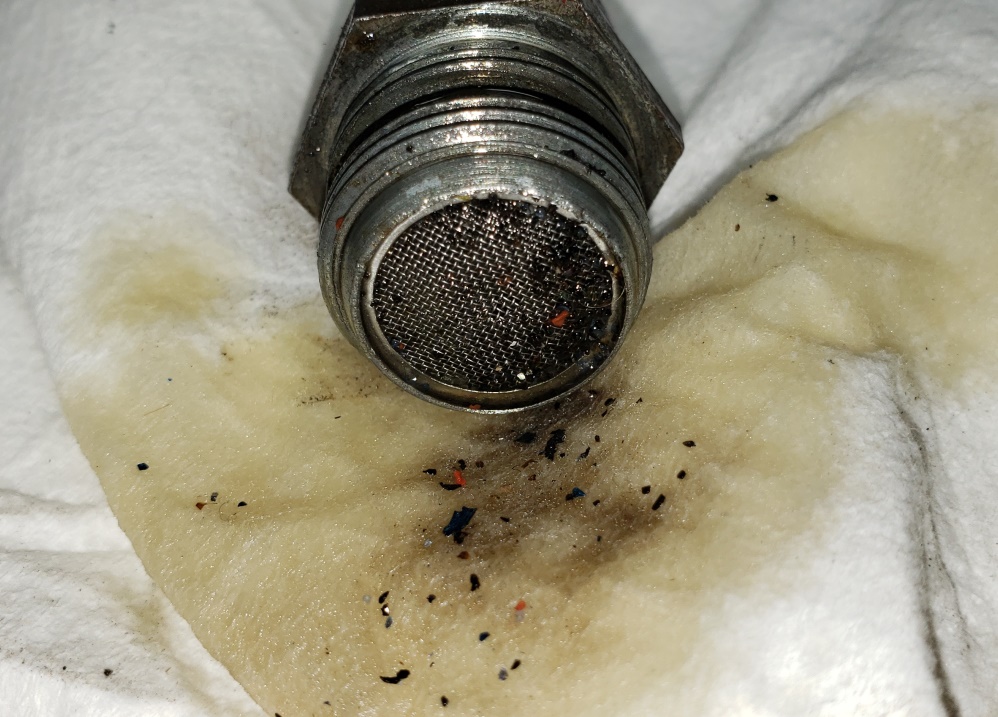
The oil pressure is figured out - it was two problems. 1) The wire from the switch are running along the wires from
the Tri-Spark and picking up enough current to light the LED indicator light. I changed it to a regular bulb to solve
that. 2) The oil pressure relief valve was nearly blocked with crap. The picture shows it after about half fell
off. Thank heavens they have a screen - that crap would have destroyed the crank as would poor oil flow from being
blocked. I took the spark plugs, oil pressure switch, and oil pressure release valve out and kicked it over many times.
The oil from the oil pressure switch came out clean so the crap wasn't getting that far. Much more crap came out
of the oil pressure relief cavity. So, I kicked and wiped it out until the oil started coming out clean and then kicked
it 20-30 times more.
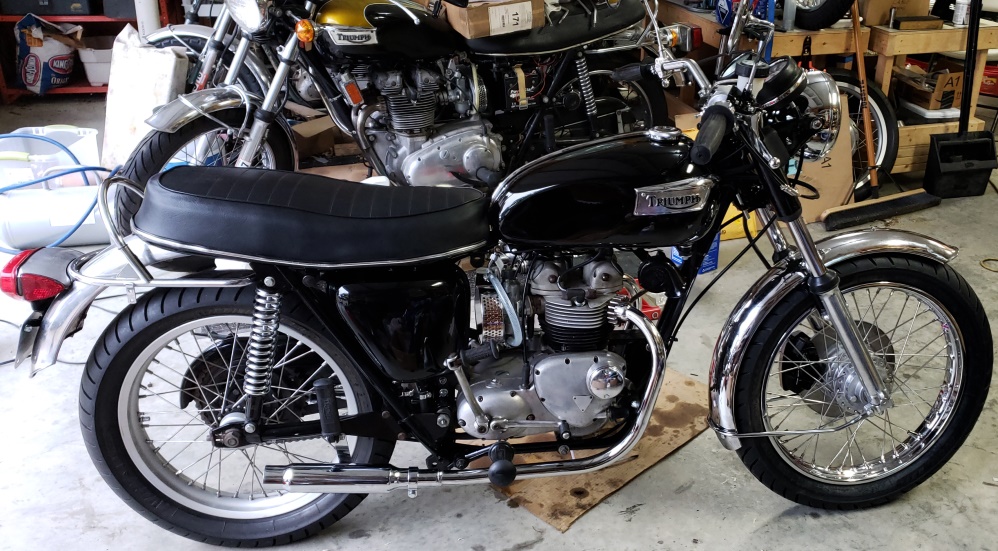
May 11, 2019 Hopefully done! The seat came out good - not perfect but good. The covers I had were all for
T140s (oil in frame) and although approximately the right length, the share was was wrong so I used the cover it came
with. That was difficult because whoever put on before trimmed the sides and it was hard to stretch it enough.
The piping does not fit the foam exactly so it looks a little lumpy around the piping and there is a slightly loose area
at the top rear but I couldn't get that out. It looks WAY better than it did and I was able to install trim on the
bottom.
Notice the tank badges. On a black tank, I like them chrome with the Triumph filled with black - no cream color in
the field.
The gas leak turned out to be a much bigger PITA than I thought. I probably took the tank off ten times today!
One petcock was bad, but once I got that changed, I notice that both sides were weeping. After over-tightening the
spigots, the petcocks and spigots had to be changed again - still weeping! Then I realize that the weeping was
coming from where they screwed into the tank. Strange since I used new dowty washers each time. I drained
the tank and inspected the holes - the paint was chipped where they seal so I sanded that smooth and tried again - still
weeping. So, I used four wraps of gasoline-specific Teflon tape and the weeping seems to have stopped. We'll
see tomorrow.
So, I was finally ready for the test ride and final tuning. Of course, that's when the rain started. I've
got to get this done and gone. We're going to a bike show next weekend and I need to finalize the 1972 Norton
Commando Combat I'm taking to sell
May 12, 2019 Fortunately, I checked the oil in the gearbox - there wasn't any! I finally got the gas leaks stopped and the rain quit for a while at 4:30 so I went for a test ride.
It handles exactly like a Triumph 500 should, beautifully! Before it warmed up, it didn't like hauling me around -
I weigh way too much. Once warmed up, it went fine. For me, it might need the needle raised but I won't know
if it really needs it until the owner rides it - he weighs a LOT less than me. The front brake works well and will
be really good once broken in. It's from a bike that weighs nearly twice as much so stopping should be no problem.
The gearbox and clutch work well. I went about three miles and only got up to about 55 (speed limit is 35).
It was pulling strong above 4000 rpm.
June 1, 2019 All done and delivered. I liked this project so much that I'm going to build another when I have
time. I have a titled frame and all the engine/gearbox parts.
|


|
Copyright © 2003-2024
Greg Marsh Enterprises
8116 Arlington Blvd. #171, Falls Church, VA 22042, (703) 200-4025
|
|