|
|
On November 5, 2016, we bought a huge lot of parts that included a titled partial 1970 T120R. The engine was rebuilt
and all black parts were powder coated. it's been sitting around the shop in the way so on March 25, 2017 I decided
to at least get it on wheels so all the parts would be together and it would be easier to move. Here's how that started.
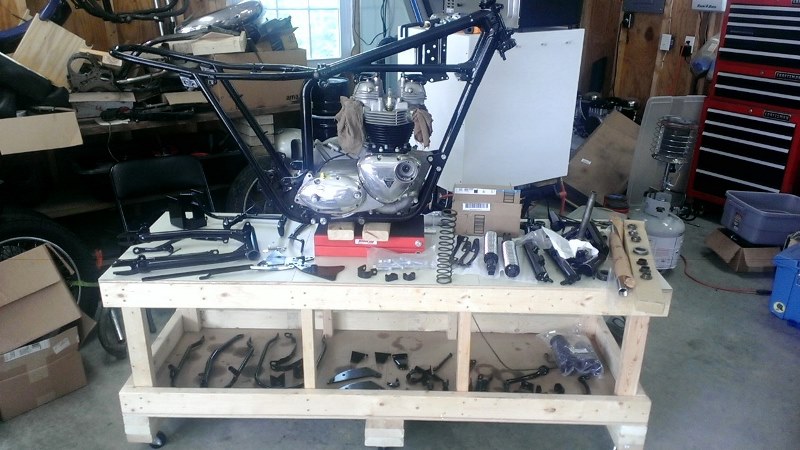
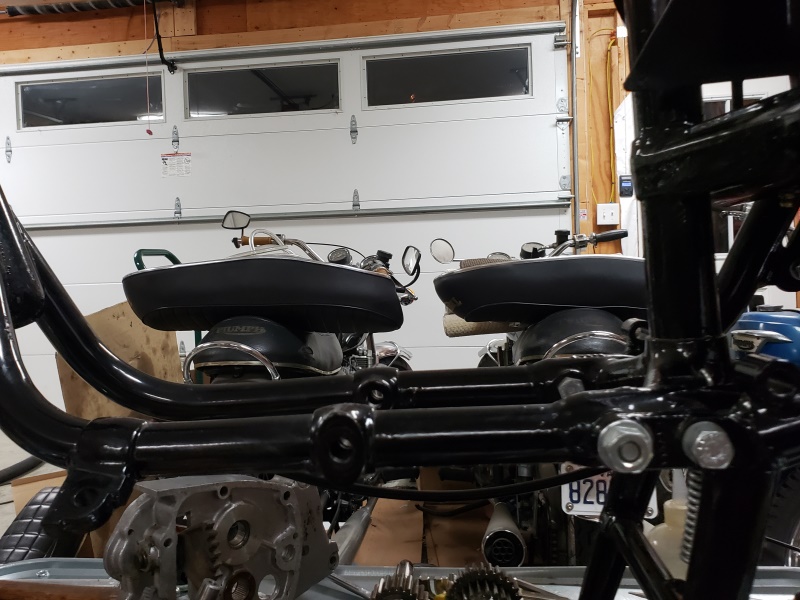
March 26, 2017, the major back end parts laid out and inventoried.
March 26, 2017, the major back end parts installed. I didn't have the right mounting bolts for the rear shocks so
they are ordered - just used a wrong bolt on one side to hold the swingarm up until they arrive. Once they do, the
rest of the rear-end parts can be installed.
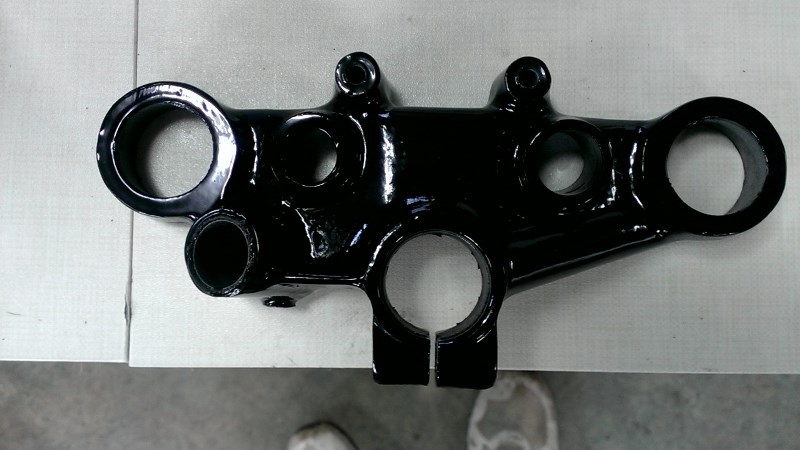
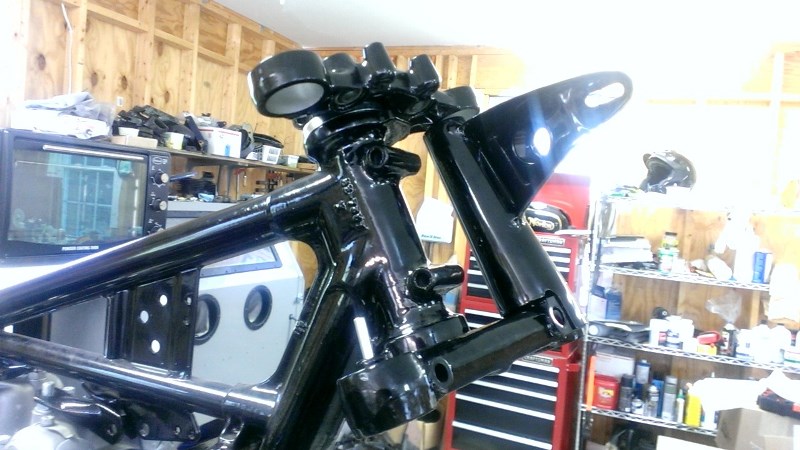
March 30, 2017, it's hard to see in this picture, but the top triple tree was powder coated without masking and without
removing the outer shell of one metalastic bush. Even though I was very careful, the powder coat chipped when I drove
that shell out. So, the next time you see it, it will have been stripped and re-coated.
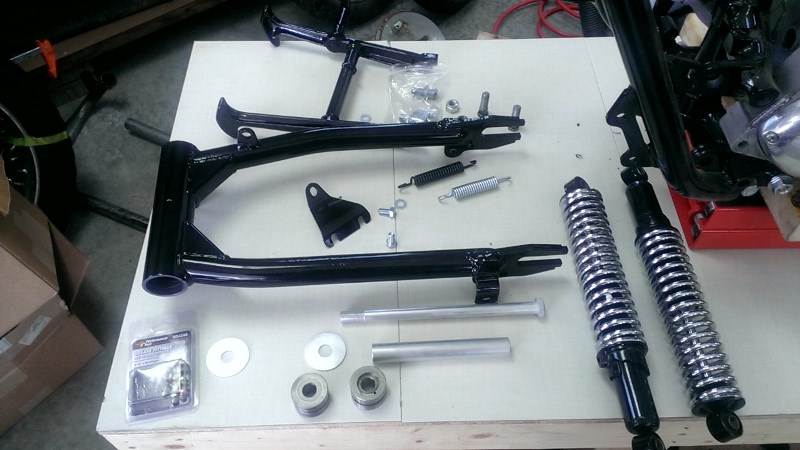
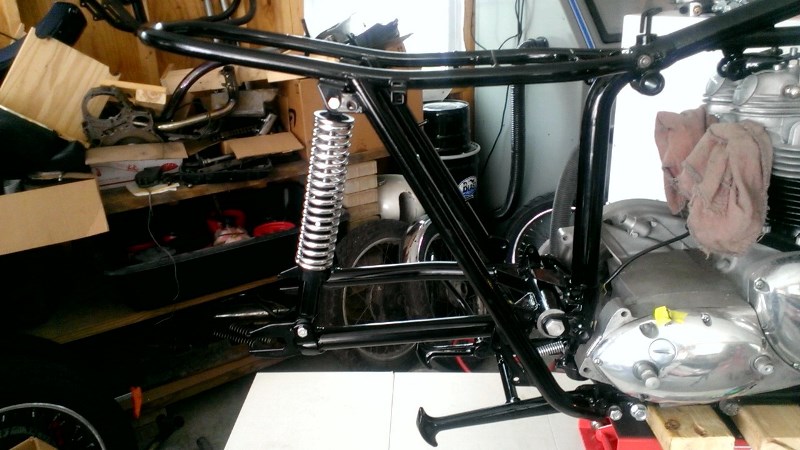
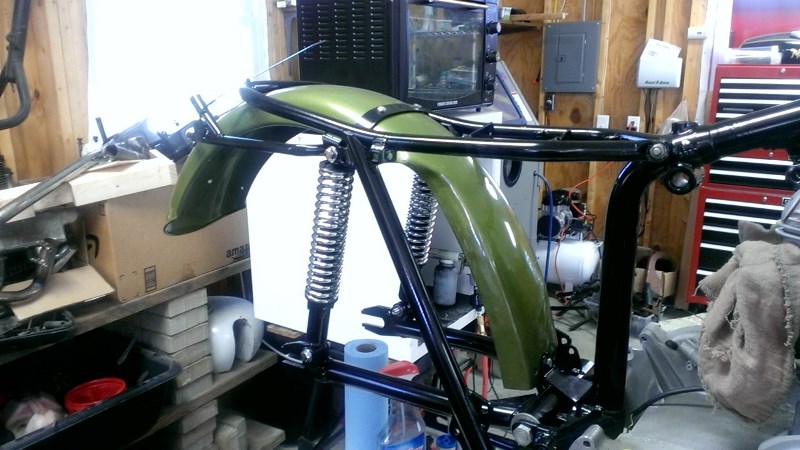
April 1, 2017, The back end is mostly together and I tried fenders until I found one that was the right type and fit.
The colors are wrong so it will have to be painted but it's all fitted so it will be easy to install once painted.
The rear wheel appeared to be ready to install but wouldn't fit between the swingarm. On investigation I realized
the brake shoes are worn out, the backing plate is warped, the bearings are no good, and the spacers are wrong!
So, I have a good deal of work to do on that.
April 8, 2017, The top of the triple tree has been stripped and re-powder coated, the lock is installed and the metalastic
bushes are installed. The bike had races for tapered roller bearings but no bearings. Fortunately, I had a set.
I had two new chrome central nuts, but both were crap. They had been chromed after the threads were cut and then slots sawed
in. After hours of working on the threads, I got them one to screw on OK, only to find out the OD was too big to fit through
the hole. So, I've temporarily used a steering damper-type nut.
The frame had been powder coated without removing the bent steering stops. They have been replaced with new.
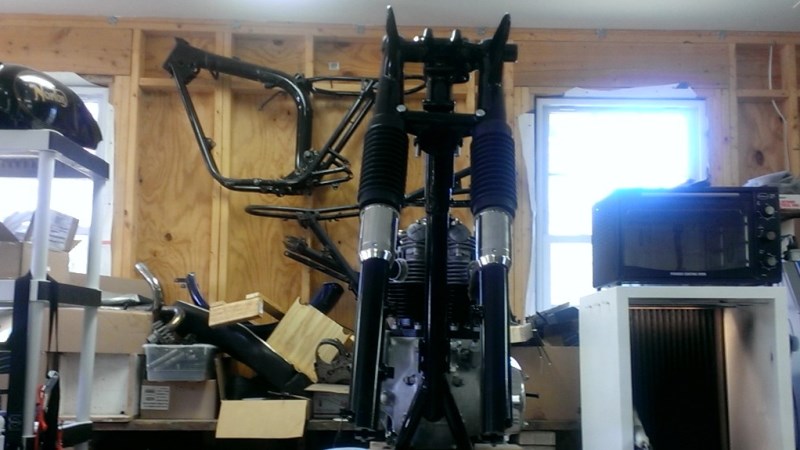
The bike came with three fork sliders, one right and two left, all poorly powder coated. The right side and one left
side were too scored inside to use. I dug though other forks I had and found a good right side. Both have been
stripped, internally cleaned, sandblasted, and powder coated. The forks are assembled with all new bushings, fork
tubes, springs, stainless steel seal holders, seals, washers, and gaiters.
The left fork ear looked good, but the right one that came with the bike was heavily pitted before being powder coated.
I sandblasted and coated another one, but ran out of time to install it and the forks.
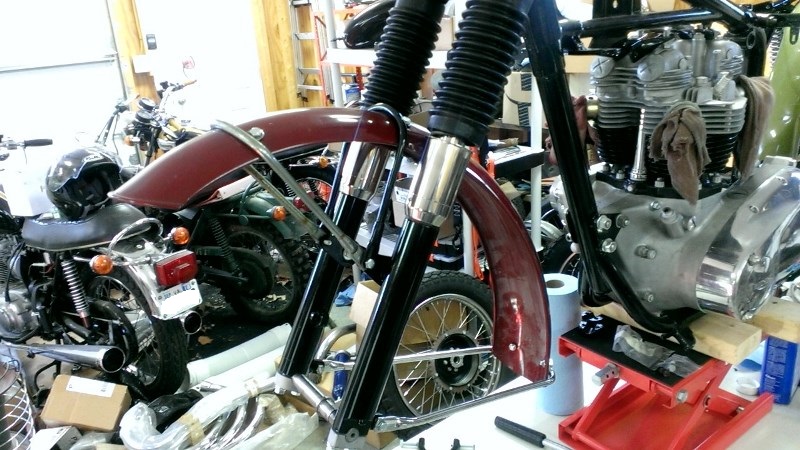
April 9, 2017, The forks are installed, time to mock-up the front fender and wheel. In the background you can see the
powder coat booth I made and my small oven.
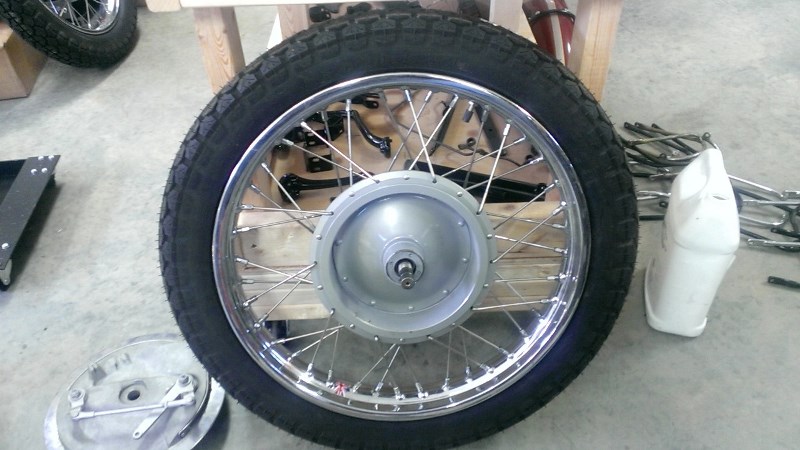
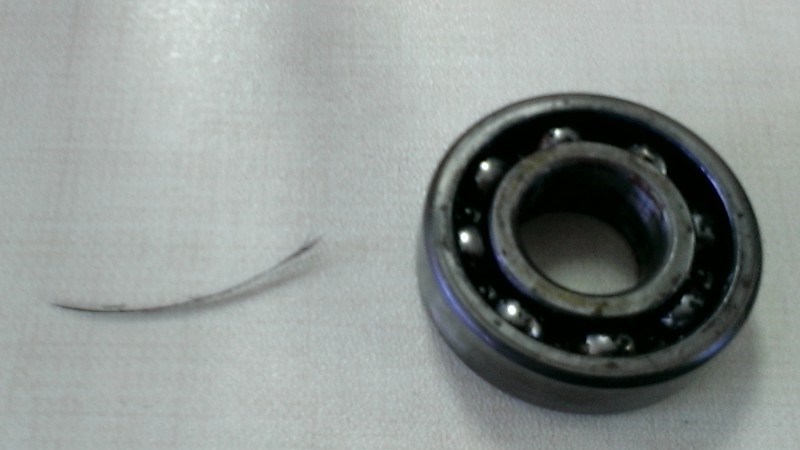
April 9, 2017, I tried to test fit the front wheel when I noticed that the bearings were bad and the axle was too short!
The wheel has a freshly powder coated hub, a new rim and new stainless steel spokes and was supposed to be ready to install!
So, I disassembled planning to just change the bearings and axle. The first picture below shows a big problem - the hub
was powder coated without masking off the brake drum! The second picture below shows the left side bearing and the piece
of cable that was in the bearing! I have no idea how the wheel builder trued that wheel with a bearing that was stuck! I
have around 10 front wheel axles, but none were right - fortunately, I had another wheel with the right axle.
That's not all that was wrong - the brake shoes are almost down to the rivets so they have to be replaced too!
April 9, 2017, I have an original paint front fender for the bike but the bike didn't come with the stays. I have lots of
stays so I went looking for a set of black ones thinking that they should be black for a 1970. I found one black (center),
one terrible chrome (front), and one like-new chrome (rear) that matched the forks and fender. I figured I would powder
coat them all black. That's when I realized that they should be chrome for 1970. So, I haven't decided what
to
do about that but I did mock it up to be sure everything fit properly.
I also made sure that axle fits and sandblasted the bottom caps - still have to powder coat those.
June 27, 2017 Just getting back to this bike. I had a "quick" fix to do on a 1969 BSA B25 for a guy that turned into a rebuild.
The drive side bearing was so bad that the only thing keeping the crank from moving up and down 1/4" was the rotor in the
stator! The shocking thing is that the bike ran! Several of the balls from the drive side ball bearing were laying in the
sump! Then, I fell and separated my shoulder so I've been out of action for a couple of weeks over that.
August 31, 2018 Over a year has gone by. Two surgeries, a broken toe and couldn't find a painter - the one I was
using decide it was too much work! I finally found a painter and shipped the tank and fenders to him today.
Hopefully, this will be finished this year.
October 4, 2018 The tank and fenders are on their way back to me. Since the fenders are pre-fitted, I can install
them and start on the wiring. I'm still trying to decide whether or not to trust the engine build or to take it
apart and check it. I also have to decide if I'll use black or chrome front fender stays. Chrome is correct
but will cost a lot - the problem is that I have a decent rear and top chrome stays. I have lots of stays that I can
powder coat.
October 17, 2018 The tank and fenders are back and they are beautiful. I need to get a little more done on the 74 Norton
before switching to this bike because I'm completely spread-out in the shop on the Norton.
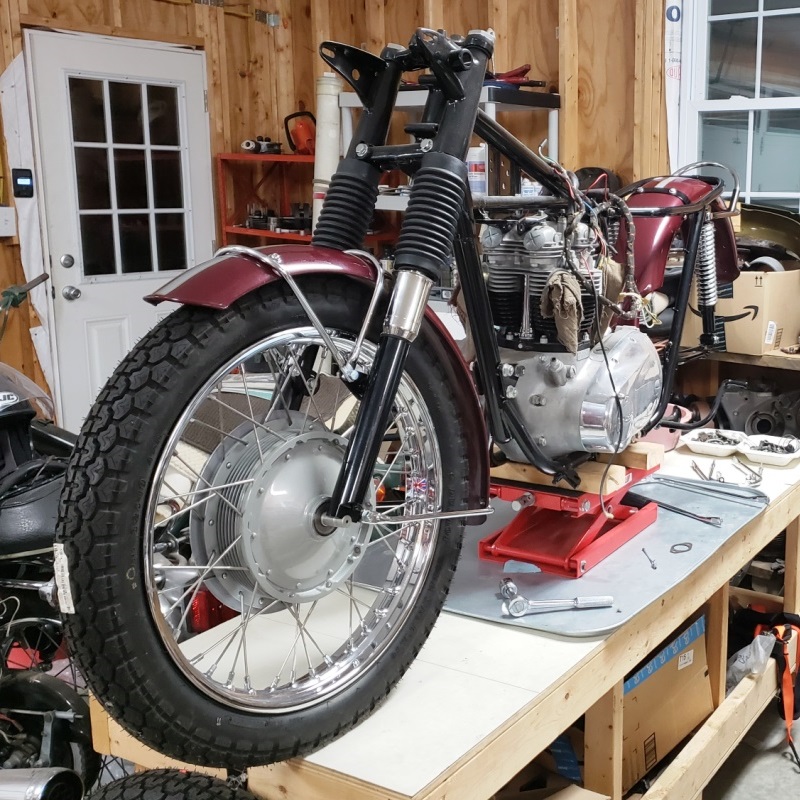
November 6, 2018 Finally some real progress. The fenders are installed. The front wheel is just there to make
sure that the fender stays are the right ones - they are. I found a top and front for a very good price and I found
a good rear one on a shelf that I didn't remember having so I decided on chrome. The front fender above is not
the one I ended up using. It's original paint NOS so I decided to hang onto it. The one I had painted was
original paint as well, but in bad shape.
The wheels were finished long ago, but apparently the front wheel has a slow leak because the tire is soft. Also, my bad
thumbs won't let me finish putting the gaiters on so I'll wait until someone stops by to help.
November 10, 2018 More progress. Changed the tube in the front wheel and installed the wheel. Spent a long time figuring
out the nuts for the rear wheel. All four were the same thickness so the wheels would not fit between the swingarm.
The chain guard is just in place, not installed because I don't have the special bolt for the rear mount - I've got
one on
order. I checked with the prior owner and was told that the engine builder was good so I'll try it as is. I've
got to go through my oil tanks - hopefully I have a good one I can powder coat.
November 15, 2018. Found a good oil tank, cleaned it, plugged all the holes, blasted it clean, and sent it CA with
a bunch of Norton sided covers to be painted.
December 2, 2018. Got the chain guard installed and then realized that it was the wrong one! They were simplified in
1969/70 and I had the older type installed. So, I took it off and installed the right one. It is powder coated
but has many fine scratches so I'll have to do something about that eventually.
Also worked on the motor mounts today. The left side motor mount and rear brake pedal were powder coated but not
masked first so I had a lot of work to get the powder coat off the pivot. Once I got that mocked up, I tried to
put the right side together. It turns out that the mount is quite bent but nicely powder coated - stupid people!
I searched through my parts and found an even more bent right mount. Before starting to search for one on line, I
looked a
few more places around my shop and found a good one. It needs blasting and powder coating.
December 8, 2018. Due to an error by my cardiologist who added a new drug that was a different version of one I
already take, I've been sick for a week. I finally felt good enough to do a little work today. I blasted
the right motor mount and on a trial fit, realized that someone enlarged one of the holes for the two pegs that position
the
footrest. So, I brazed it closed and re-drilled it then I powder coated the mount. That little bit of work
wore me out.
November 30, 2019 I've been working on this bike off and on again for a few days. The chain guard and rear
brake torque stay are giving me problems. The bike came with the older and newer chain guards and both are missing
the holes for the rear brake switch. More importantly, both are scratched up and are power coated so I'm experimenting
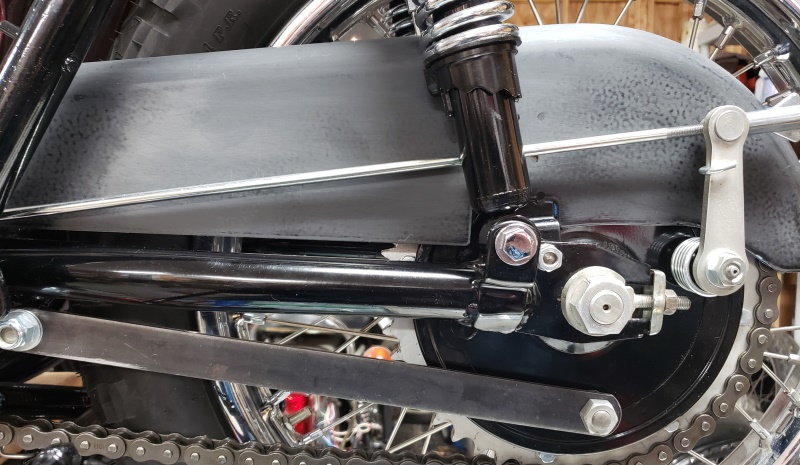
on how to fix that. The brake stay is standard but I don't like that it causes the rear wheel adjuster to rub
on the brake return spring. I made a new stay that was an inch longer, but that makes the chain guard rub on the return
spring. So, I'm going to make another 1/2" longer than standard which will resolve both. Fortunately,
there's nothing special about them - 1" wide by 3/16" thick steel. I took pictures but cannot find them.
I'll take a picture again once the rear ends is finished.
December 5, 2019. Made the new stay and relieved some from the chain guard, but was still not happy. So, I made
a third stay - this one is good. The original hole to hole length was 12-1/2". In the picture it is test
fit and perfect. With the new chain adjusted, there's plenty of room between the adjuster and brake return spring.
As the chain wears and the wheel is adjusted further back, the gap will reduce, but still not hit. Also, the chain
guard does not hit. I relieved more than needed based on the second stay, but that's no big deal.
I mentioned before that I had to figure out what to do about the scratches in the chain guard. It turns out that it
is not poorly powder coated, it is poorly cleared. I've sanded out the imperfections and will paint it before
final installation. It's too big for my oven so I can't powder coat it.
September 5,2020 Touched this project for the first time today this year! I took in four Nortons and a
Norton gearbox that have consumed all my time.
- The first was a 850 that needed a lot of work to finish - that's done.
- The second was a 75 850 MKIII that needed a new frame and a lot of work - that's done.
- The third was a 72 750 Combat that also needed a frame change and just about everything else - that's almost done
but if keeps having small problems.
- The fourth was a was a 69 650SS that I'm almost done with - I was supposed to make run reliably and to fix the rear sets
shifting problem. I had to rewire the bike, fix the shifter, and then noticed oil in the primary which was
converted to belt drive. I'm waiting for parts to finish that project.
- Last was a Norton gearbox to rebuild. That took the usual part of a day until I started on the gear change
mechanism. The outer cover and gear change that came with it were not usable and I only had part of the required
used parts. The gearbox is done but the gear change mechanism doesn't work right and I haven gotten back to it.
Once those last three are out of my way, I'll be working to get this done. It doesn't need much to finish
- I just
have to have the time to work on it.
September 8, 2020 The chain guard didn't have holes for the stop light switch. Drilled those and installed
button head Allen bolts from the inside out and a thin nut with red Loctite. Then repainted the chain guard AGAIN!
I hope this
is the last time and I can finally put the rear end of this bike behind me.
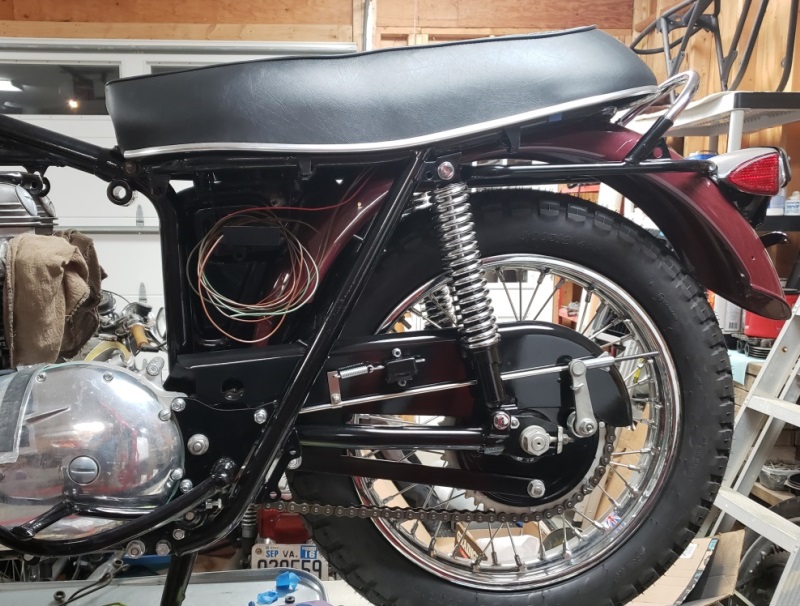
September 9, 2020 The rear end of this bike is finally done other than running the breather line along the rear fender
and wiring the rear brake switch. The chain is adjusted as it the rear brake switch. The taillight is all
tested, just need the screws to hold the lens on. The seat (was a PITA that was) works properly as well. The
passenger pegs are restored but I have to powder coat the mounts.
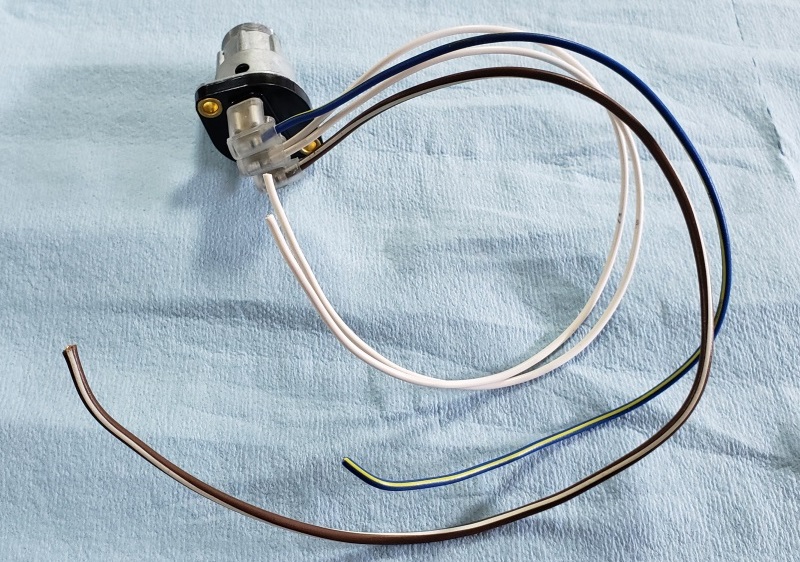
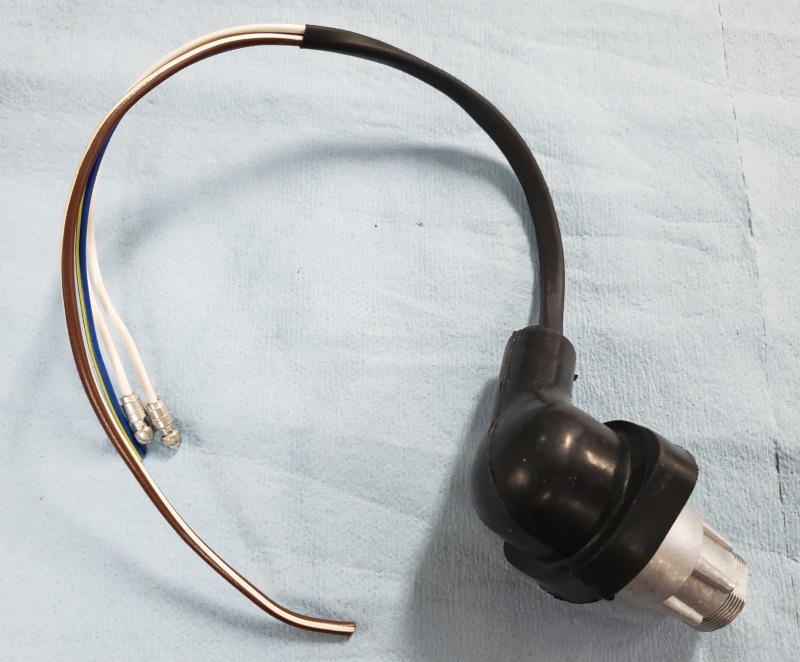
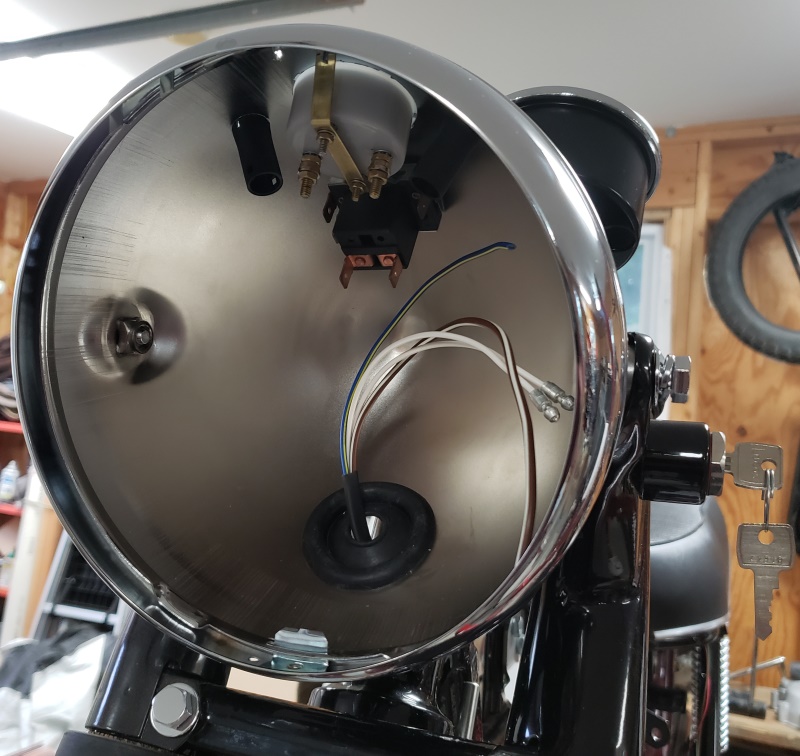
September 12, 2020 I'm continuing the wiring process. You can see the progression below. I didn't realize
I
was out of eyelet connectors for the ammeter and right-angle female spade connectors for this lighting switch.
This bike will have the Tri-Spark MOSFET rectifier/regulator and the Tri-Spark electronic ignition so I needed to update
the wiring diagram to match that and some changes I make when wiring a Triumph.
I also worked on the head steady. The spacers and bolts did not come with the bike so I have to sort that out.
September 21, 2020 I needed to turn the engine to the fully-advanced timing to prepare to install the Tri-Spark
ignition. That's when a big scare happened. The engine and gearbox were already "fully rebuilt"
when I got
this bike. When I tried to put it in 4th gear to turn the engine with the rear wheel, I could not get it to shift
at all. So, I checked the primary and gearbox oil levels. Both had none! I guess the builder oiled
the parts as it went together but never added oil. Once I added the gearbox oil and spun the rear wheel a few
times, I could shift. Once it was able to go through all gears with the rear wheel turning, the shifting became
easy so I think it is OK. If not, at least Triumphs are easy to take apart and fix.
September 24, 2020 Over the last several days, I've been able to make a little progress. I had head steady spacers
made and the engine is completely installed in the frame now. I also received the parts to install the handlebars
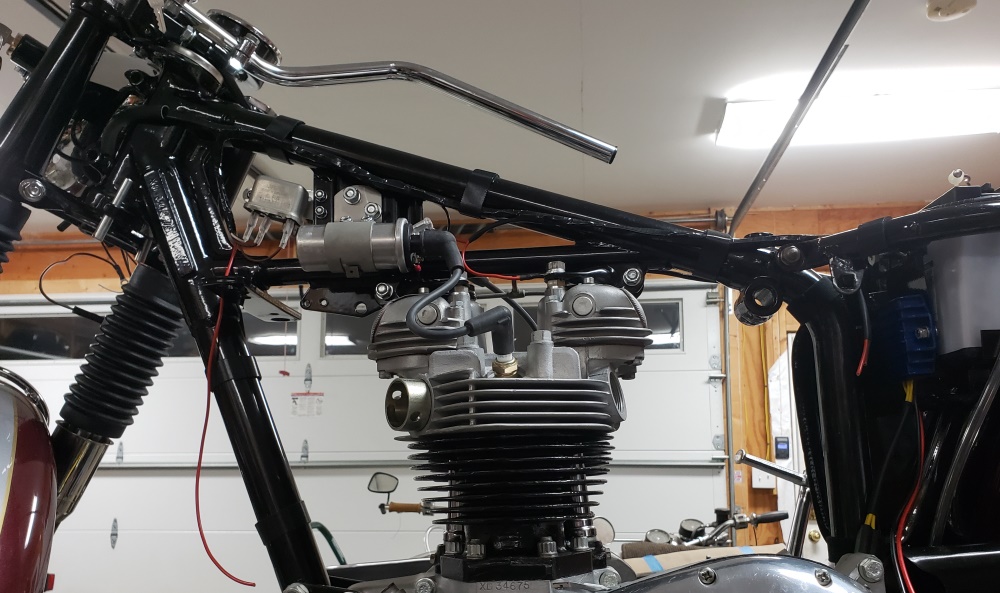
so that is done. I installed the coils and temp installed the tank so I could make sure that the coils are in the
right place - they are. I also started to install the Tri-Spark ignition and MOSFET regulator. So, now I'm
back to
wiring.
September 25, 2020 I mounted the Tri-Spark MOSFET regulator on the front of the battery carrier and then realized I
couldn't get the carrier installed because I mounted it too high. This was a brand new carrier. I noticed
some lumpy powder coat on the carries and rust in a corner. As I scraped the rust out of the corner, I
realized that the "powder coat" was installed over rust. So I got another out of stock and noticed the same
thing.
So, I tried blasting it. The PAINT came off without a lot of trouble - not powder coated! So, I blaster it
clean, drilled new holes and it was easy to mount so I powder coated it and quit for the day.
September 26, 2020 I had a lot of paperwork to do today and then I got company so I didn't get a lot done. I did get
the
wiring harness mostly made and the Tri-Spark MOSFET regulator installed. I still have to run the wires for the
horn(s), then test and once it's good, wrap the harness. Similar to how I wire Nortons, there is a central
14ga red ground wire and where other grounds are needed the red wires are spliced and soldered to that central wire.
I try not to use bullets for the red, white, brown/white, and brown/blue wires and when I do they are at the end of the
line (in the headlight or tail light). There is no specific frame ground but the engine is solidly grounded so the frame
is too but nothing relies on a frame ground.
September 28, 2020 I mentioned a few days ago that the engine, gearbox, and primary had no oil and that I added oil to
all three. British bikes often leak, but not like this one! I'm not sure yet, but I think the crankcase
leak
was the sump plug. The copper washer was very rough. I replaced that and used Teflon tape and am watching it.
The inner gearbox cover is leaking - haven't gotten to that yet. Took the primary cover off to see why it was
leaking badly. Along the bottom, they didn't scrape off all the old gasket, but once I did I checked the cover
for
flatness. On an flat surface, an .008" feeler gage will slip under at the center, top and bottom. I'll
try the cover
without a gasket and see if there is a gap once I put the primary back together. I didn't intend to take it apart
but see the picture. That chain oiler tube is broken. That in itself would not be a big problem, but the clip
pushing against the chain would eventually be VERY dangerous. Also, the tab not being bent over is not good.
I had to take the clutch apart to get the plate off that the hose attaches too. That's when I noticed that there
is no clutch pushrod! Once I got the clutch off, it was clear that the steel plates had been blasted - that's
OK. The friction plates are new and the springs are rusty. That's all fine/fixable. The countersunk
screw that holds the plate I needed to take off was installed with red Loctite and the head was striped. Two hours
later, I had
the screw out.
September 30, 2020 I finished taking the primary apart. Then I started on the gearbox. The outer cover came
off OK, the gasket was a thin piece of crap which is why it was leaking. The inner cover was VERY hard to get off
- the studs were bent and it was clear that the cover had been driven on - without a gasket or sealer - no wonder it
leaked!
October 1, 2020 While taking the engine apart I found:
- Some of the head bolts are stainless steel and no anti-seize was used - a really bad idea!
- The drive side had a small piece of aluminum on top of the piston.
- The timing side had some sort of large dead insect.
- The pistons are +0.30, Hepolite, and with new rings and pins.
- The cylinders are properly bored and honed.
- The valves are new Kibblewhite Black Diamond Valves
- The valve springs look new, but have surface rust - I guess the builder didn't oil them.
- The front drive sprocket needs to be changed, but so far, I can't get the nut off.
- Since I couldn't get the sprocket nut off
- I decided to get the gears out so I could use a proper socket on the nut.
- Normally, the mainshaft simply slips out of the high gear - it would move a quarter inch bit not come out.
- Also, I noticed that I couldn't turn the mainshaft in the fourth gear by hand!
- I ended up heating the fourth gear to expand it a little and get the mainshaft out.
- It appears that the builder replaced the fourth gear bushing and then drive the mainshaft in - there another gorilla
thingsI must fix.
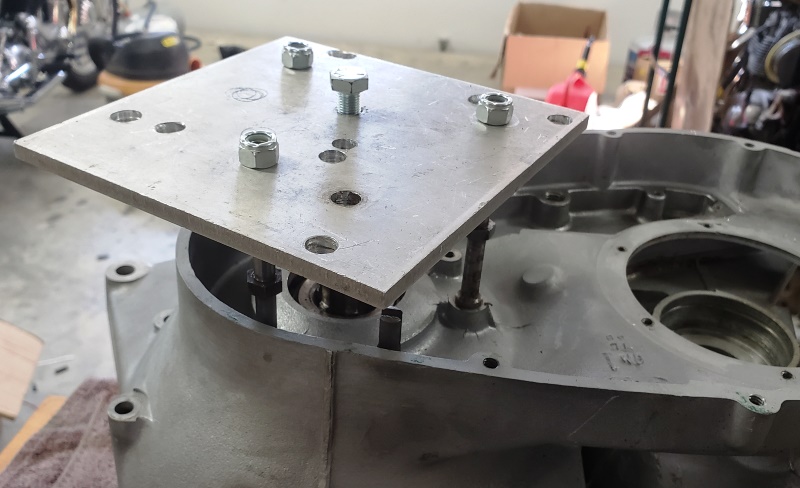
So, I'll resolve the bottom-end issues and the bench and the put it back in the frame to finish rebuilding the
engine/gearbox.
October 2, 2020 Finally got the sprocket off and ordered another. Also realized the fourth gear bearing is the same
as a Norton
sleeve gear bearing and I have those in stock. I also went through my loose oil seals and found two new ones so
once I get the crankcases apart I can replace those. Next I unbolted the crankcase thinking I would have them back
together in half an
hour - bad thought. After two hours of trying they haven't budged! It's amazing that whatever sealant
the
engine builder used has glues the crankcase halves together but leaked! I have a home made puller for the purpose
for this, but it requires three long stator posts and I can't find my spare one. A 650 Triumph has two short and
one long. After looking for a while I realized that I have other 650 crankcases - I'll have to get a stud out
of
one of them.
October 3, 2020 The first picture shows my home-made, multi-use puller. I was shocked that the plate was actually
bending and the sealer did not let loose. So, more rubber hammer and it finally let go. Once apart I could
see why it leaked:
- They ran the sealer up to each stud but not around them
- The sealer was rock hard - really stupid on an aluminum, vertically split set of crankcases!
- I tried acetone and alcohol to soften the sealer - did nothing. Then I tried WD40 which helped.
- I spent a very long time with a single-edge razor blade cleaning up that mess.
- There were also places around the mating surface to the cylinders where someone hit them with a hammer - that's all
been corrected. There's no doubt that the cylinder base was going to leak!
So, once the cases were ready, I installed the fourth gear bearing and seal, and sealed the layshaft needle bearing that
the builder also neglected to do.
Then I applied the Permatext Form-A-Gasket 3 (aviation) that I always use, after letting it air dry for about 20
minutes, I put the cases together, aligned them, and the slowly torqued then in a pattern to the correct torque.
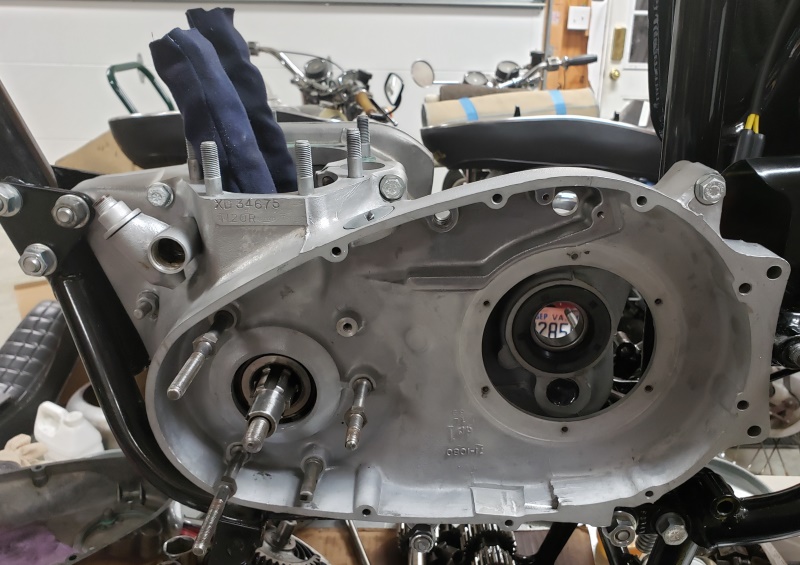
Finally, I stuck the bottom end back in the frame. I like to have all motor mounts and head study hardware
installed before I tighten any of it I need to wait for the new drive sprocket to arrive before I can put the
gearbox together and tighten the sprocket nut. So, I can't installed the timing side motor mount yet. I
can
out the top end back together so that's next.
October 7, 2020 The front drive sprocket came in so I installed that - PITA!. The sprocket seems to be very high
quality, but the splines were too tight. I spend almost two hours with a fine file working on them until I could
get the sprocket on the hight gear. Also, the problem I had with the mainshaft not coming out of the high gear was
because when they installed the new bushing they mushroomed the outer edge. I carefully removed the problem with
an expanding reamer.
Then I went to work on the gearbox. Again that hardening sealer was used with no gasket so that took a while to
clean up. After putting the gears in, I was going to install the inner cover when I found two more problems.
That mainshaft bearing is bad and the selector arm was very hard to move in the case. I hope I have the bearing.
I pulled the two cotter pins and then the lever. It is rusty so I'll clean that up, clean up then shaft, and
reinstall after going to buy new cotter pins.

October 9, 2020 Besides the timing-side mainshaft bearing, I checked the timing-side layshaft needle jet and it was bad.
So, I've changed both bearings. I also, checked the two studs and one was bent - luckily, I had one.
October 10, 2020 Been off working on other things. Did get the gearbox and inner cover corrected and installed.
There are a few parts that will be here Monday that I need to put the outer gearbox cover one. In the meantime,
I'm working on a 1979 T140E for a customer.
October 22, 2020 The parts order got hung up in customs and a customer brought his 1979 Bonneville to be rewired -
I thought that was going to be a winter project.
That's done now and I'm back on this. I cleaned, formed, and re-plated the rocker feed line and engine oil
lines.
The rocker feed line was bent way out of shape - it took a long time with my tubing bender to fix that but it fits
properly and looks good now.
October 23, 2020 Realized that I didn't have a replacement for the primary chain oiler hose then realized that it's
the
same as the Norton OEM rocker feed. I had an old one of those so I made one. Took two tried because the pipe
had a curve set into it and I needed to warm it and reshape it. On my first try I got over zealous with the heat
gun and kinked the pipe. The second try went fine.
October 24, 2020 Things keep getting it the way of me making real progress! Besides bored people coming to visit,
a couple of silly mistakes have made me "lick my calf over". I had the primary ready for the clutch plates
to go
in when I remembered that I didn't tighten the screw or abutment in the picture and the screw was completely hidden
by
the clutch basket. So, it came apart again. It's all back together again, but I made another silly mistake
that I'll get to.
I mentioned before that whoever built the engine didn't put a clutch pushrod in. Also, they installed new friction
plates and media blasted the steel plates That's OK, but they didn't do anything to keep them from rusting.
So, I
had to blast them again. Also, the pressure plate and spring cup has light rust do I cleaned then up as well.
I think the clutch will be fine. Once I had it all back together I wanted to see about the warped cover.
made sure that the mating surfaces to check it with very light pressure. There was no discernible gap anywhere but
the
middle of the bottom and that was .008". So, I tried the center four screws just snugged up and the warp was
gone. I suspect that it was put on and not tightened in the correct order. I was happy with that so I put in
on to keep
- MISTAKE! I never adjusted the clutch springs for throw out! Can't do that until gearbox outer cover
is on and the clutch cable is installed. So, I went to work on that. That went fine until I put the foot peg
back on and realized that the kick start lever hits the foot rest - now I have to figure that out!
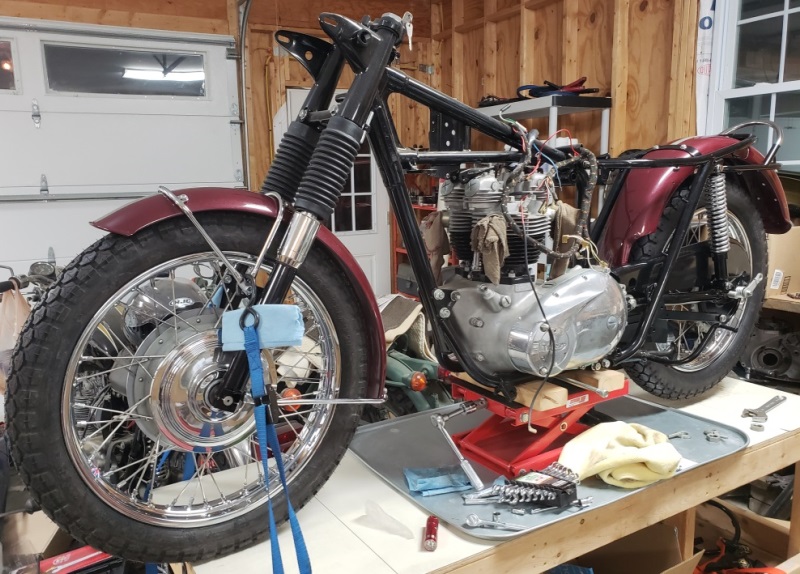
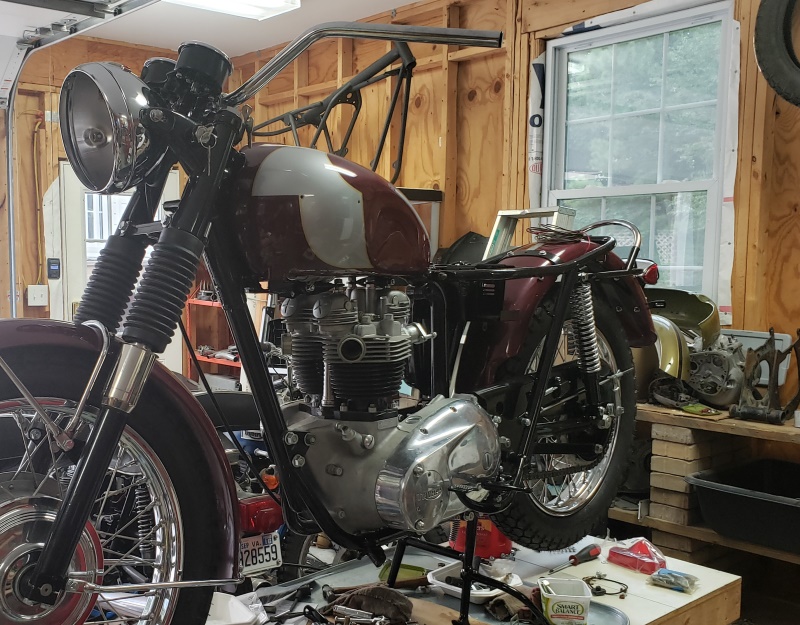
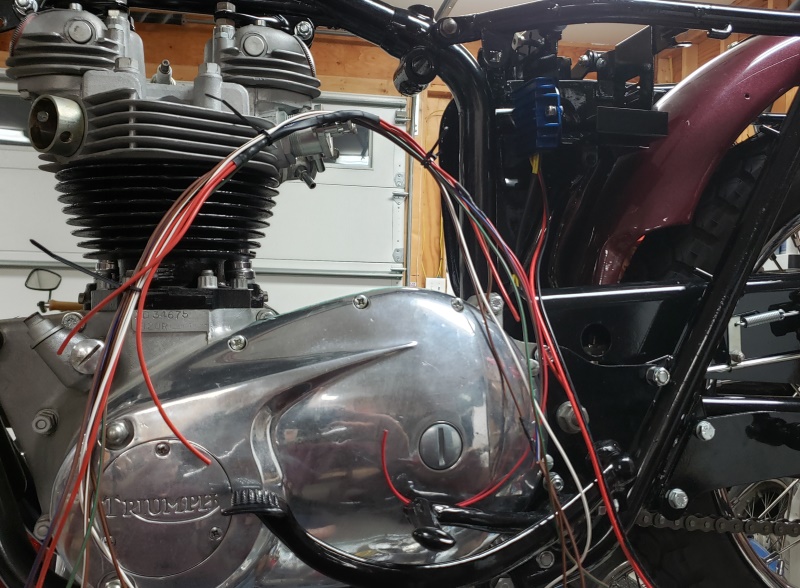
October 26, 2020 Finally I'm back to wiring. The engine is all together and fully installed in the frame.
The valves are adjusted and the plumbing is done. A some point I'll have to take the primary cover off and adjust
the clutch springs and I still have to install carbs and exhaust but it's coming along. At least now I know that
engine and gearbox are in good shape and can say that when I decide to sell it.
October 30, 2020 I'm pretty sure it's a conspiracy � the world doesn't want me to finish this bike! It's
one thing after
another stopping me. I did finish running all the wires and started dressing and terminating them today. Hopefully
nothing will get in the way this weekend and I can finish the wiring at least!
November 2, 2020 The wiring is installed and tested including the Tri-Spark ignition. Tomorrow, I'll
remove the harness,
wrap it and install it for keeps.
November 3, 2020 The harness is more or less finished and installed. Still have to connect the Tri-Spark MOSFET
regulator, handle bar switches and headlight. I have lots of old horns - need to go through them, find two that
work and restore them
November 5, 2020 Well! This is annoying! The only thing I didn't fully test was the horns. Initially, I thought
of the horn relay as it would be on a 71 or later bike and ran a ground wire and the brown/black wire that would supply
-12 volts when the button was pushed. Then I remembered that there won't be the switch consoles, just a horn
button that provides ground. So, I got rid of the ground wire and ran a white (hot) wire and tested that when the
brown/black was grounded the relay picked - perfect so I finished the harness. Today, I went to wire the horn
button and it didn't work. In 1970 Triumph went to rubber mounted handlebars and they are not grounded so the horn
button has no ground! I suppose I can add a ground to the handlebar mount, but that seems weird. I'll have
to try to figure out how it was originally done. I have one old switch that provides the high/low beam and a horn
button that could have a ground wire added, but it is in very bad condition.
November 7, 2020 It turns out that the handlebars should be grounded through the bottom washer for the "P"
bolts.
But, the triple tree is powder coated and that is insulating the washer. So, I made a ground harness that connects
to the bottom of one "P" bolt and to one mounting bolt of the speedometer and connects to the ground inside the
headlight shell. Then I tries to mount the handlebar switch and clutch lever - they interfere with each other.
The handlebar is drilled for mounting the switch rather than with a clamp, but I don't have the plastic parts that goes
under the switch to make that work - more study needed!
November 8, 2020 I made a rubber pad to go under the handlebar switch and it all works but I hate it!
Thinking about using a standard Lucas console on the left, but I don;t have a matching chrome lever. They are VERY
expensive for some reason. I could easily put a console on both sides - I have LOTS of new alloy levers, but then
the right console would have switches that did nothing - still thinking about it.
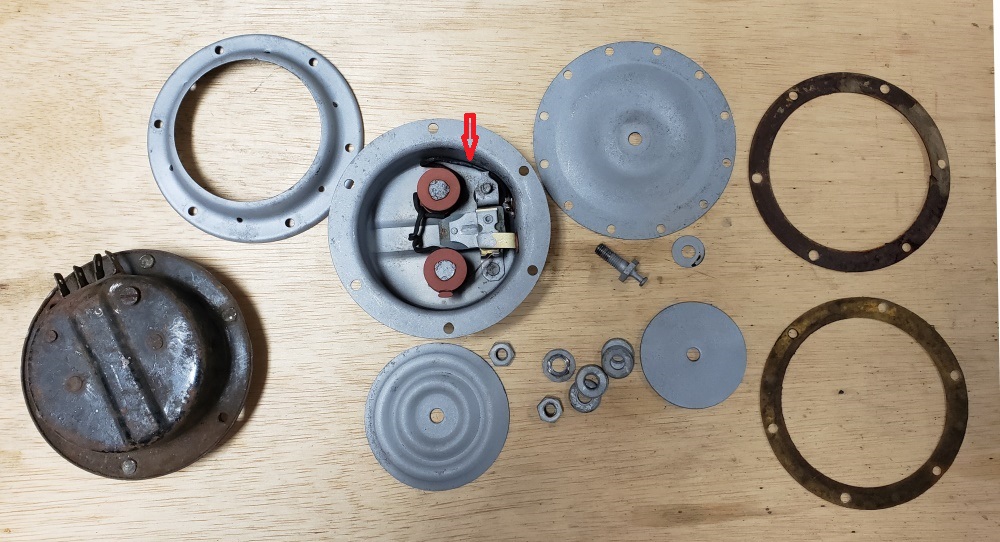
November 9, 2020 Since I worked all weekend and accomplished almost nothing I decided to forget about the
handlebar switch and work on horn. Since a T120R is supposed to have two horns, I wanted the shallower type like the one
in the picture. I found two alike in my stash, but neither worked and both were as bad looking as the one in the
picture. Took the first one all apart and blasted it clean. The wire pointed to by the red arrow had been against the
adjustment spring and the insulation wore through causing it to short out and the melt, breaking the connection.
Fortunately, there was plenty of wire to reconnect it. It is now covered with heat shrink tubing and formed away from
the spring. The points were corroded and barely making contact � cleaned them up and they are zero resistance now.
Finally, I held it all together and tested � works fine. I would love to powder coat it, but I think that would cause
problems. So, I'll paint it. Tomorrow I'll take the other one apart and fix whatever is wrong with it. That way,
I can
paint both at the same time. The next problem is that I have no mounting brackets. I do have the ones I had made for 71
T120Rs so I think I can drill a couple of holes and use those (I hope!).
BTW, the factory assembled the horns out of bare steel and then painted them. I will paint them inside and out so
they don't get rusty again.
November 11, 2020 I plated all the bare metal parts other than the main section and then put a coat of paint on the
sides that should have it. I have to find the right thickness gasket material, make gaskets, and then assemble.
Then I can adjust and do the final painting. Parts are arriving tomorrow for the side stand and for a better
handlebar switch.
November 12, 2020 Sometimes the simple becomes very difficult when working on old Triumphs. The frame to the bike and
the side stand that
came with it in the parts box were powder coated. To fit the side stand the power coating on the side stand frame lug
and the inside of the side stand pivot area had to be removed. That wasn't terrible hard. Once removed, I detected no
wear on the side stand lug � great!
The side stand that came with it was not OEM and not even a good replica. It had not facility for the stop bolt so it
would go against the frame and would be hidden under the exhaust. It was also a bit longer than an EOM stand, but that
would be OK. It was made like the OEM in that the pivot bolt should slip in the bottom, screw in the top and then be
locked with another nut. But, an OEM pivot bolt, and current pivot bolt and none in me collection worked so I ordered
what was supposed to be an exact copy of an OEM stand and supposedly an exact copy of an OEM pivot bolt.
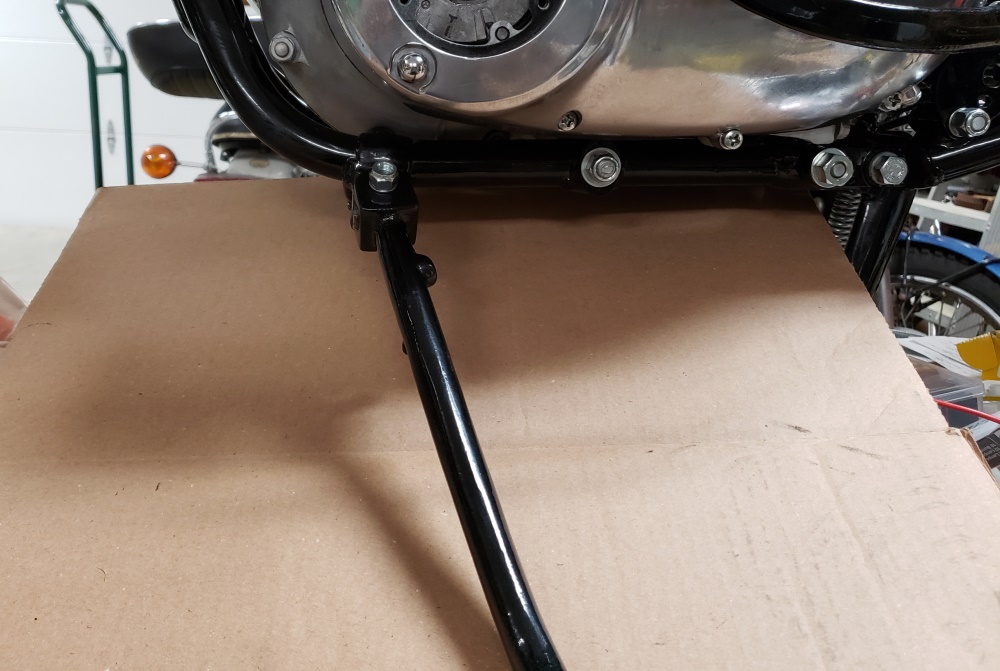
That stand arrived today. They are a LONG way from exact copies! The pivot bolt slips all the way though so you have to
rely on the lock nut to keep the stand on the bike and the threads are short so only a thin lock nut will work. I'll
live with that.
Look at the first picture with the stand installed � no way that will work. Since the frame lug looks perfect I didn't
want to touch that so for about three hours I filed the inside of the stand pivot testing every few minutes to see my
progress. After those three hours I was sure I was never going to get there and then realized that I had three Tridents
all with the proper OEM side stand and one was apart in boxes. Sure enough, put that one on and it worked perfectly so I
was now sure the stand was wrong.
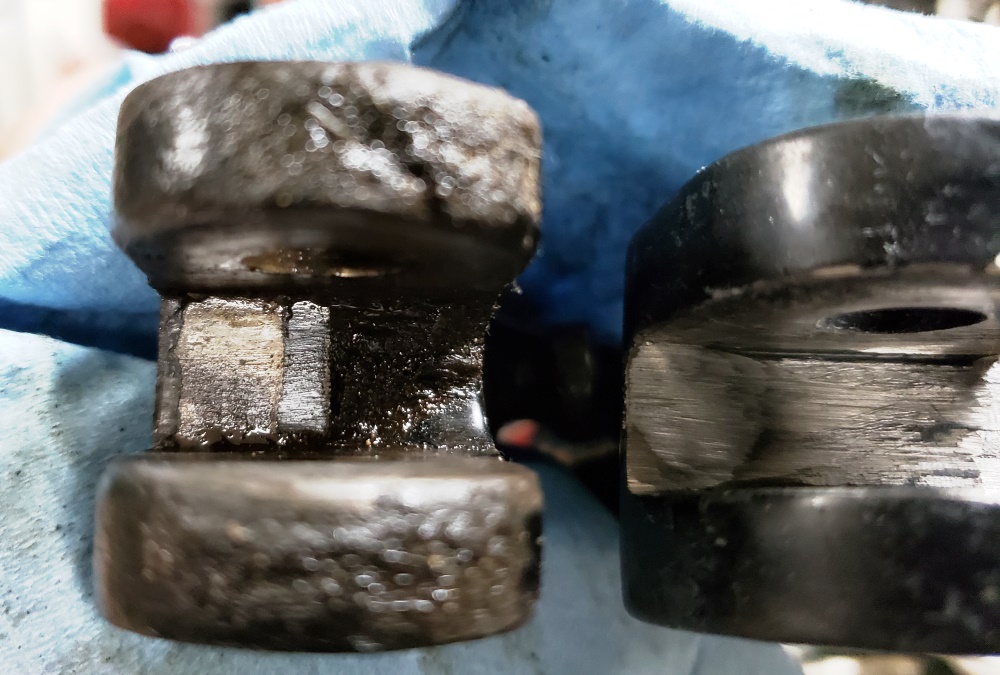
The second picture shows the pivot area of the stand. It's a little hard to tell in the picture, but the new stand is
cupped all the way across in the bottom and the OEM stand has a flat ramp on the front side that stops against the frame
lug and is cupped on the rear half. To make a long story short, I used an angle grinder to remove about 3/16" from
the
front edge and sloped it to near the middle to match the OEM stand. The third picture shows the result.

November 14, 2020 Cleaned and painted the insides of the new exhaust pipes. I've never figured out for sure that
painting the inside helps, but when I built my second Triumph, I made TT pipes for it and had them chromed. The guy in
the chrome shop told me to paint the inside with white spray paint. I've been painting them ever since, but today I
use very high temperature paint. I installed the timing side exhaust � for a change, that went smoothly.
Then I tried to install the clutch cable and realized that it had the wrong end on the engine end. So, I went off to
investigate.
November 15, 2020 It turns out that at some point in it's past, someone used a pre-1968 clutch actuator on this engine.
The actuator on top in the picture was installed and requires the ball-type end shown and a tall abutment. The actuator
on the bottom is the correct one for 1968 and later with the short abutment. Since I only have the new cable and correct
abutment, you guessed it, the exhaust and foot peg has to come off so I could install the correct actuator. Of course
the gearshift and kick start mechanisms must come out of the outer cover to get at the screws.
That's done and then I ran into the next problem. I bought new clutch and brake levers � they are JUNK! For one thing,
the pivot is simply a metric fully threaded screw and the hole in the lever is larger than the screw. I went through the
levers and parts I had and made a good clutch lever. I need to look a little more � the parts are all perfect, but the
actual lever is the brake side which works fine but the pivot nut is on top which looks weird.
At least I was able to actuate the clutch and adjust it (remember I forgot to do that before). The primary is finished
and both it and the gearbox, once again, are filled with oil.
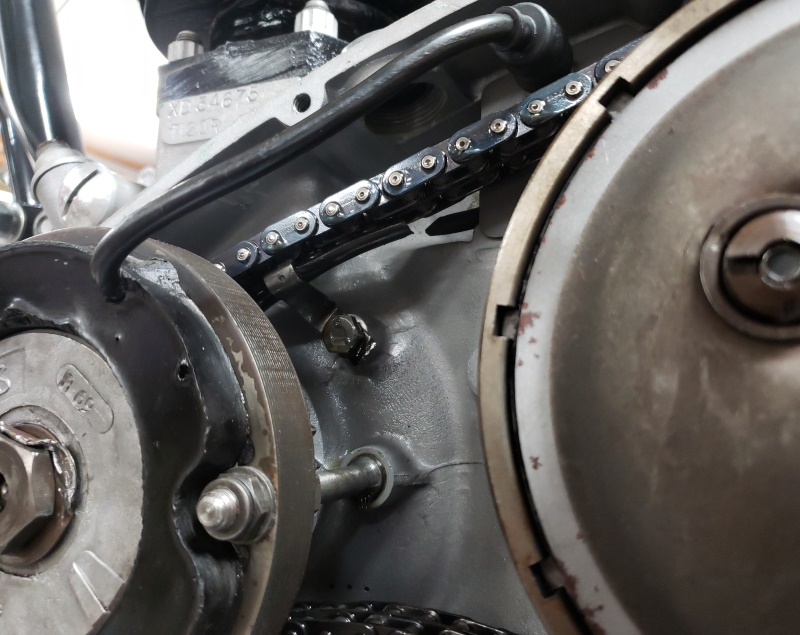
Next problem. I installed the drive side foot peg and it's bent. That wouldn't be hard to fix except that it's
powder
coated � have to figure out what to do about that since I don't have any spare drive sides pegs.
November 16, 2020 Finally some noticeable progress! Fortunately, I couldn't find anyone selling a good drive side foot
peg. I went in the attic and found a milk crate full of foot pegs! There were three candidates � all rusty and dirty. On
inspection, one was very bent, one was bent and way too rusty and one was bent and slightly rusty. I blasted it clean
and tried it on the bike. It was bent up and in but since it was bare metal I could fix it.
It took quite a while to find a way to hold it but I did. Then I heated it to dull red and bent it into shape. Finally I
blasted it again and then powder coated it � looks brand new and is properly aligned.
With the foot peg on, I could put the exhaust on � that went find. Just noticed in the picture that I didn't put the
front race on yet � that's a simple job. Now, if I could just remember where I put the intake manifolds I could mount
the carbs.
November 17, 2020 I finally remembered where I put the intake manifolds. The brand new Amal Premier carbs are now
installed. It sure was a pleasure installing them - I've done so many Nortons and carbs are a royal PITA to install
on a Norton! They are statically sync'ed. Still need to finish the horns, plumb the breather hoses, install
the front brake cable, and install the fuel lines. Then it can come off the bench, install the seat and tank, and
it will be time to fire it up!
November 22, 2020 For the last few days I've been piddling around with several small projects.
I finally found my big box of air cleaners but no clips. I cleaned and polished all the chrome surrounds I had, throwing
away many. I ended up with one perfect set, three very good sets, and two usable sets. About when I finished that, I
thought about one more place to look for the clips � I was having no luck finding them for sale reasonably. Sure enough,
I have a bunch including two brand new ones that are probably 50 years old but still look new. The black parts have been
blasted, straightened and powder coated. I don't have an filter elements so I can't finish installing the air cleaner
�
they are ordered.
I basically finished the horns, but they are the standard horns and the Bonneville wanted "snail horns". I don't
have
two decent ones of those so I ordered a set of Nikko horns that were sometimes used on Triumphs.
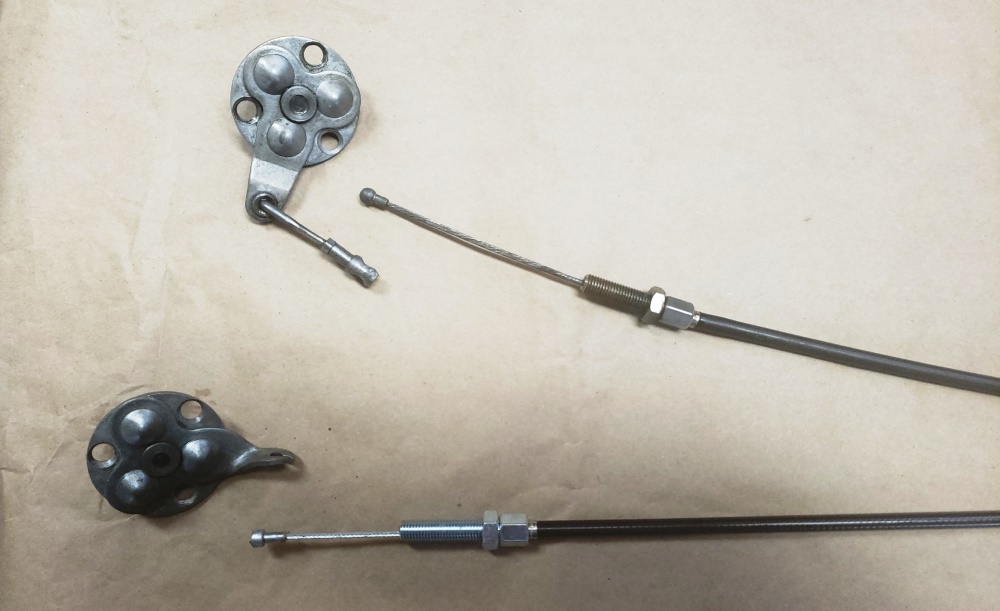
The front brake cable is installed and adjusted, but I don't have the pivot pin so I temporarily used a 1/4" bolt
� the
correct pivot pin is on order. Still need to make and connect the harness to the front brake switch.
The side panel needs to be painted but I forgot to sent it when I sent a bunch of Trident side covers so it will go in
the mail tomorrow along with one for the "Rebuild from Hell".
Once these last few parts arrive, I'll take it down, install the tank, and it will be time to tune it.
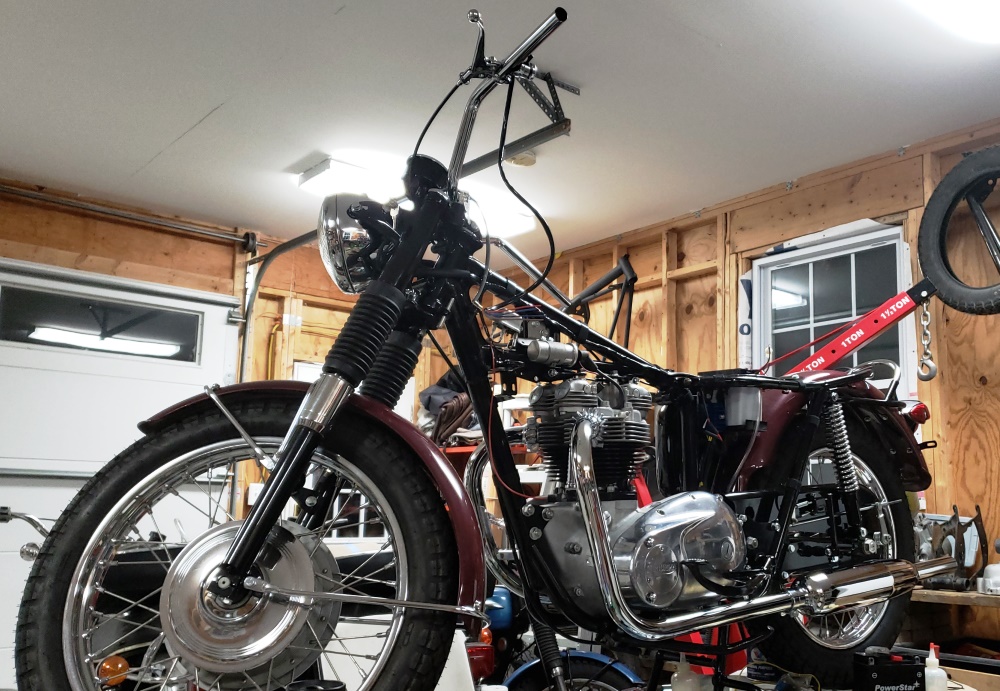
November 28, 2020 Still waiting on parts, but did received some. All the rubber parts are now installed
(foot pegs, passenger pegs, kick start, twist grip, etc.). Still waiting on the horns and breather parts.
December 5, 2020 The parts finally arrived and have been installed.
The breather system went together without problem.
The horns were more effort. The wires were bad, they were very dirty, and the paint was bad. That's all been fixed and
they work well. I originally was going to installed them with chrome covers, but the brackets are not long enough to
install that way and I didn't want to modify the bracket they attach to.
The only problem left is that the tach cable is a little too short and would bind when turning the steering fully to the
right � have to do something about that. I have other cables � need one about 1-2 inches longer.
I didn't like the throttle cable routing I had so I corrected it. In the process, I swapped the cables at the twist grip.
So, I need to statically sync the carbs again.
I plan to take it off the table tomorrow and put a Trident in its place that I've needed to finish for about three
years! If the weather is decent, I hope to start this one tomorrow .
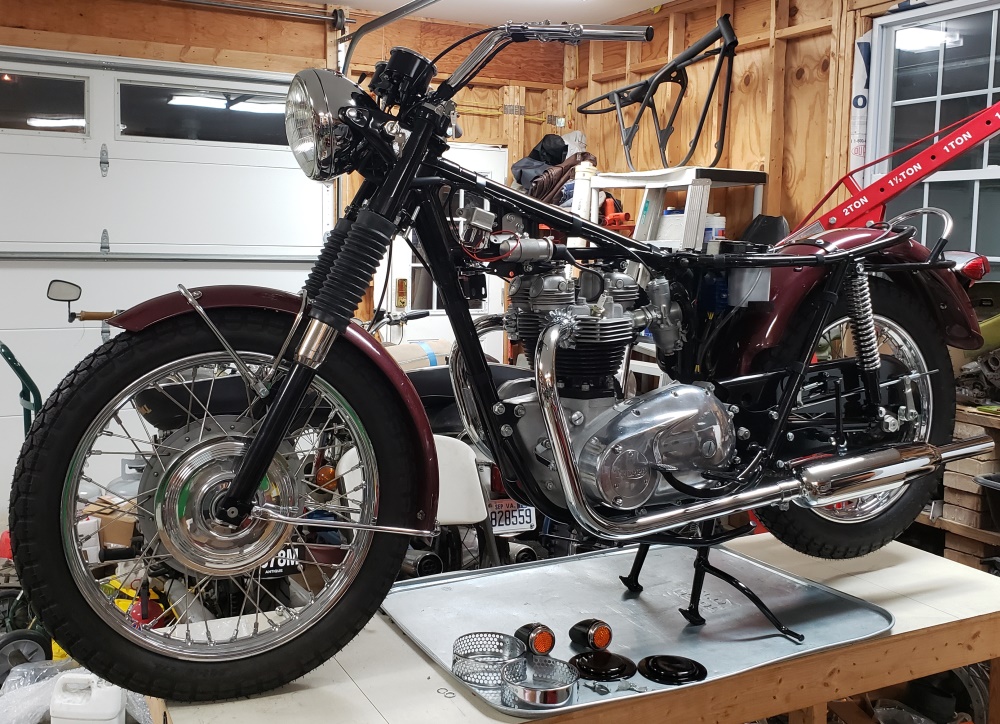
December 6, 2020 Big day - almost. Everything is done now except installing the tank and seat. The seal is no
issue, it has already been fitted.
Before I sent the tank of to be painted, I removed all rust, coated the inside with oil, and sealed it. The
painter found a problem with one of the front mounts and fixed it. In the process, he cleaned out the tank (don't
want to weld an oily tank). I didn't realize that he didn't reseal it before working on it and there was a
good bit
of dust and surface rust inside. I went at it with WD40 and a handful of bolts. That got it clean enough
that I would have used it if it were going to stay with me. Since I'll sell it, I decided to get rid of all the
rust again. It's too cold out to use my normal method that takes less than an hour so I've filled it with
Evaporust and will do it the slow way. After several hours, I'll flush it, blow dry it, and re-coat the inside
with
oil. The oil wouldn't be required if I were going to quickly fill it with gas, but I'll only put in a small
amount
to start with in case I have to take the tank off again. Another problems is that the perfect center strip I've
been saving for this bike is for the earlier bigger tanks - I've ordered one - let's hope it is right!
Anyway, the bike is on the floor for the first time and the Trident I need to finish is on the table.
December 7, 2020 The tank is rust free - that went well. The tank is now ready to go on - but it took some doing
to get there. I got an email this morning saying that the guy in the UK who made the center styling strips dies
and they are no longer available or OEM tanks. While looking for something unrelated, I found one - a brand new one
at that. It too a LOT of fiddling to get it to fit the tank right - about 3 hours. It too so long because I
was very careful to kink it and because the top seam of the tank is a little wider due to modern paint. Then,
the brand new hook for the rear I bought didn't come with a nut. It takes a 4BA nut. I looked for over an hour
in
my nuts and finally found one. Then it was time for the tank badges. I have quite a few originals and I have
a set of after market. I wanted to use the originals because they fit OEM tanks better. I chose the pair with the
best chrome and cleaned, painted, and polished them. I like them chrome with the Triumph black and no ivory
background so that's what I did.
I would have installed the tank but I forgot to get the front mounting studs. I probably have some somewhere -
that will be tomorrow's adventure.
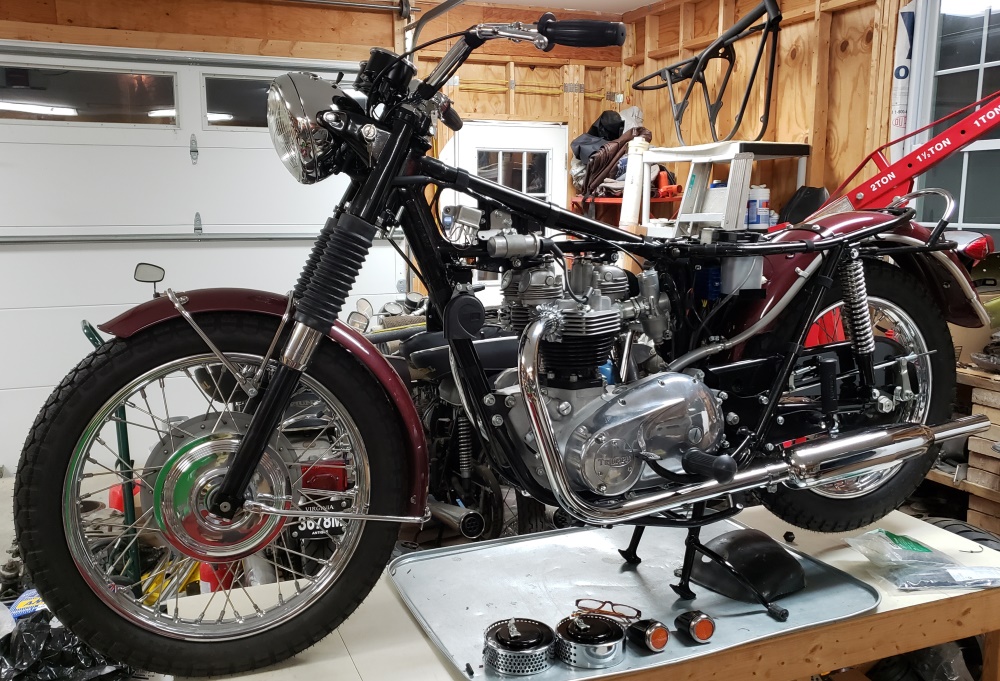
December 8, 2020 Obviously found tank mounting hardware! I'm getting real close now. Mounted the tank but forgot
the side markers (amber reflectors). They are ready - easy fix. Not sure how to run the fuel lines.
There's very little room between the petcocks and carbs. I'll probably switch from the 150 degree banjos I
currently have installed and use 55 degree banjos and run the lines more or less hidden. Still need to install the
mirror and seat check wire. Also, waiting for the side panel to return from the painter.
December 10, 2020 If a picture is worth a thousand words, a video must be worth two thousand words!
Starts easily, runs fine. Has a bad gas leak that scared me. It has new petcocks, new stat-o-seals, and new backing
washers � never seen that leak before so I was worried that the tank itself was leaking even though I tested before
sending for paint, and the painter tested as well. Turns out that both surfaces where the petcocks seal need work.
I checked before installing the petcocks but I should have put glasses on � 70 year old eyes just aren't that good!
I usually also use Teflon tape but didn't this time � that's probably good because they may have started leaking
later. I'm also hearing a louder than normal intake rocker on the left side � need to check that.
December 11, 2020 Used a fine file to flatten the tank sealing surfaces then reinstalled the petcocks and tested. That
problem is resolved. Also rechecked the rocker clearances - it was really the left exhaust rocker that was a little loose.
it's all back together and I'll take it out tomorrow to test and take pictures.
December 12, 2020 Needed to install the plate to ride it and couldn't find it. After some checking, I realized
that I titled but did not register this one. Just mailed in the paperwork and check to get antique plates.
One bad/good things about COVID-19 is that you can't go to the DMV and get this done, but you can do it by mail.
In the past you had to go to the DMV so being able to mail it is nice, but I wish I could get the plate today. You
can only go to the DMV now with an appointment. So, I'm stuck for now.
March 10 2021 Drats! First motorcycle weather when I could take this out for pictures - 70 degrees and I had a problem.
December 10, 2020 I started with "Starts easily runs fine". Today, wold refused to start - not even a pop. Went through
all the usual things - good spark, tickled fine, removed plugs and put in starter fluid - fired! Scratched the old noggin
for a minute and realized I had an air leak. This bike has the big o-ring and rubber washers/cupped washers mounting
system for the carbs. In the two months sitting, that seal was leaking badly. After tightening the bike would again start
easily. Of
course while trying things, I messed up the idle settings I had already worked out so I roughly set them as went for a short
ride int he dark.
March 11, 2021 Took the bike out today. Got gas and took it for pictures - see them below. Need to touch up the
idle mixture more and the idle is too fast when warmed up. Also, need to check the timing - it's only statically
done right now.
Also, I need to get someone who weights a lot less to test. The front end is too soft for me. If I were keeping the bike
I would needs heavier oil and possibly heaver springs. I think it will be fine for a 170-200 pound person.
Pay particular attention to the center tank trim. The guy who last made them died a while back.
There are none available in the world as far as I can tell. This bike has the last new one I had.
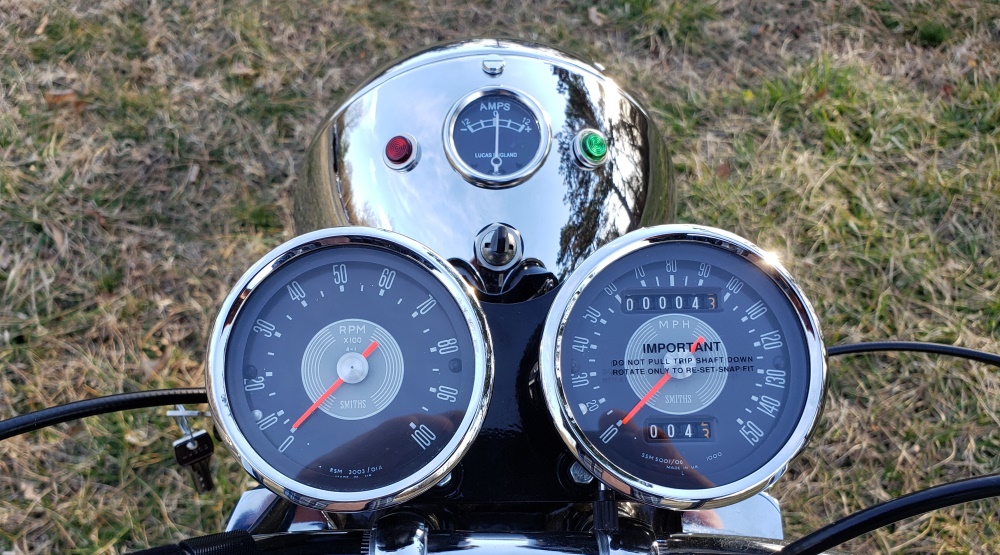
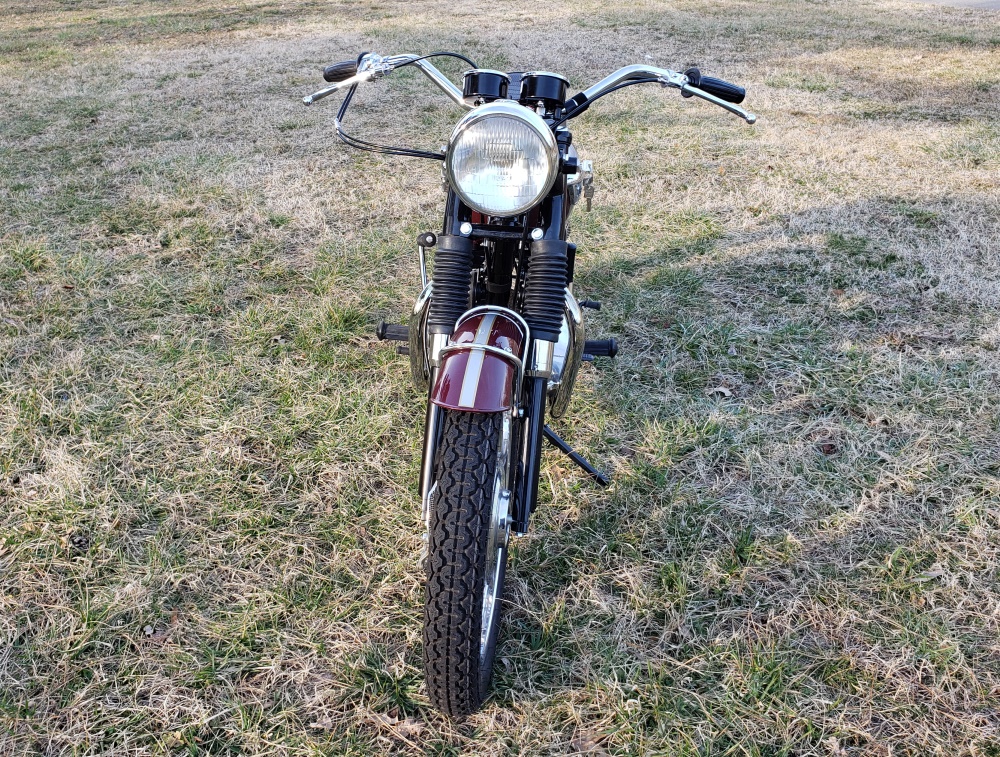
March 12, 2021 Happy 71st birthday to me! Finished up the idle, checked the timing and went for a ride. It's doing
everything it should so it's time to sell!
March 16, 2023 Well, I'm now 73 and this beautiful bike is still here! Since I no longer sell on eBay it's not advertised there and there's only been a little interest where it is advertised. I like the bike very much so I'm not pushing hard to sell. A few guys want it but they are poor and even though I'm asking way to little it's still out of their budget. The guy buying the two Nortons might decide to buy this too.
It went for a nice check ride today, and when it came back, I got help and got on to took it out myself - it now has 192 miles since being built. Absolutely love riding Triumphs!!!
February 7, 2024 Still here. Maybe I should double the price and list it - maybe people think it is too cheap!
October 26, 2024 A while back a guy came to look at the Trident I have for sale and liked it but also liked this bike. It had been sitting since February 7th and was running rough. Had help the last couple of days and he drained and refilled the tank and cleaned up the carbs. It's back to running great and the guy will come pick it up next month.
|