|
|
March 15, 2025 Coming March 19, 2025. I sold a 1974 Triumph Trident for a Norton
MKIII Commando partly rebuilt basket case and a little cash. That Trident is documented
here.
March 19, 2025 The MKIII arrived today. It has lots of new and restored parts and
seems complete. I haven't spent much time looking it over yet. The gearbox needs
to be built and I'll do that first. The bottom end of the engine is built and
in the frame. The cylinders are bored - haven't looked yet if they need to be
painted.
It is a black, matching numbers Roadster.
Started on the gearbox. Other than a couple of studs and nuts everything is there
and in good shape. However, the shell looks "rider good" and when I rebuild
a bike I want all cases to look new. So, I've stripped it and have started my
beautification process. Normally, that would only take me an hour but working one-armed
really slows things down!
March 20, 2025
It's always interesting and always different when you start on a bike. Besides
the actual beautification process, I makes sure that every threaded hole is open
clean and the stud, bolt, or item that screws into each hole will go in with
fingers only. Since I had studs keeping the holes clear for the seven studs
that hole the inner case to the shell, an old drain plug in the drain
hole, and an old neutral switch in the neutral switch hole, those holes were
easy. That only left the index plunger housing, selector fork shaft, and some
checking:
- Index Plunger Housing. That hole was easily cleared with a bottle
brush.
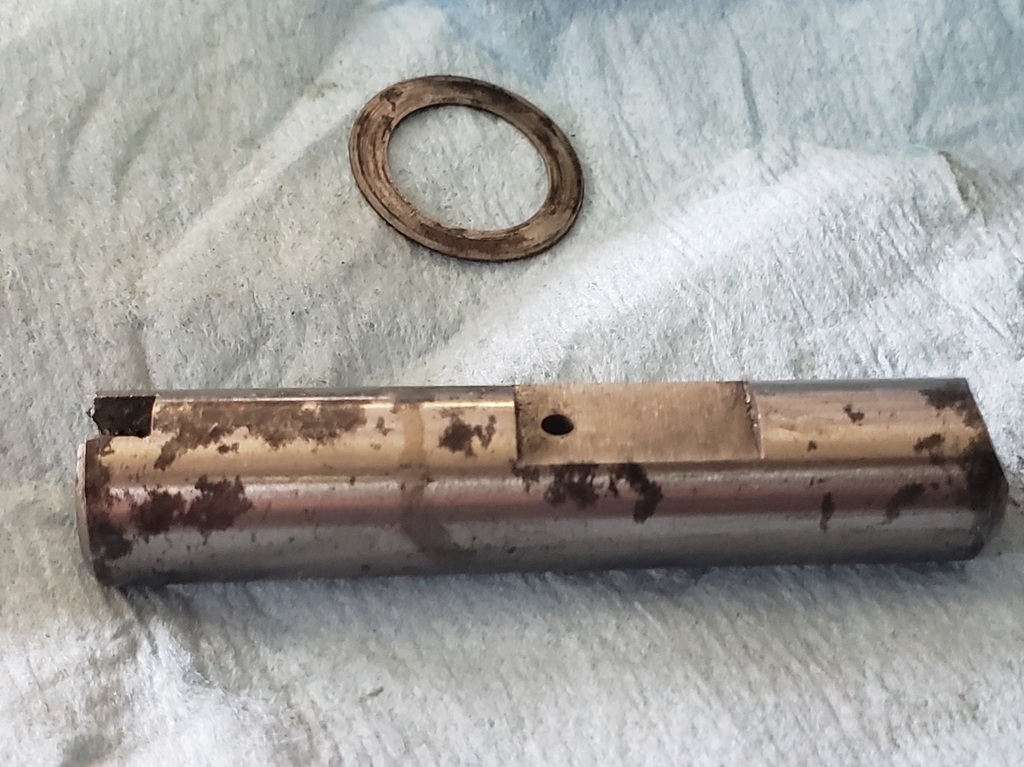
- Selector Fork Shaft - see the first picture. the four on the left are correct,
the one on the right came with this bike and was poorly hack sawed off. It did
not want to start in the hole and would not start from the outside either. So, I
used on of the other ones I had. Rough starting from the inside but started
easily from the outside. Used it to cleanup the first couple of threads on the
inside. Now all four of the good ones start and thread in without problem from
the inside and the ones that came with this bike is in the metal recycle bin. I
have no idea why someone shortened it!
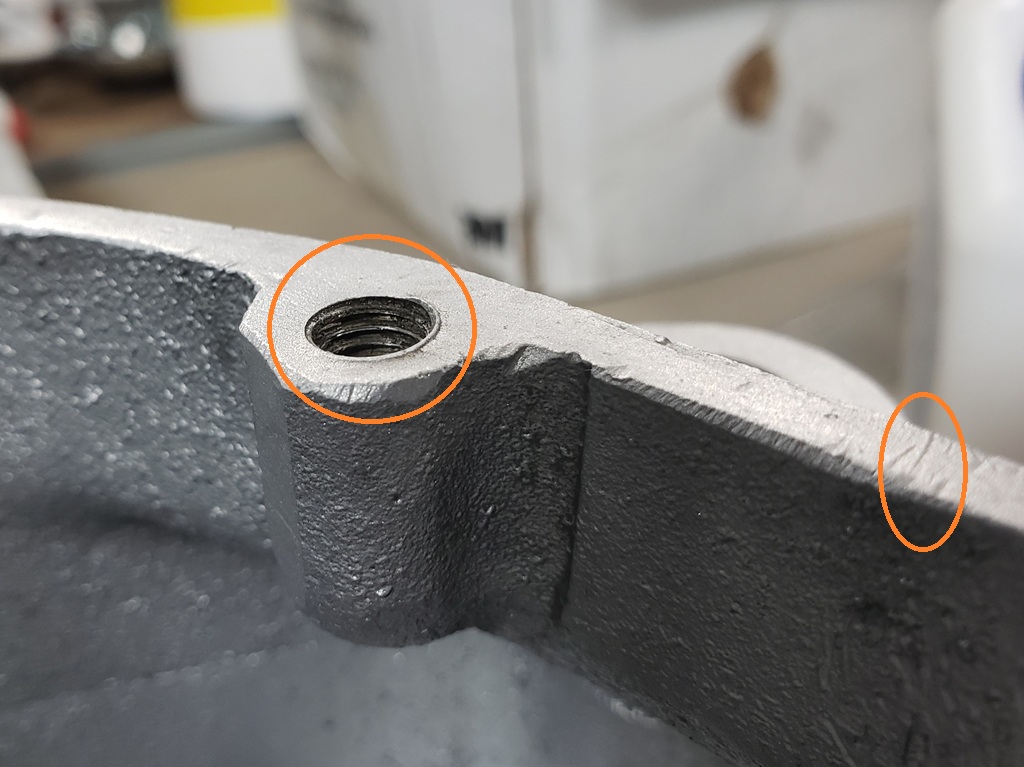
- The second picture shows the other issue I encountered. At some time in it's
life, the nuts were overtightened and raised a lip around the stud (orange
circle). Also, there were scratches in a few places across the mating surface
(orange oval). Finally, with the location studs removed (PITA), there was a
.002" gap between the shell and my surface plate. A few seconds with 120 grit
paper, about one minute with 220 grit paper, and about two minutes with 320 grit
paper and all is resolved. With a good gasket, it probably would have sealed but
now I know it will.
- Now I'm stuck for little while. The camplate switch "button" is
badly scored and I'm out of stock on them so I have to wait for my next AN order
to be able to assemble the gearbox. I have quite a few used camplates but none with
the MKIII neutral switch "button" in usable shape.

March 27, 2025 I've had a lot of medical stuff going on for my knee replacement
on April 1st. It's still not confirmed that it will happen – PITA! I've
been rebuilding the gearbox as I've had time.
The quadrant "button" for the neutral switch was badly damaged and I didn't
have one, so I order one. That is now installed. The neutral switch that came with
the gearbox was missing one terminal, so it had to be replaced. I stock the Lucas
switches, but they do not work "out of the box". I learned/fought that
on the last MKIII gearbox rebuild. This time I was stuck. The original switch plunger
sticks out of the switch body about 3/16". The Lucas one sticks out about 3/8".
With it adjusted so it just closes, it will catch on the "button" and
prevent you entering neutral. It took two tries, but I cut the plunger in half and
used a Dremel and fine sandpaper to put a smooth ball shape on the remaining plunger.
The first try came out too short and the switch would not close. On the second try
I got it perfect. Now with the switch adjusted so if just closes when on the "button",
it does not touch the quadrant in other gears and hits the "button" part
way up so no binding. With the plunger as supplied the binding between the plunger
and switch body was way too much.
Next problem. The bike came with three main shafts. One is clearly used and form
the middle to the two ends is off by 0.040". the next looked nearly new but
was off 0.020" The third is new from Andover Norton and perfectly straight.
Another problem. The bike came with two layshafts. Both are in perfect shape except
that someone turned the bearing end down slightly – probably to make the slip into
the original ball bearing. The inner race for the layshaft roller bearing would
slip on easily. They probably would have worked and with bearing set they certainly
would work, but I didn't want to wait a day for that to set up. So, I got a
layshaft from stock and used that.
March 28, 2025, Got a call today, the surgery is on for Tuesday. Of course, I was
told that the scheduler would call in the afternoon today and let me know what time
to be there – didn't happen!
More gearbox troubles. See the video below. I really need a phone stand! Anyway,
the kickstart shaft and its bushing that came with the bike are not usable. The
shaft OD measures 1.121" in one direction and 1.123 in the other. The bushing
ID measures 1.128" and is round. Also, the pawl is the most worn I've ever
seen!
I checked a new shaft, and it is 1.122". I went though my bushings and found
a good one with an ID of 1.126". I found a good used shaft in my gearbox parts
that is 1.122" and it has a like new pawl.
OK, time to check/correct the layshaft end play. It has .055" so too much.
Of course, I can't find my collection of shims, so I ordered more from McMaster
Carr and the gearbox is on hold for now unless I find my shims before Monday.
Next problem. The sealing surface of the inner cover was worse than the shell, so
I corrected that and went about checking the screw holes used to hold on the outer
cover. Two holes were fine, one had to be chased since the screw would only go in
about 3/16", I thought I would have to HELICOIL the others as the first part
of the threads was bad, but once chased the more internal threads are fine so it
will be OK.
March 30, 2025 Since I'm stuck on the gearbox until shims arrive, I started
on the engine yesterday.
I expected the bottom end to be ready to go but when I uncovered it, not so much.
Basically, greasy grimy gopher guts! With basically no right arm and a hurt left
arm, getting it out of the frame was not fun but I did it. I was able to do it because
my steroid shot from Thursday morning had not worn off yet; but, of course I hurt
both arms more in the process.
Next was getting the timing side apart. What a nightmare! The camshaft nut would
not come loose with my longest breaker bar, even with a fork tube to extend it.
Then I tried heat - no help. Then my air wrench - no help. So, it was time for the
big electric driver capable or 450 ft. lbs. I have never found anything to resist
it and this was no exception. It came right off. OK, now onto the drive worm gear
on the crankshaft - the big gun was needed for it as well. OK, home free? Nope!
I had three pinion pullers when I started. My very old Triumph one that I modified
to work on Triumph and Norton - it broke. Then I had
a Norton one that I modified to actually work (the "legs" are too thick),
it broke. OK, last try. I had a new Norton puller I got when I bought someone out.
Of course, it was too thick to work so after a bunch of grinding I finally got it
to grab and thankfully it pulled the pinion without breaking! Another interesting
thing is that the
outer camshaft bushing was very loose in the case - I'll have to figure that
out!
Whenever I'm rebuilding a Norton other than 72/73 750s, I send the cases to
Colorado Norton Works for their breather upgrade. To save time and accomplish something
while in the hospital, I'm going to have them do the case cleanup as well. So,
I stripped everything from the cases today and they are box and ready to ship tomorrow.
The insides of the engine are so grimy that I assume the crank needs to be cleaned
out so that will be the next step when I'm able. The first picture below is
after I got the parts out and cleaned up a lot of the grime!


May 4, 2025 Before my knee replacement surgery I did take the crank apart and
cleaned/inspected it. It’s I good shape. I couldn’t put it back together because
I didn’t have the stud/nut set. Those parts came in the day after my surgery.
I’ve only been to the shop a couple of times before today to get things. Today
was the first day I worked on something there. The gearbox is assembled except
the outer cover. The gear ratchet plate is missing (or I haven't found it) and
the outer cover is not only ugly, but someone drilled out the location pin
holes. Those two parts are expensive, so I'll check options before ordering
new.
So, I can walk, get in the car, and drive. Everyone says I'm doing great. I
hoped to be a lot further along at this point!
May 18, 2025 Lots of doctor appointments a little progress but not much. I had to
cancel my shoulder replacement for now since I can't get up fro a chair without
arms and I will lose use of my right arm from three months after the surgery.
I got the parts I needed to finish the gearbox including a new outer cover from
Andover Norton. I was quite disappointed in it. It's functionally fine, but
I ended up spending a lot of time polishings it. It was not the quality I'm
used to form Andover Norton! By the time I had it looking acceptable, I was out
of steam.
May 19, 2025 I'm moving like a snail, but I did get the gearbox finished today.
May 20, 2025
I spoke too fast yesterday. I had put the outer cover on the gearbox and tested
the gear change, but I had not tightened but the screws. Today, I took out the crappy
original screws and out put in stainless Allen Cap screws with anti-seize. First
I tightened to 30 in-lb. - no problem. Then when tightening to the final torque
of 50 in-lb, the bottom three all spun in the threads. See the gearbox section of:
Norton
Torque. Fortunately I had a 1/4" BSF thread repair kit so I installed
inserts in all three.
I put in 5oz of 80W90 and turned the gearbox every which way. Since it will likely
sit for quite a while, before installing, I'll drain it and once in the bike,
fill it properly.
That done, I finished cleaning up the crankshaft and put it together with a new
stud and nut set, but I haven't torqued it as I'll have to have help to
do that with my bad shoulders/arms.
May 23, 2025 Next issue! I work on way more pre-MKIIIs than MKIIIs. I always use
a new stud/nut kit when I reassemble the crank. The MKIII set is supposed to have:
1 – 06.5671
4 – 06.6609
2 - 06.6607
but had:
1 – 06.5671
6 – 06.6609
0 - 06.6607
I didn't notice it when I put it together but I was wondering how the crank
was
aligned to I checked - oops - AN made a rare mistake.
Fortunately I had two 06.6607 in stock and put them in.
Now for the real shock! I was able to torque it. It took forever getting situated
for each so I had the strength to do it without too much pain.
Then I started on the conrods. They are in decent but ugly shape so I'll clean
and buff them. The disappointing part is that the shells were clearly put in the
rods without cleaning and the shells that are probably nearly new are not good.
Fortunately, the journals are good and I have a new set of shells in stock.
May 24, 2025 Cleaned up the conrods and then installed on the crank. I did my usual
tests and the rods feel perfect on the crank. I didn't worry about a mirror finish
on the rods, but they are clean with no stress risers.
May 25, 2025 My plan for today was to go to the shop rested and put the bottom end
together. I partly accomplished that. First job - find the camshaft in one of the
boxes. Found it - too poor condition to use and I sold the last one I had in stock
so the bottom end could not go together but I continued on.
Installed the main bearings, crankcase location dowels, top studs, and timing intermediate
gear spindle. I mentioned on March 30th that the outer camshaft bushing was loose
in the case. I had two new bushings in stock, and they were a proper fit in the
case so I installed them after checking that they fit the old camshaft well. Of
course, once in they shrunk and the camshaft would not go through them so I broke
out the 7/8" reamer and corrected that. Then I put the cases together with the old
camshaft to check that it would spin freely as it is easy to put in new bushings,
ream them and then be out of line. This time it was fine.
I put a camshaft on order so I'll be stuck now until Wednesday or Thursday. I
guess I'll use the time to inspect the cylinders and pistons to decide what needs
to be done there. At a minimum I think they will need to be painted.
May 26, 2025 Only a little progress today. The cylinders are bored .040" over and
they have been painted but need some touch up. The tappets look good but have a
slight mark across the face. Since I'm installing a new cam, I'll surface
them. The tappets were not moving smoothly in the tunnels - a small amount of rust
developed. That's easy to cleanup. There are some small spots of rust on the
bottom
of the cylinders (not in the bores) so I'll probably give it a light blasting
to cleanup the tunnels and those spots and then will give it a new coat of paint.
Also, the top gasket surface is stained - I'll spend a little time with fine
sandpaper and the surface plate cleaning that up.
May 28, 2025 One step forward ... The bike came with cylinders bored and honed to
.040" based on a pair of good used pistons. Those pistons came with a set of
Hasting-type new rings installed and there is a set of new Hastings rings as well.
I normally install a new set of Hepolite pistons but decided there was no need in
this case (or so I thought).
The piston marked left was in pretty good shape and only had some minor marks on
the skirt but also had some minor dings in the bottom edge of the skirt in-line
with the pins. Spent about 30 minutes removing those dings, polishing the piston,
and then cleaning it well. Next I checked the skirt clearance. A .003" would
go but not a .004". I like .004"-.005" on fresh bore and hone
so I wasn't pleased but could hone it for better clearance. Then I started on
the other piston. One circlip was broken off in the piston and after an hour of
trying to get it out, I gave up on that set of pistons.
I had a new set of .040" over Hepolite pistons in stock. I checked the skirt
clearance: .004" went in and .005" would not so that was good. Then I
checked all the rings gaps and they were all in spec.
May 30, 2025 I'm feeling like I'm 90 this evening.After spending the morning
on
customer IT issues, I went to the shop at noon with my stepson who was visiting.
He did lots of work, I sat a lot and did what I could. We were at ti for seven
hours.
I've been wanting to rearrange the shop for a long time, and he wanted to get
back to rebuilding his 74 MK2A. We finished the power unit months ago and he had
his frame painted so it was time. But first, we needed to get my 74 MK2A off the
table and on my lift so we could use the table for his bike. This caused moving
every bike in the shop at least once. Once all that was done, we installed new steering
bearing and then put his power unit on the now free table and lowered the frame
over it. Now when he comes to visit he can make progress on it and if I have free
time I can do some too.
So, I didn't accomplish anything on this bike!
June 1, 2025 Progress! The bottom end is together and the engine is on the stand
and lazy susan. I started on the timing chest but am stuck for now waiting for some
parts from cNw. When they machine the cases for the reed valve they also do Jim
Comstock's timing check mods and they were out of the plugs I need to install
- that can't be installed with the timing chain installed.
The cradle is powder coated which I really don't like. It was masked more or
less per the Old Britts instructions but all the washers were too big. So
painting the bare areas is a mess. I love power coat - just not on cradles. If
I had another MKIII cradle I would put this on aside and use it painted it like
I always do. I may scuff up the powder coat and paint the whole thing - haven't
decided what to do.
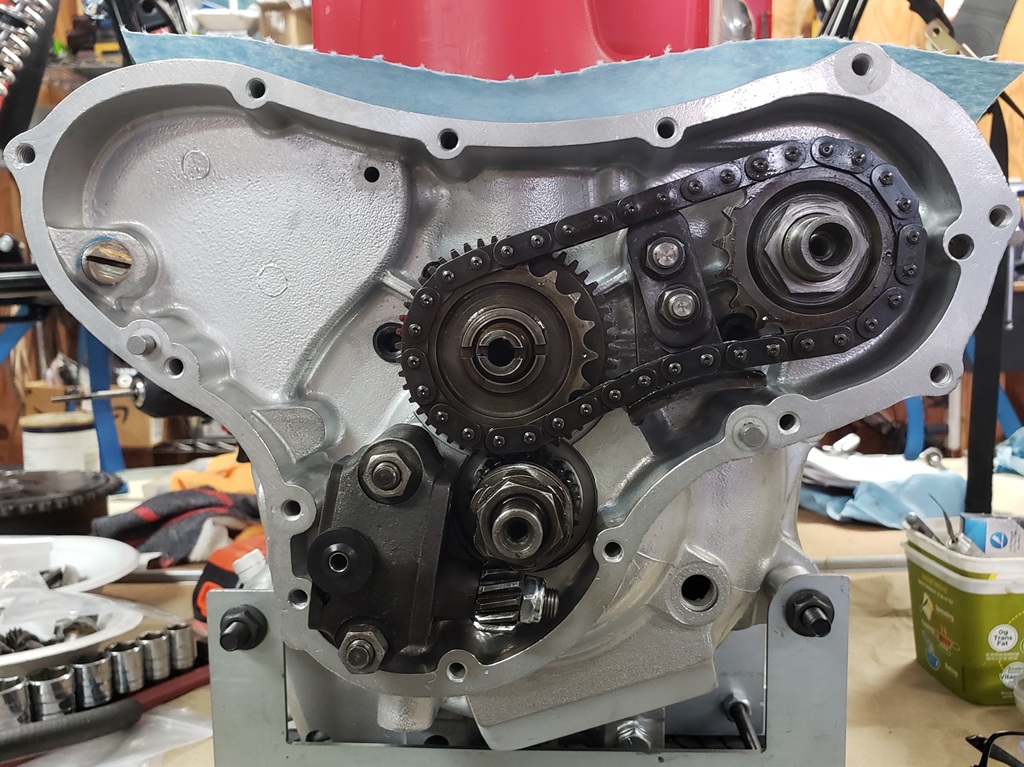
June 2, 2025 Not a lot of progress. I cleaned up the timing chest parts, installed
the missing chain adjuster studs, and checked the oil pump. The oil pump was clogged
and not turning right. The screws were the tightest I've ever come across. Finally
got them out. The internal driving gear is damaged and I don't have one so I
spent the next hour searching eBay and making offers on oil pumps. Besides this
bike I have two more to build and there's a chance they will need pumps too
so I'm trying to buy three.
June 3, 2025 Well, that dummy doesn't understand business so I found three more
oil pumps for a little less! Attacked the cradle today - took forever. After cleaning,
I sanded it all with 220 grit paper. That barely touches powder coat but does
help with the transition from powder coat to bare metal. Then I changed out the
bead in my blast cabinet for glass abrasive. That got all the bare metal ready for
pain and improved the powder coat surface more for paint. Then after a through cleaning
with denatured alcohol and blowing with air, I masked it for paint. I use VHT Gloss
Rollbar and Chassis paint. It requires no primer and is tough an heat resistant.
All coats must go on within an hour or you have to wait seven days for the next
coat. I was way too tired to do the painting today
- probably tomorrow.
June 5, 2025 Got all setup to paint the cradle and then it happened. Big ol me hit
the concrete floor very hard. The heaviest impact was my left hip (bionic), left
ankle took damage, left toes bent under and scraped, and left knee (replaced April
1st) whip-lashed. So, there I laid surveying the damage and wondering if and how
I could get up. My medical alert that is supposed to detect falls didn't. I
pushed the button - crickets. No point in yelling for help - no one to hear. So,
after about 30 minutes, I got finally got to my hands and knees which is really
not fun with my knees and using a chair and a storage bin was able to get off the
floor.
After sitting a long time I finally decided to at least get the cradle painted
since the humidity was scheduled to be high for the next three days. It's done
and I hope I did a good jobs. So, my knee that didn't hurt now hurts like hell.
My ankle is swollen but I think OK. My bad left shoulder is worse and my really
bad right shoulder is even more bad now.
June 6, 2025 Sleeping last night was a non-starter. Was in pain no matter how I
laid. the only pain killer that actually works for me is aspirin but I'm not
supposed to take it. Around 4am, I took 1000mg and finally got some sleep. I'm
somewhat better now but walking is difficult so I didn't work n the bike today.
June 7, 2025 Worked in the shop for a few hours but no on this bike. My stepson
was here and we worked on his MK2A.
June 8, 2025 The cradle paint was hard enough so I installed the gearbox in it.
I'm hoping the parts from cNw arrive soon so I can attached the engine to the
cradle.
Once again I figured out how to torque the bolts with bad shoulders - ouch!
The used oil pumps I ordered arrived yesterday. Both need servicing and one is from
a
pre-Commando
but has the "6 start" drive gear so it will work. It normally takes me about 30-40
minutes to fully service a Commando oil pump. The first one took over two hours!
The last "person" to service it was a gorilla and it had a bunch of RTV in it and
it would not turn a full revolution. Once I got it apart, I had to dress the driving
shaft (mushroom'ed) and replace the
un-driven
shaft as well as the return driven gear (why I keep old bad pumps). I surfaced all
surfaces and put it back together - it feels great!
Once I had that one done, I was too tired to do the other.
June 9, 2025 Restored the second oil pump - that went a lot easier!
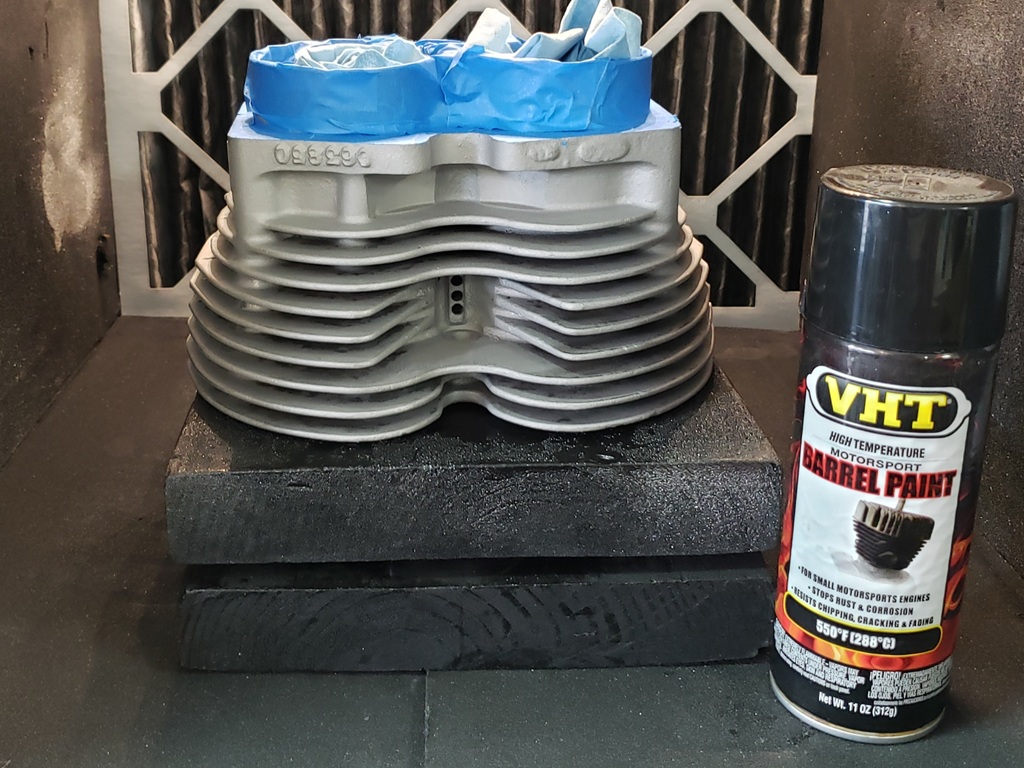
Round and round she goes where she stops only the surface plate knows! I mentioned
before that the cylinders are nicely bored but must be repainted. If the cylinder/head
mating surface is not flat, it must be corrected before painting or the paint will
be damaged on top when surfacing it (unless you're lucky enough to have a mill).
I was shocked that the area between the cylinders was .0015" lower than the
outside. So, 150 grit paper on the surface plate and 90 minutes of rubbing/twisting,
checking and repeat. The surface is now perfect. The center is still stained but
the surface is flat. The cylinders are
now masked for blasting - I don't want the nicely honed surface hit with glass
abrasive. Once I get all loose paint off, I'll wash in hot soapy water and
immediately blow dry and oil the bores. Then mask again and paint with VHT Gloss
Barrel Paint.
June 10, 2025 The parts from cNw arrived today and they are installed as well as
the rest of the timing side except the cover - I can't find that. There are
a
lot of boxes and bins of parts for this bike and going through them looking for
parts is hard for me right now. I should have emptied the bottom of the mobile
table I'm using and put the parts for this bike there. After all, that's
why I
built the tables that way!
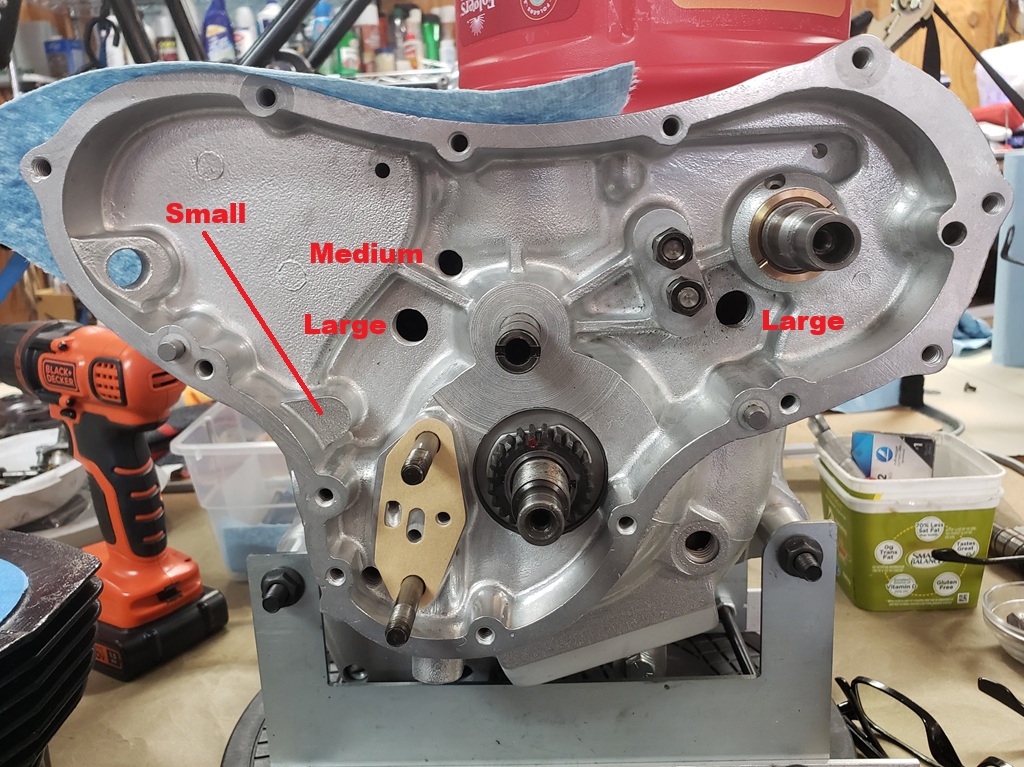
Look here.
The cNw breather kit comes with four black plugs you install in the timing chest
along with a steel one with a chrome end to replace the original breather connector.
There are two large, one medium and one small plugs. The MK3 cases already have
the spot for the small plug blocked off so it is not used.
The first picture shows where they go (with red Loctite) and the second shows them,
the breather plug and timing parts all installed.
June 11. 2025 Surprise, surprise. I planned on just blasting the cylinder bare and
rust spots. However, the paint is weak and most was coming off easily. I spent about
40 minutes on it until my new knee could take no more. It is mostly bare metal now.
Next time I feel up to it, I will inspect and blast the rest off. Then I installed
the cNw breathers. Another surprise: the MKIII oil tank breather return is 1/2"
so the cNw breather is also 1/2". The older ones are 3/8". So, I ordered
some Gates 1/2" SAE 100R6 transmission oil cooler hose for it. I was shocked
how the price went up! The same hose in 3/8" that I bought 25' last cost
$65.00 - this 3' piece cost $21.00
June 12, 2025 Well, when I looked at the cylinders in good light it was time to
try again! They are clean now and in the paint cabinet on the Lazy Susan but I was
too tired to do the painting today. Normally blasting and painting cylinders is
a few hour job, but between my foot, knee, and hip and bad shoulders everything
is hard!
August 9, 2025 All hell broke loose on June 13th. I was coming home from PT planning
to finish the cylinders. Then my phone started ringing frantically - my last remaining
IT customer was completely down. To make a very long story short, the first three
days I did not sleep at all and I had them partly back in business.Then for the
next seven weeks, I worked an average of 18 hours per day, seven days a week except
for doctor visits. Sitting all that time took quit a toll on my health. Along the
way, a bunch of other life events got in the way.
Then I was trying to help my stepson with rebuilding his MK2A and needed to powder
coat the bottom of the triple tree. It became clear that my oven no longer worked
right. After searching for a replacement to no avail, I decide to rebuild
it. I finished that today and it is now much better than when new. I bought it
for $99 and just spent over $150 rebuilding it!
Tomorrow, I plan to cleanup the shop a bit and then get back to this bike. Of course,
I'm moving like a 90-year-old so even that little task will take time :-(
August 26, 2025 OK, lots of delays. August 11th I was working at my computer and
all of the sudden the screen seemed garbled - I could not see anything clearly,
I had go to the bathroom and when I got up I realized that my head was also garbled.
Bounced off the walls getting to the bathroom. Again, bounded off the wall getting
back to my computer. At first thought that my pacemaker was screwing up, but I was
still able to think so I started thinking stroke and needing the ER. I tried to
get my wallet and keys as I always drive myself to the ER but realized that I couldn't
find them or the door to get to my car so attempted to call 911. Couldn’t see the
screen to dial and forgot to push the help button on my medical guardian device.
I finally hit enough keys that the screen turned red and 911 answered. The rescue
squad got here quickly and took me to the ER. There is a LOT more to tell, call
me if you want to know more about our screwed-up medical system. Anyway, I spent
two nights in the hospital and left with no diagnoses other than the neurologist
was fairly sure I didn't have a stroke and the pacemaker technician verified that
there was no issue when this happened and that it was working right. I have extreme
double vision - two perfectly formed images when I left the hospital, but my head
was clear. Yesterday, the double vision went away so I'm back to 75-year-old-normal.
The past 45 days have been hotter than usual and much more humid than usual so painting
the cylinders could not happen. They were blasted three different times due to rust
and on close inspection today, they were nowhere near clean enough. Apparently in
the past they were painted with very tough paint on top of dirt and rust. I scraped
a lot, blasted with #75 glass abrasive (my go to), switched out to garnet, changed
the jets and nozzle in the sandblaster, and still they were not clean. So, folded
up 100grit paper and a long effort and then back to blasting. Finally clean enough.
They have been masked, and I will paint tomorrow. Fortunately, last time I bought,
I got several cans of the paint - they have quit making it :-(. This paint requires
all coats to be sprayed one hour. I will spray a light coat and then two heavier
coats with it upside down as shown, turn it over and do one light coat and two heavier
coats. Then I will do straight on coats and use pipe cleaners dipped in paint to
get to any bare spots.
This paint is excellent and easy to work with as long as you follow the instructions.
Inevitable, it will get some chips before the first start - a small brush dipped
in a spray of the paint will easily fix them. Once the engine is started and up
to temperature, this paint is VERY tough.
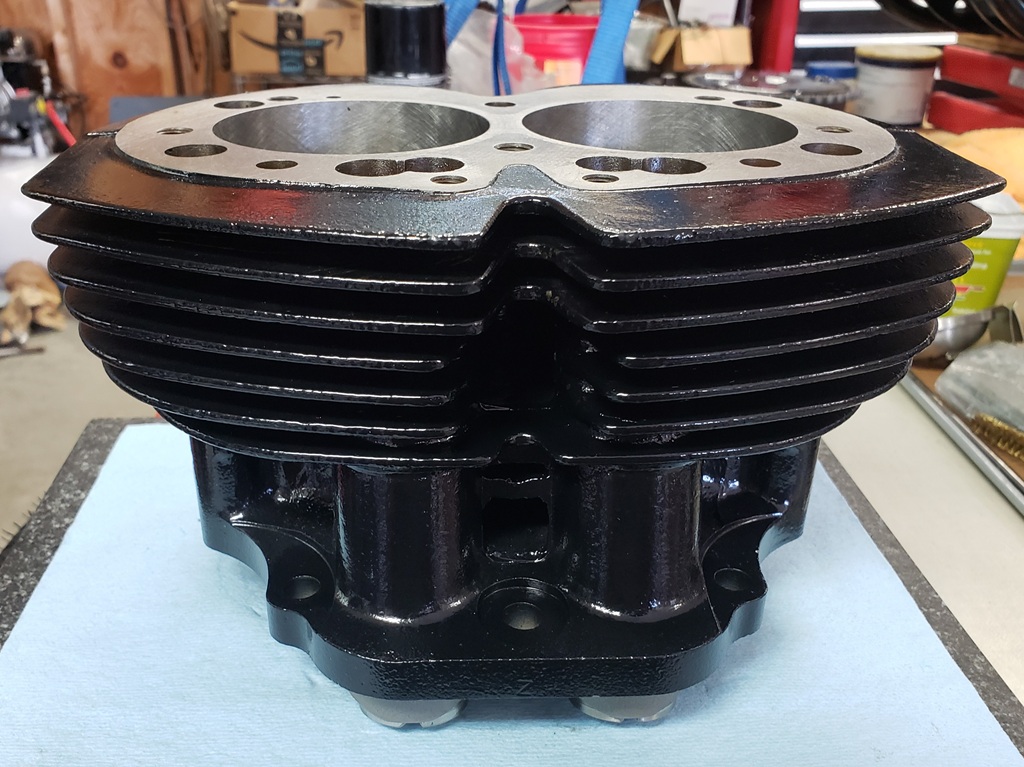
August 29, 2025 The cylinders are finally painted so once the paint hardens up,
I can install them.
August 31, 2025 the cylinders have been washed in soap and water, dried, oiled.
The tappets have been surfaced and installed. I was getting
rig them to put them on when I realized that I have not found any of the
hardware! For a bike just needing to be assembled, I keep hitting this sport of
roadblock!
September 2, 2025 It's not true! Things can escape from black holes. I had
all the cylinder hardware in stock except the four stepped studs - the black
hole in my shop is always swallowing things, but today it gave up the studs I
needed!
I did a terrible job taking the picture, but the first picture shows the
cylinders hanging from my engine hoist ready to put the pins in.
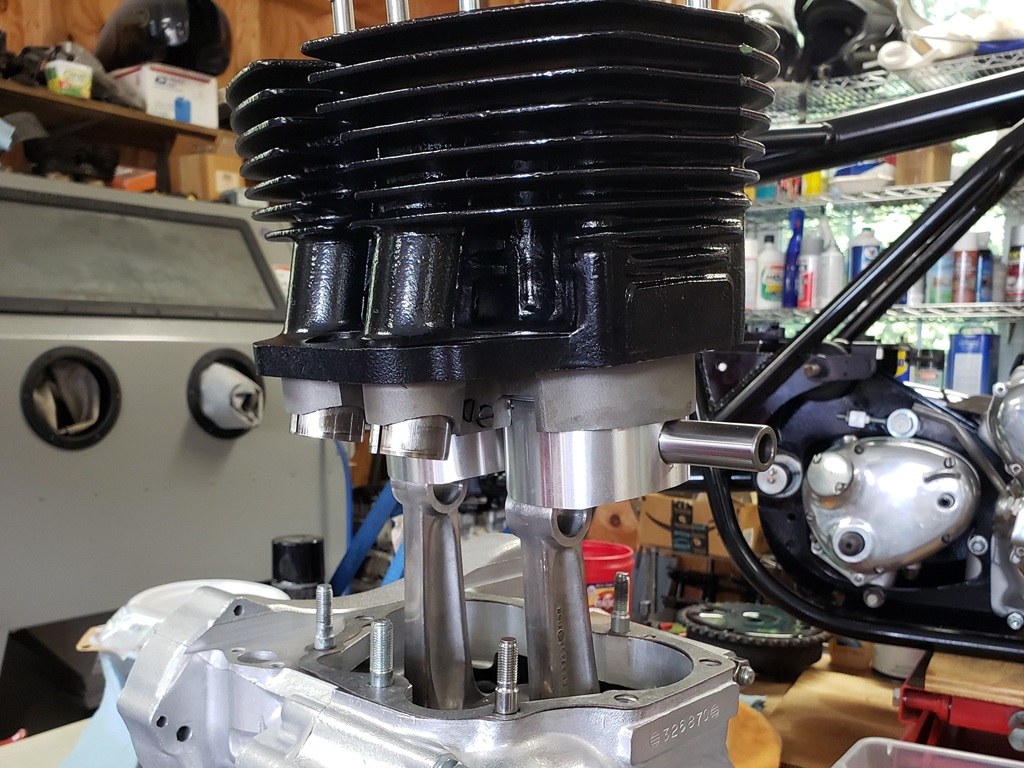
September 3, 2025 I put the cylinders on yesterday but didn't torque them, I
did
that today. It's comical watching me with two bad shoulders and having to hug
the engine to hold it :-)
Then started the search - I need to put the timing cover on so I can lay the
power unit on it's side and put the frame over it. After a lot of searching
through boxes, I found the cover but not the anti-wet sump valve. That took a
LOT more searching.
The timing cover is very nicely polished but the inside is very dirty and the
gasket surface was really not good. About an hour on the surface plate and the
gasket surface is now good.
You'll probably noticed the took on the end of the crank I use to turn the
engine. I wanted to put the rotor nut on to keep it in place. The nut would not
start. I have a 5/8"-20 UN tap and die. The tap easily cleaned up the nut but
I
could not start the die. I used a thread file and got the nut to start but don't
know why the die won't. It's possible it's some British thread - I'll
have to check that.
September 4, 2025 Didn't accomplish a lot on this bike, Did install the timing
cover and attempted other things.
Tried to connect the engine and cradle and realized I didn't have a clamp for
the breather hose - the MK3 uses 1/2" hose where the others use 3/8"
hose. I use fuel injection clamps and no auto parts in the area had the right size
so I ordered some from Amazon.
I also noticed that the connections on the neutral switch would be a problem as
there was almost no clearance to the engine so there was no way to connect/remove
spade connectors. This is a new Lucas neutral switch and they are not like the originals.
September 5, 2025 The hose clamp arrived so installed that. Cut the spade connectors
on the neutral switch and soldered wires to it. I tested after re-installing and
adjusting the switch and it works. I'm a little nervous about it as the plastic
around the connectors slightly melted while soldering but everything seems solid.
To insulate and make sure the connections don't vibrate loose, I epoxied over
and around the connections. I've spend a ridiculous amount of time on this neutral
switch!
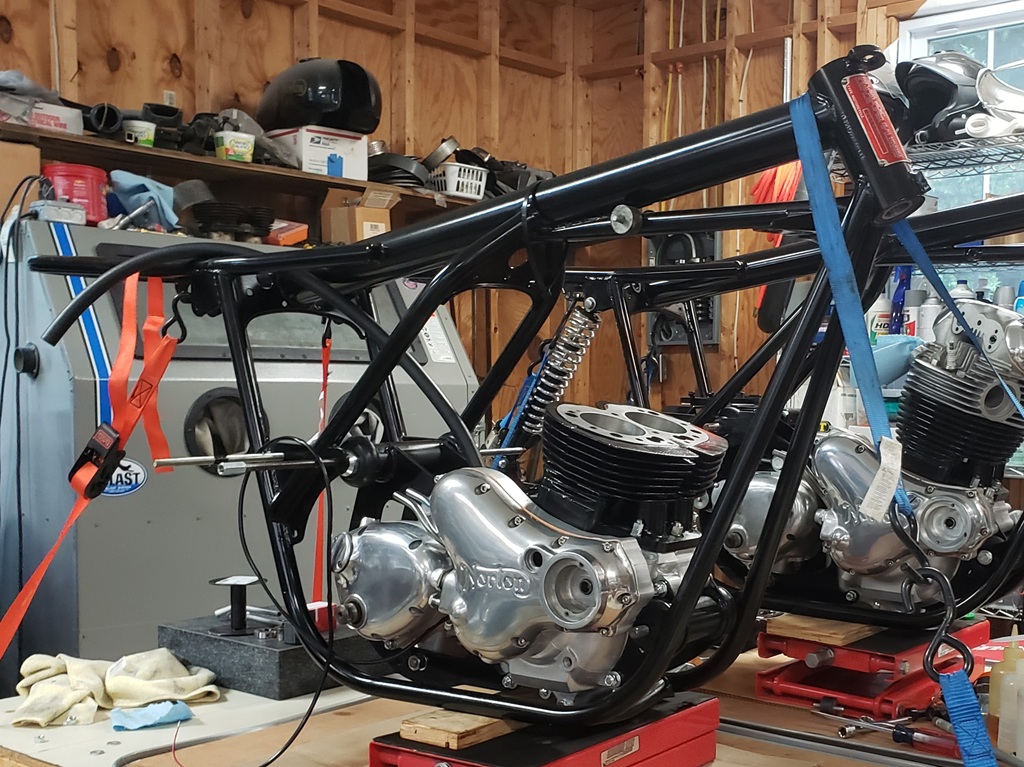
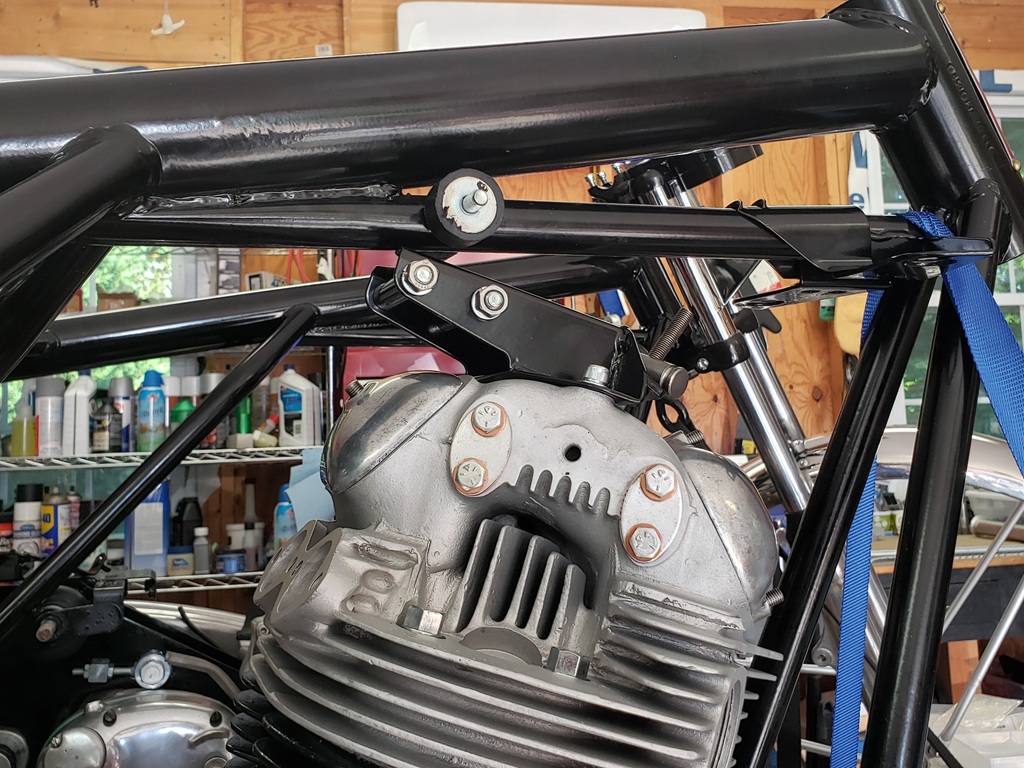
September 6, 2025 The goat has been roped and what a goat roping it was! This is
the second bike in a row that I've had help installing the frame on the power
unit and the second time is was a Royal PITA! With one shoulder not working and
the other hurting, I needed the help so I can't complain. Now it all becomes
"easy" - oops - probably a jinx to say that!
September 7, 2025 You may have noticed in yesterday's picture that the rear
ISO stud and front ISO bolt was no installed. The front bolt that came with the
bike was in terrible condition and the rear stud was missing, so I replaced them
with new and they are now properly torqued. With that done. I went through parts
looking for the things needed to put the Z-Plates on as well as the battery tray.
I found four good 3/8" spacers but no 1/2" spacers.
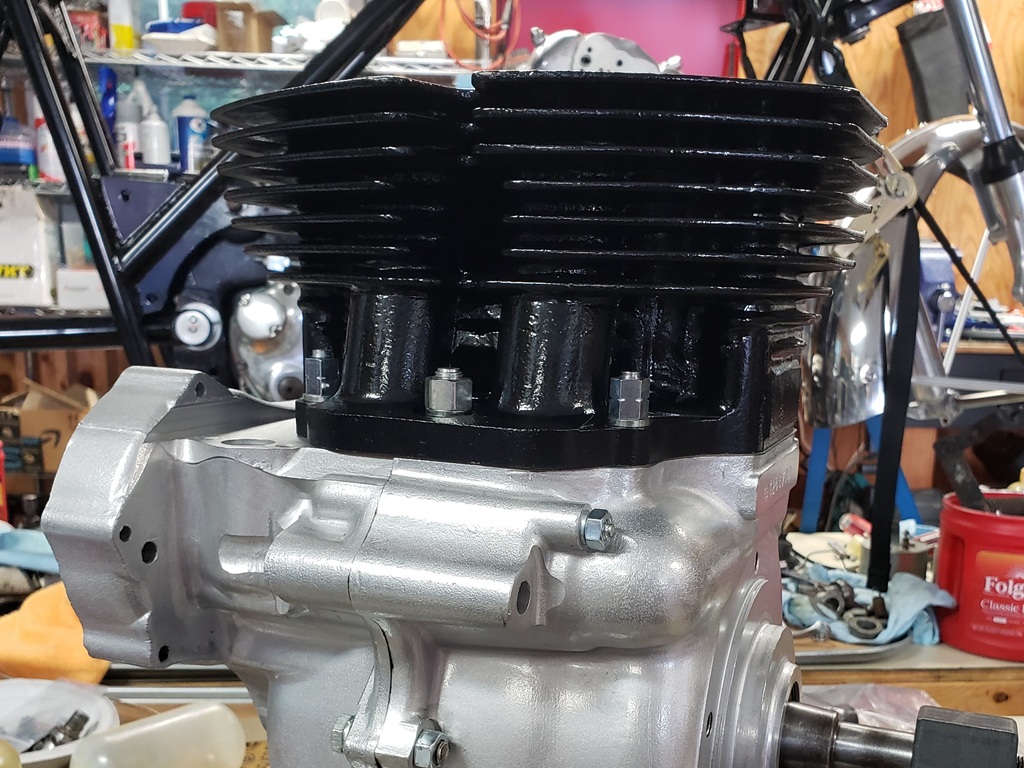
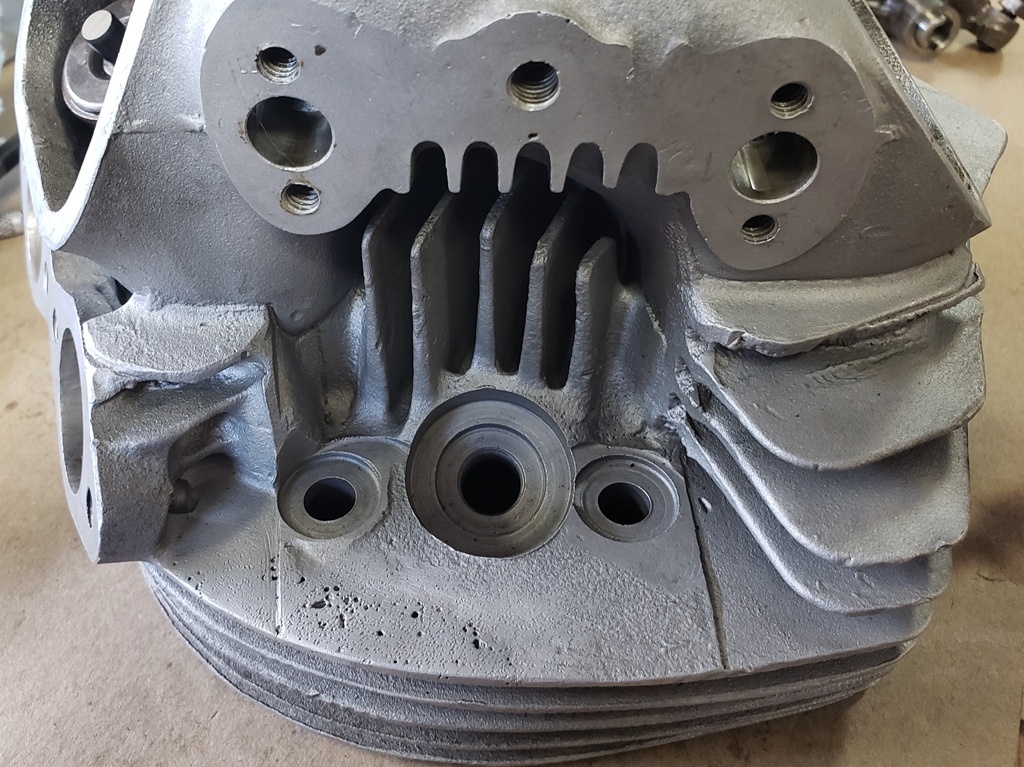
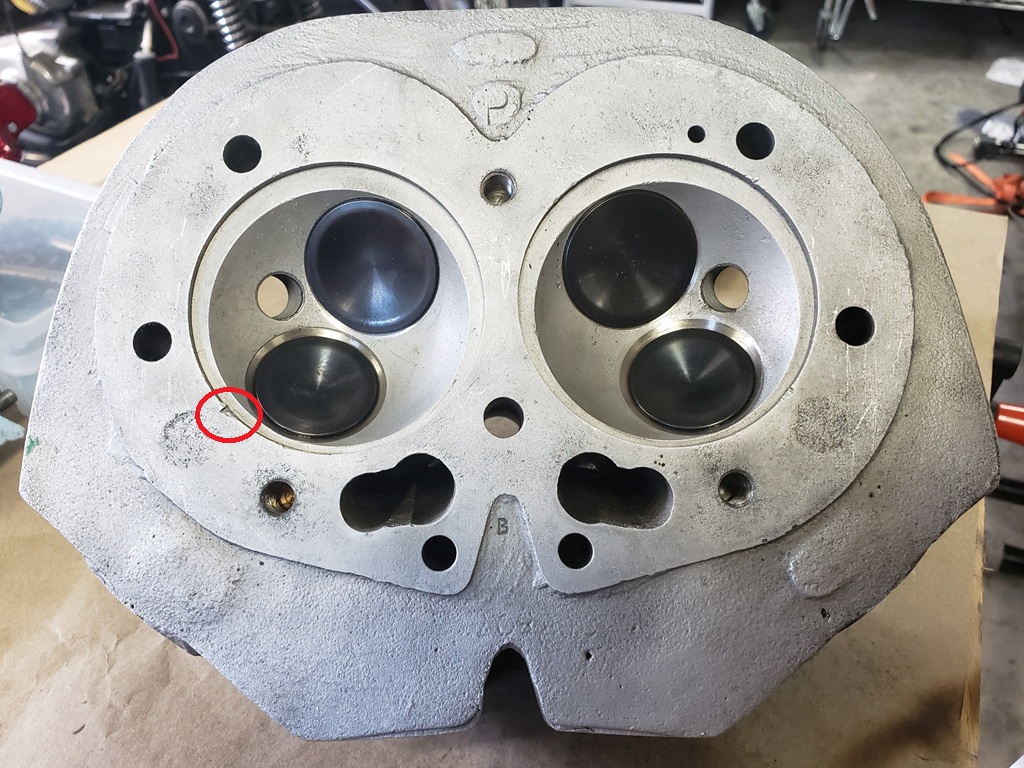
Then I started on the head. Really annoying because it has new valves and even seems
to have new seats - see the fourth picture. However, the head is ugly so it has
to came all apart for my process to make it look new. This head will never look
as nice as I like as it has some bad porosity - see the third picture. The first
issue was that all four spindles were in too far and all four were very hard to
get out - the hardest I've ever had. I almost gave up on the drive side and
replaced the head - see the first two pictures. At any rate, they are out and those
two bad spindles will be replaced. The rockers are OK, thank heavens! The three
studs were installed with red Loctite so they were very hard to get out as well.
I always change those. To see why
here: Head Stud Study
September 8, 2025 The valves are out of the head and it's been through my process.
I looked into improving the bad area on the timing side. Turns out that others have
tried and it showed as very wavy once shiny. I smoothed it as much as I could but
many of those pockets are nearly through the fin so it's not possible to remove
them.
The head has new Black Diamond valves, new bronze guides, new seats, and the exhaust
threads are good. It's a shame I can't make that bad area better because
this is now a high-dollar head.
September 9, 2025 It's OK, call me a big dummy! I got the head spotlessly clean
in the kitchen sink, then remembered that I only trust my own valve lapping, So
I did my light test on all found valves. The two intake valves passed and the
lapping marks on the valves looked perfect, so I was happy with those. The drive-side
exhaust valve showed a tiny light in one position and the valve lapping mark was
a little thin so that needed a little lapping. Took about two minutes. The timing-side
exhaust valve was another story. It showed light all the way around and there was
NO lapping mark on the valve. In other words, the seat was cut but the valve was
not lapped to it. It too about 10 minutes to correct that.
Why am I a big dummy - now I had to wash the head again!
Anyway, the valves are in and I'll probably do the rockers tomorrow. I'm
really
fighting with myself over this head. I hate the way the timing side top fin looks!
I'm pretty sure I have a good RH10 head and keep thinking I should change it
out, but then that bike (in boxes) would not have a head!
September 10. 2025 No energy day. On the bright side, I'll get a steroid shot
in my foot tomorrow morning and "Superman Mode" will kick in late in the
afternoon.
I have to see the dentist tomorrow afternoon - have a broken tooth, then I should
be able to get something done.
September 11, 2025 Last Thursday my last top right molar broke off at the gum line.
It's been a pain for years - multiple root canals and multiple crowns. Saw the
dentist today expecting him to refer me to an dental surgeon, but he pulled it himself.
So, I'm trying to get the bleeding to stop (I take blood thinners) so I'm
not going to the shop today.
September 12, 2025 The rockers are installed. Two spindles were bad and I went though
my collection of used spindles and only found one good one so I used it and the
last new one I had in stock. I really don't understand why Norton spindles wear
and the rockers rarely do. I suppose it's a good thing because spindles don't
cost a lot but the rockers sure do!
September 13, 2025 The head is on but just snugged up. There is a mysterious clicking
sound once in a while so I'm working on figuring that out before torquing the
head. It's probably nothing but I don't like unexpected things!
September 14, 2025 I couldn't sleep last night for fixing that noise. In my
off and on sleep, I took is all back apart and found nothing. When actually awake,
I got to thinking that it might be that the cam chain got too tight when I put the
cover one - nope, it was fine. Had a friend over and he was turning engine while
I listened. I couldn't figure it out. He mentioned that it only happened every
once 720 degrees which didn't sink in at first.. Then I realized that one valve
was causing it, So I went on the search for that.
Finally, the light came on! When I put a head on I lightly torque it and don't
even bother will all fasteners - sometimes to get the pushrods in place you have
to pick the head up so no point in doing it all up. Thought about that, but I always
do that without trouble. So, then as an experiment, I lightly set all four valves
to zero clearance and the noise was gone! Dummy me! I loosened them back up, torqued
the head properly, and adjusted the valves. Now there's only normal valve noise
- there never was a problem!
I also spent a lot of time recovering the crankshaft rotor nut threads - they are
good now.
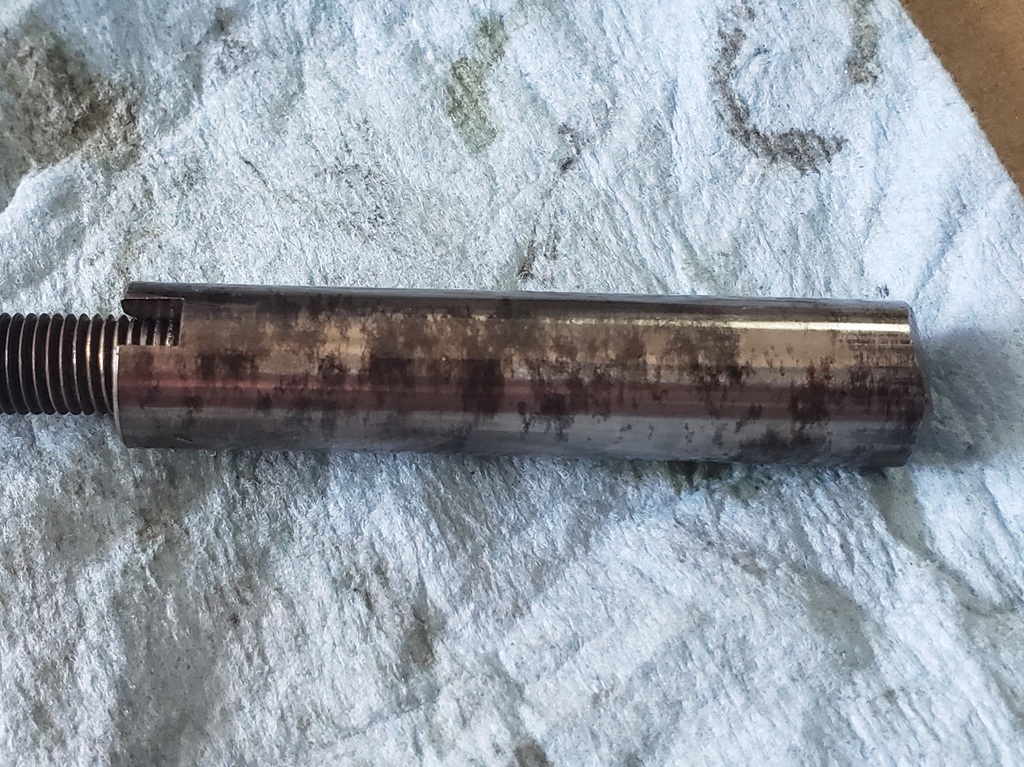
September 15, 2025 Found the swingarm and spindle. Apparently, the Welsh plug was
missing from the drive side as the end of the spindle was rusty and the oil wick
was like powder. Fortunately, the rest of the spindle is fine and the bushings are
as well. Spent a good bit of time getting the spindle clean and rust-free inside.
The swingarm is now on, but I can't find the cotters and I"m out of stock
on those, and the top plugs and Welsh plugs, so I ordered some.
September 16, 2025 The timing cover is back on and I had the cotters and associated
parts in stock so the swing arm and shocks are on. I don;t have the correct shock
hardware so they are on temporarily and I don;t have the felt parts and Welsh plugs
so I can't finish the swing arm. I also checked out the pressure relief valve.
It was stuck and had no shims but I got it unstuck and cleaned up. The outer cover
is UGLY and painted so I'll have to replace that.
UPS charged me $100 in duties and fees for the $341.65 order I have coming. Actually
it is a $86.00 US tax unapproved by congress and $14 UPS fee to collect the tax.
The Govt destroyed my computer business in 1987 and is now trying to destroy this
business!!!
September 17, 2025 I had an outer cover and shims for the oil pressure relief valve
so that is now installed. I also powder coated the oil filter mount. This was a
two doctor visit day so I didn't get a lot done.
September 18, 2025 You would think a 75-year-old would have too much time on his
hands. 10am podiatrist, 12:30 pm, physical therapy, 2pm until 4:30pm completing
an IT job for a customer, 4:30pm - 6:pm returning phone calls to people wanting
help with their bikes, and now checking in parts from AN for the rest of the evening
(UPS tracking shows delivery between 1pm and 5pm and it's 6pm and UPS just arrived).
September 19, 2025 Not a lot today, received an AN order than included the swingarm
parts (felts and Welch plugs) but didn't install then yet. Spent a lot of time
cleaning up and messing with the rotor nut - get a new one which did not want to
screw on so I spent more tie on the crank threads - all good now with the new nut.
September 20, 2025 Since I'm building this to sell and I have a Combat to build
for a customer, that is the new priority. See:
Combat 5
September 29, 2025 No actual work today, but I did do what I'm supposed to do before starting a build! My tables have a shelf underneath and I'm supposed to empty it and put the parts for the bike there instead of all over the flow! The shelf is empty and clean now, and I spent a lot of time getting the parts consolidated. They aren't in place just yet but are getting there.
October 1, 2025 I actually have a little room to move now! Most of the parts are
under the table on the shelf!
October 4, 2025 On this day in 2012 my wife turned 69 and it wad the last day we
were able to talk to each other. On October 8, 2012 I had to allow life support
to be turned off.
I am working on finishing the wiring on my rider so I can get it off the lift
and have room for the two bikes I'm working on. Did some powder coating planning
to install the head steady. Went through all the boxes and no head steady side
plates! Then I went looking for the ones to my rider and cannot find any part of
its head steady!
October 10, 2025 Still working on my rider and Combat5 but I did get a little done on this today.
The bike was missing the two plate that went from the head steady to the rubber bushings screwed into the frame. I bought a pair on eBay and they arrived today. They cleaned up nice and are now installed. I thought I took a picture but I can't find it.
|