|
|
January 15, 2023 I generally build/rebuild bikes. However, I was recently contacted by a guy who has a new to him MKIII Commando. He is rebuilding the bike but wants someone to go through the engine and gearbox. In theory, they are in good shape, but he's not sure. So, he is shipping them to me and they will be here later this week.
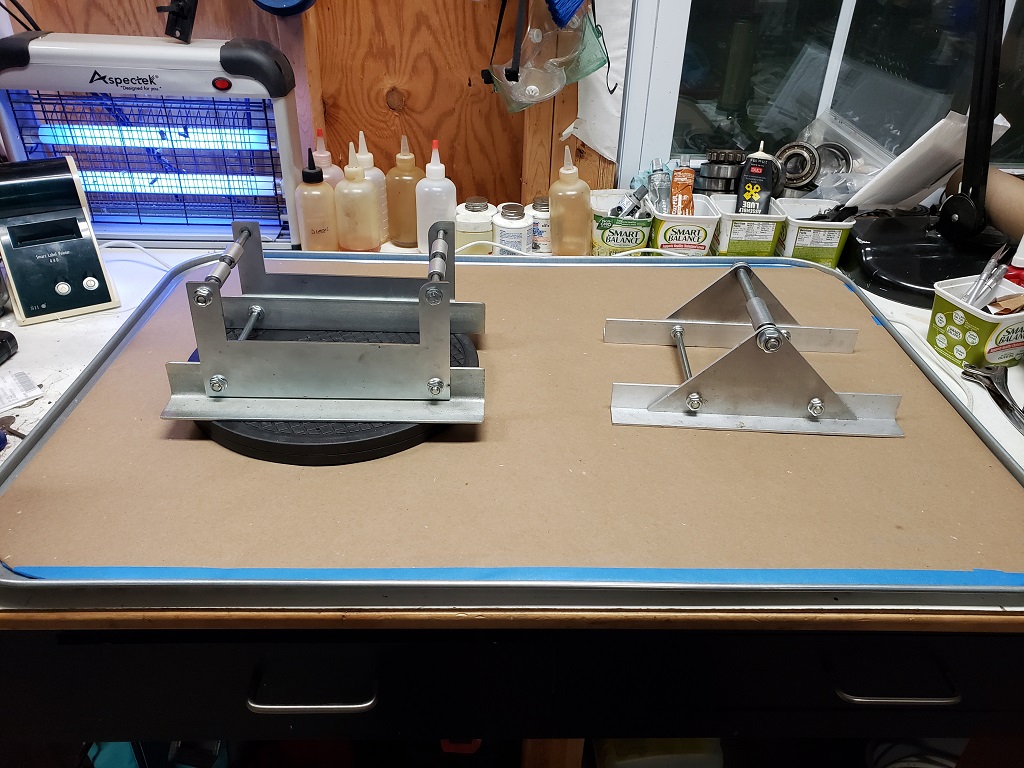
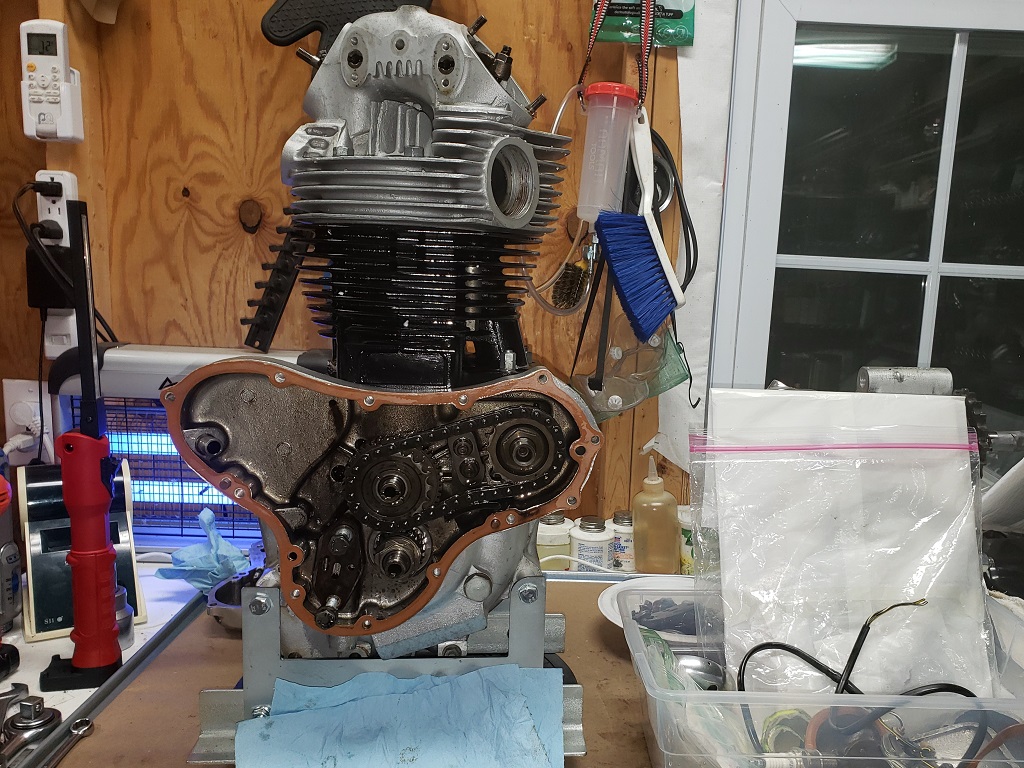
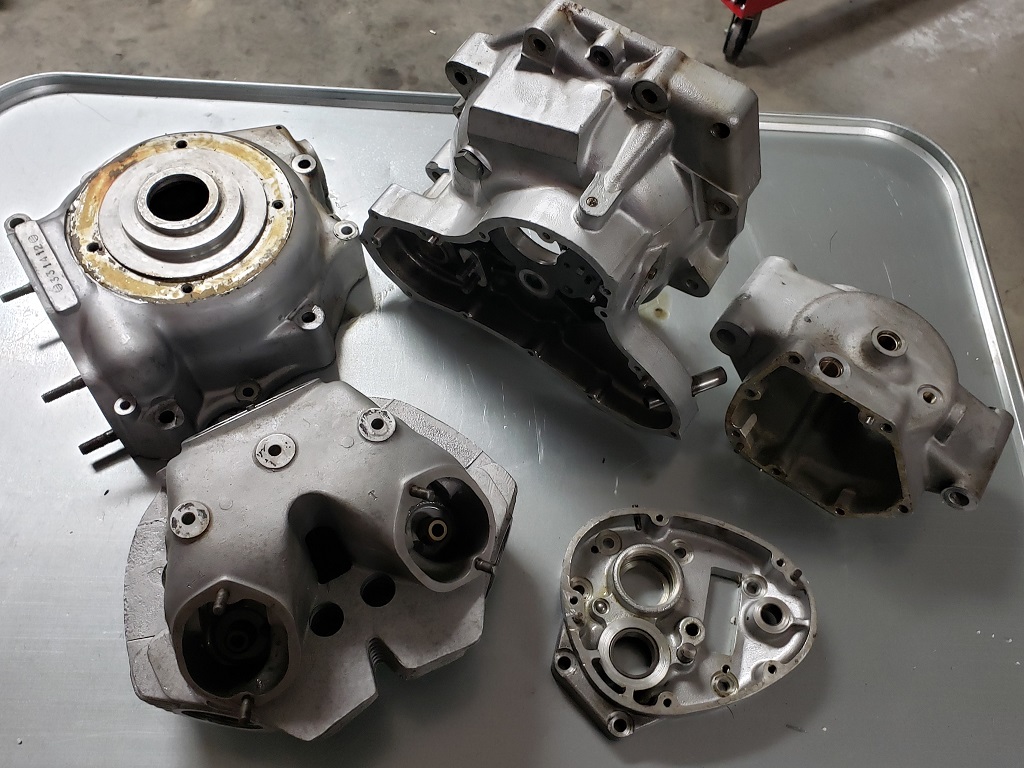
Whenever I'm going to work on an engine and/or gearbox, I clear the engine building section of my workbench and make it clean. There is a steel 24" x 36" steel drip tray topped with a kraft paper covered piece of cardboard. This makes a clean surface and ensures if I drop something that it won't be damaged.
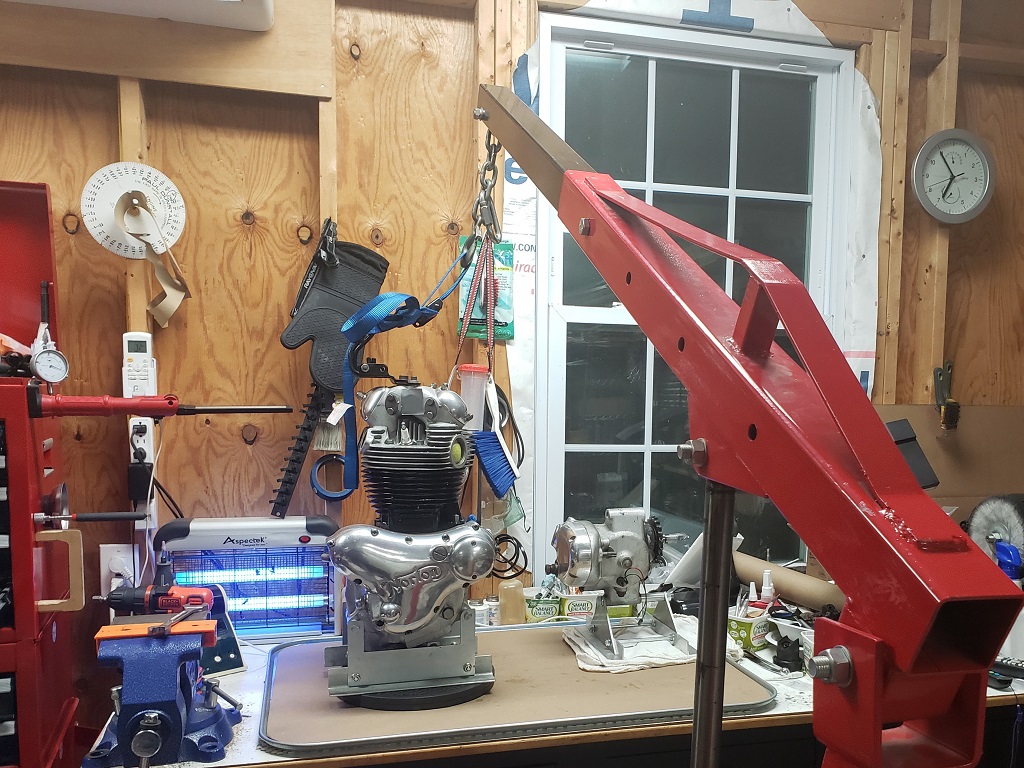
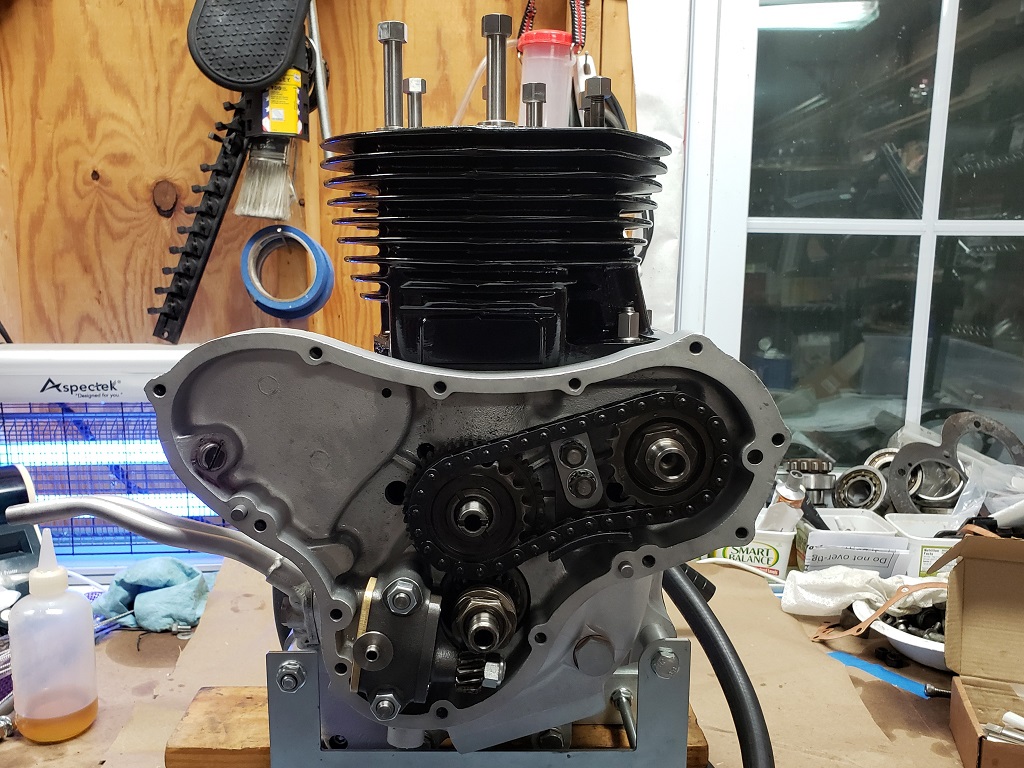
You can see the engine stand on the left sitting on a heavy-duty turntable and the gearbox stand sitting next to it. I will disassemble both inspecting along the way. Then I can order any parts needed that I don't have in stock and while waiting, I'll beautify the cases. (1 Hour)
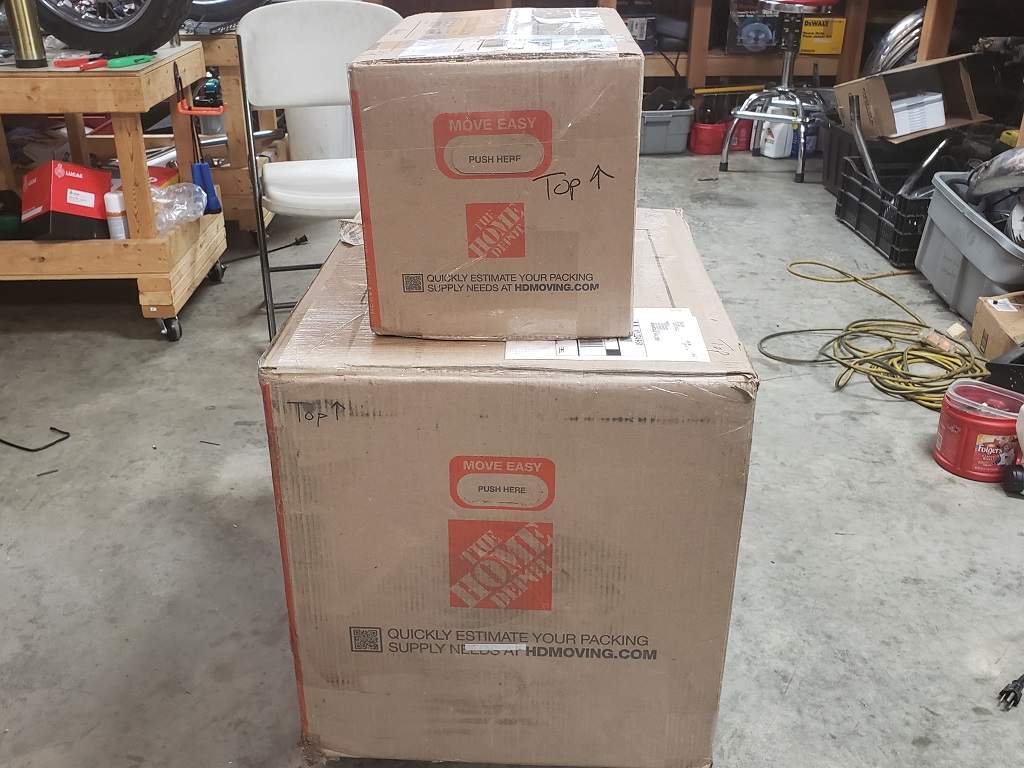
January 19, 2023 The boxes arrived today in good shape. Thankfully, the UPS guy put them in the shop for me. It was a struggle, but I got the big on wheels so I could move it where the engine hoist could get to it.
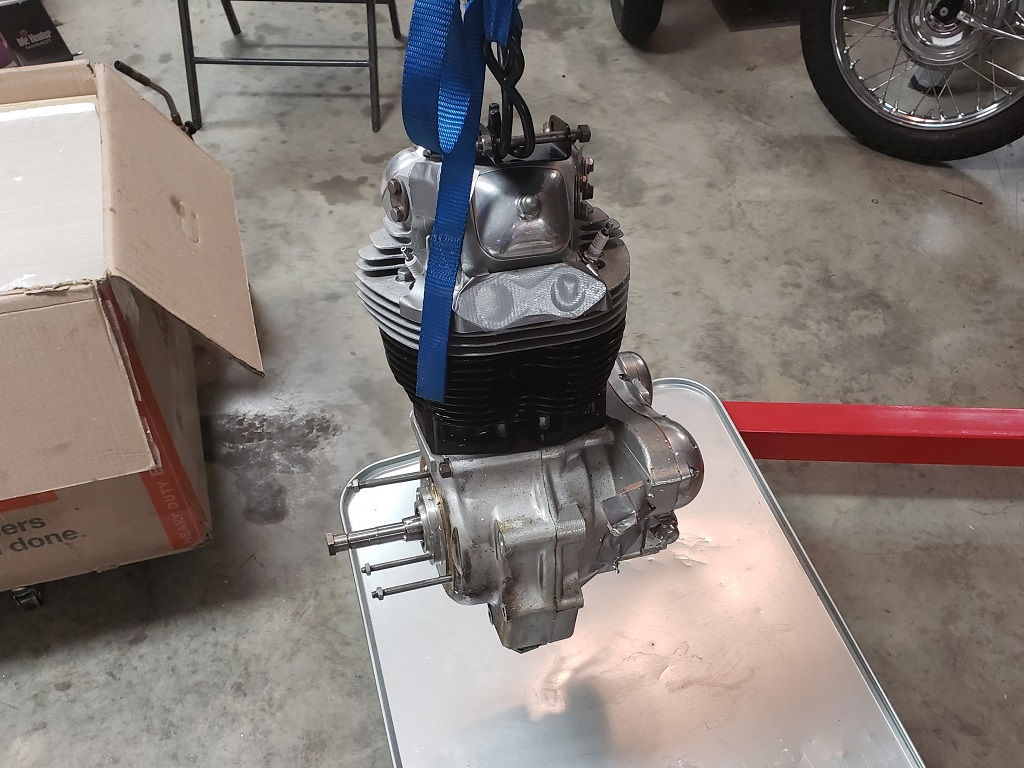
Then I unpacked the gearbox, cleaned up the oil that spilled out of it and mount it on the bench.
Next, I hoisted the engine out of the box and cleaned up the oil that came out of it in shipping and moved it to the bench.
Then the disassembly started. First, I removed all the duct tape the owner had covered things with - Grrrrrrrrrrrr - I hate duct tape and oil mixed and I really hate getting the residue off!!! Then I stripped the parts from the head that interfere with easily removing the head. Next, I started to remove the head. Every bolt and nut were either way over tightened or Loctite'd. Don't know which yet - but by the time I got them cracked loose, I had hurt both arms, so I decided to finish that later and moved on the timing cover. Being 72 sucks!
The timing cover came off without problem. However, there were problems inside - not sure how big yet. I removed the oil pump bolts with my fingers - not tight at all - and, as far as I know, they are supposed to be studs and nuts without washers, not bolts with washers. I need to check if later MKIIIs switched to bolts. A bigger issue is that the timing chain is dead tight. The sprockets look OK, but I bet the chain is bad and I hope the cam and intermediate gear bushings are OK.
BTW, I'm never kept close track of my time before but people ask me how long things take so I'm keeping track of this one. (8 Hours)
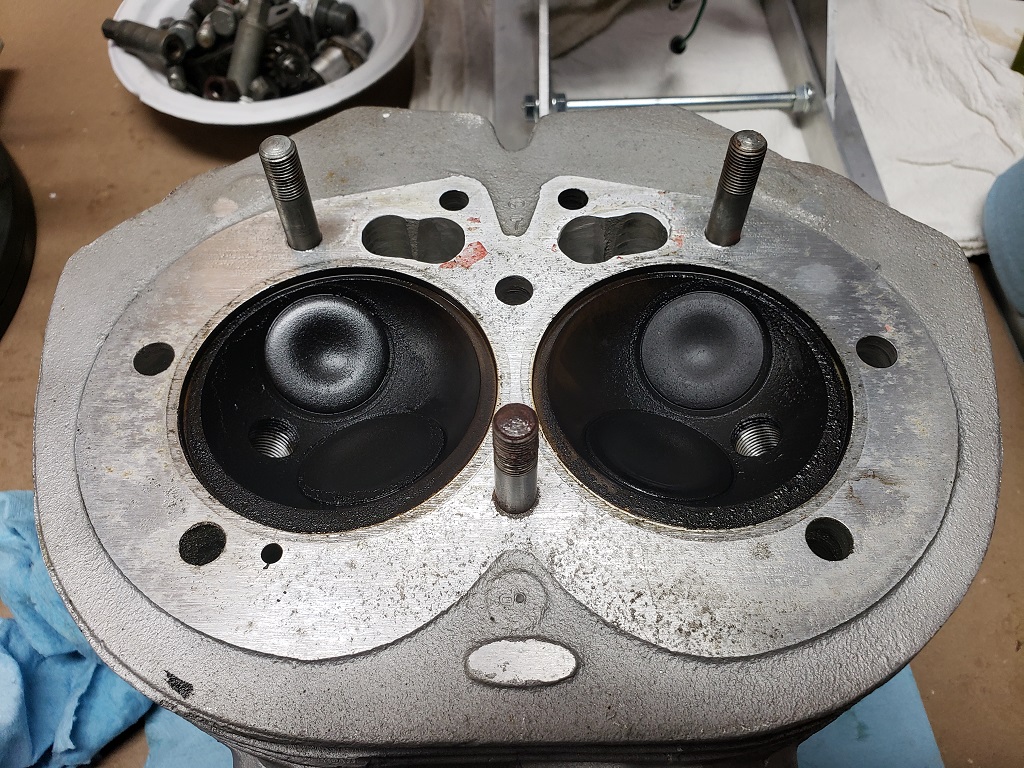
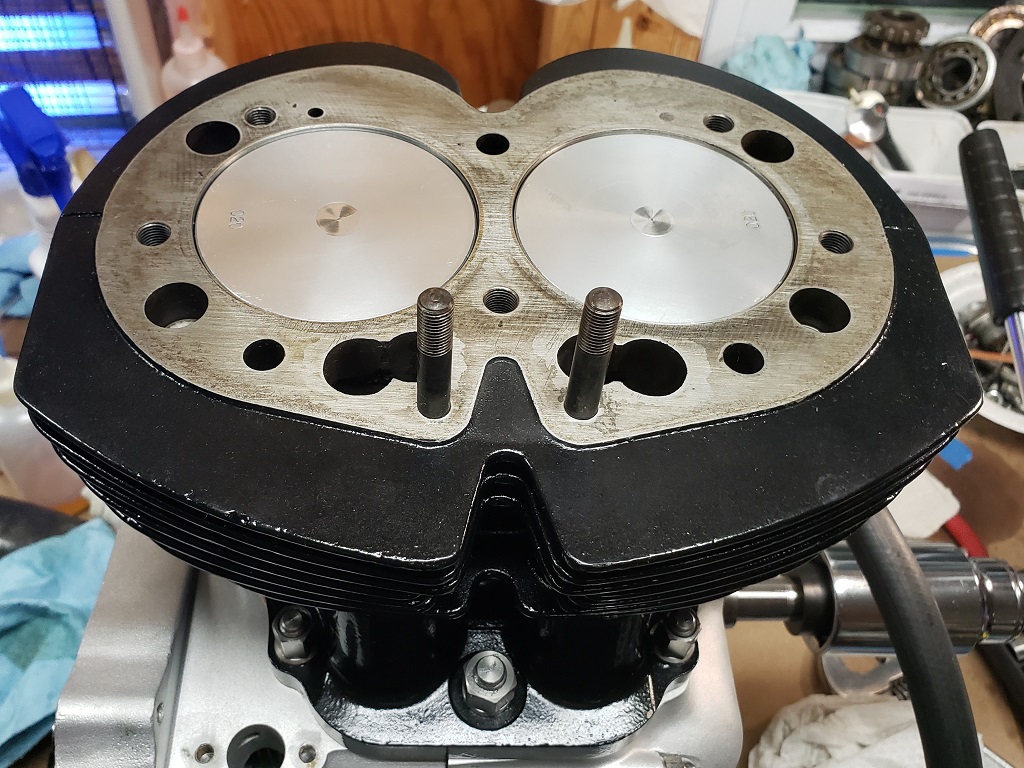
January 20, 2023 Continued disassembly and inspection. It's hard to tell in the first picture, but the timing side was running quite rich. Besides a lot of carbon, it smells of gas. However, it's clear that the engine was not run much after being rebuilt - the carbon is not thick - more on that in a minute. Clearly I haven't dug into the head yet, but I bet everything is good except the timing side exhaust rocker. It is very rough feeling. It will most likely need that rocker and spindle replaced.
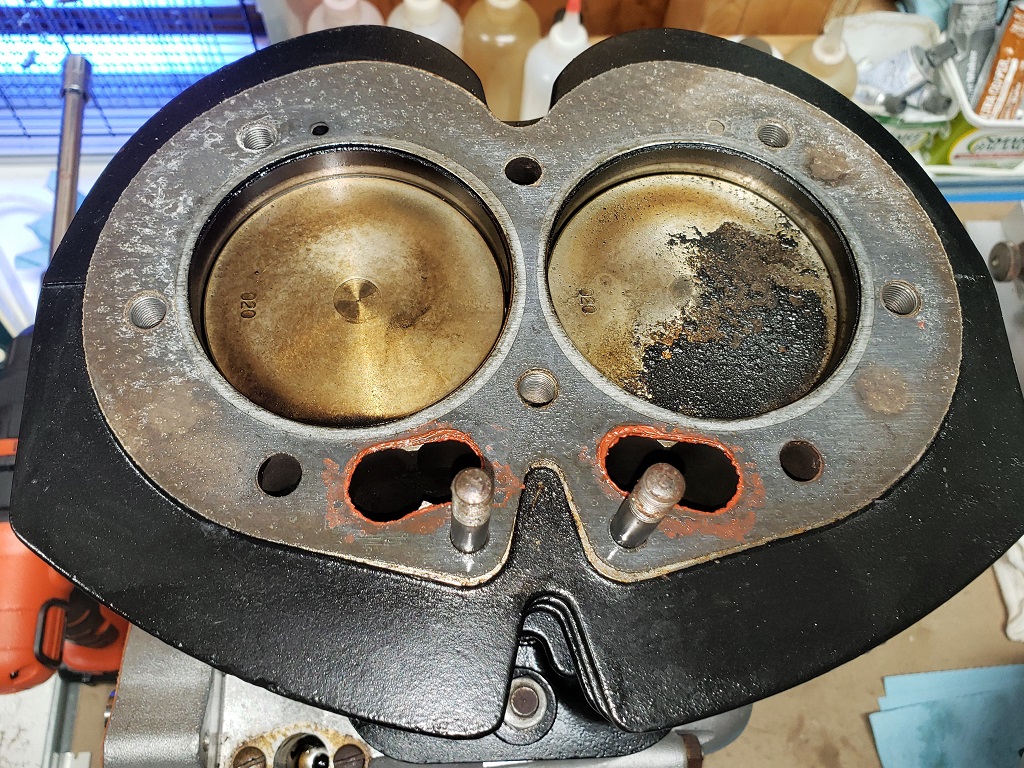
In the second picture you can see that the drive side piston top is almost clean - I wiped it later with some WD40 and it came clean. The drive side was a little more effort to get clean, but it came clean but a little stained. The pistons are obviously new and 0.020" over. I am not convinced that they are properly fitted - they seem too tight. I have not measured yet. The bores are way too smooth - I think it they were honed with way to fine stones. The cylinders will need to have a proper cross-hatch, but that's easy. The rings are new but must be changed - they have been worn unevenly probably due to the lack of proper honing. I tried to get pictures to show that but could not.
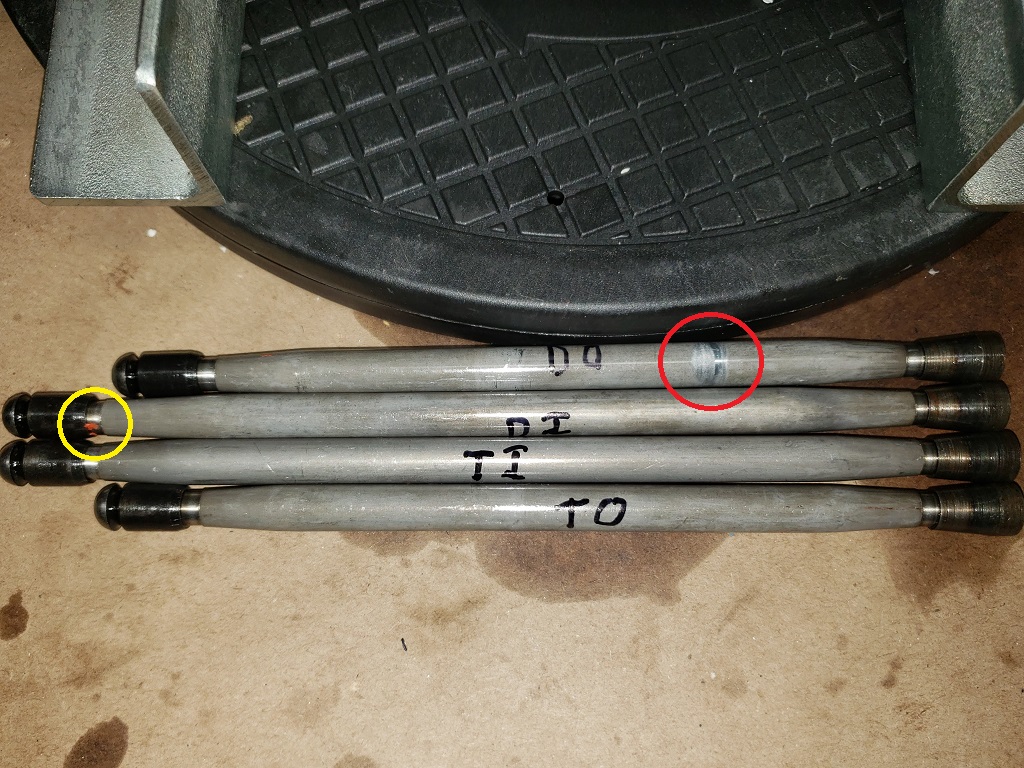
The third picture shows the push rods. Three are in excellent shape. The red circle shows a scuff on the forth. I'll have to see if that will buff out. The yellow circle shows a piece of silicone - I keep finding bits of it - I really wish people wouldn't use that stuff!
The last picture show the timing side apart. The cam and bushings are in excellent shape. I was worried about the cam chain, but it is fine.
BTW, I said yesterday that I was going to keep track of my time here. I decided to do that as a running total rather than the time each day. (8 Hours)
January 21, 2023 If you watch YouTube much you've probably seen "Expectation verses Reality" videos mostly done by younger people. This was one of those days for me.
Expectation: Have the crankcases stripped, the gearbox shell stripped, the gearbox inner cover stripped, and the head stripped so I can do the beautification process to all at the same time.
Reality:
- The crankcases still need the bearings and idler spindle dropped out.
- The gearbox shell is ready.
- The gearbox inner cover is ready.
The head wasn't touched today.
What happened?
- Saturdays start off with catching up on paperwork - had more than expected.
- The crankcases were strange. On the one hand, they were put together with no sealer!!! On the other, the studs were rusty and that made them difficult to get apart.
- The gearbox was the really hard part. The screw in the first picture took me over an hour to get out. In hindsight, I should have chiseled it off since the sprocket is being changed. It had some sort of Loctite and the head was partly rusted away.
- I don't have a deep enough socket to get the sprocket off with the main shaft in place so I went after the gearbox guts next. The screws that hold the outer cover on were Loctite'ed! They are hard enough since they are straight slot screws and the slots are narrow. Had to use an impact driver on all of them.
- Then came the inner cover nuts. All were on with Loctite - it appeared red but was not
red Loctite since I got them off without heat. I did have to use my impact driver and two of the studs came out. Ridiculous! The studs should be put in with blue Loctite and the nuts simply properly torqued - no Loctite.
- The last person inside the gearbox was a glue maniac. The gasket was glued on both sides - had to spit it with a single-edge razor blade to get the inner cover off!
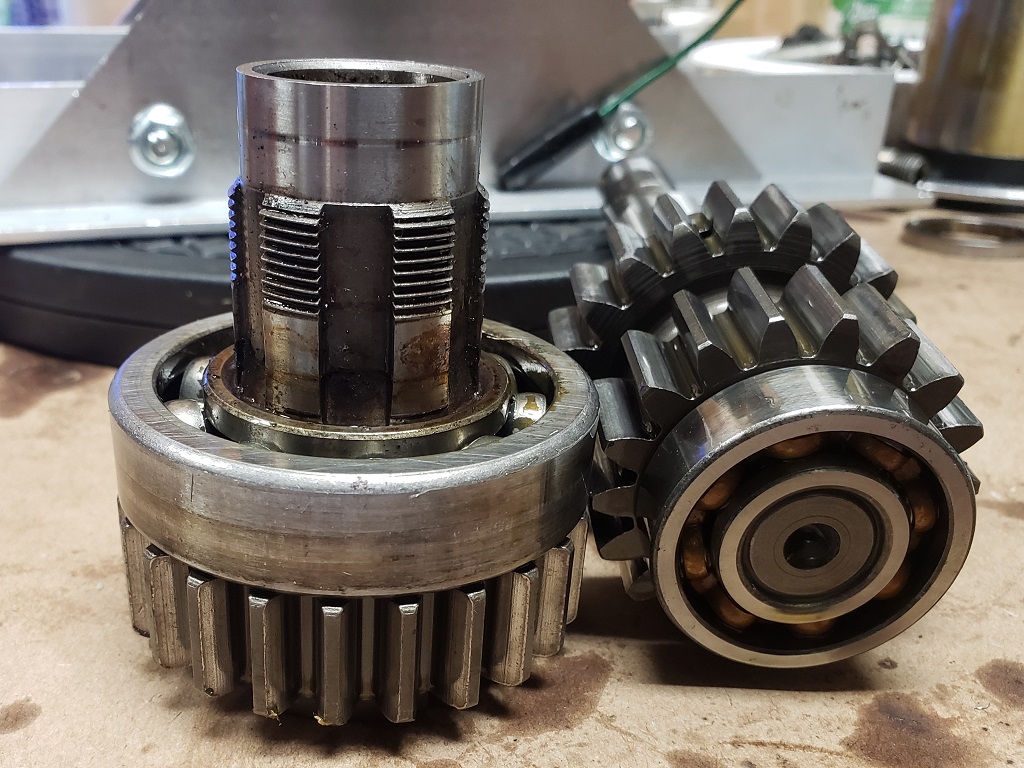
- As I took each gear off and inspected I was amazed to see that each part looked new. But when it came time to lift out the layshaft, it became clear that is still had the original ball bearing - it would not pull out. Also, the sleeve gear was stuck in the main bearing. While investigating, I spun the shaft - hopefully you can hear what I heard in the video. So, it was torch time. I finally got the case hot enough that I could get the layshaft out and then some more heating and the sleeve gear and it's bearing came out together. I was shocked when I checked the layshaft bearing - it's fine. The sleeve gear
bearing is toast. Of course, the layshaft bearing will be changed to the roller bearing.
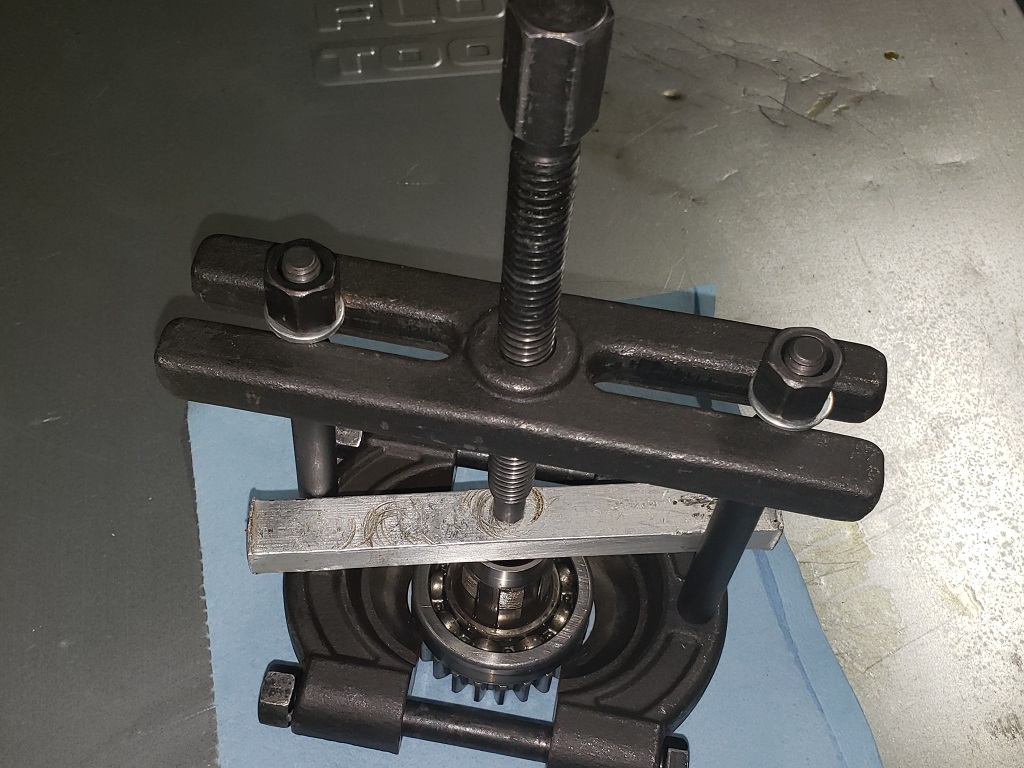
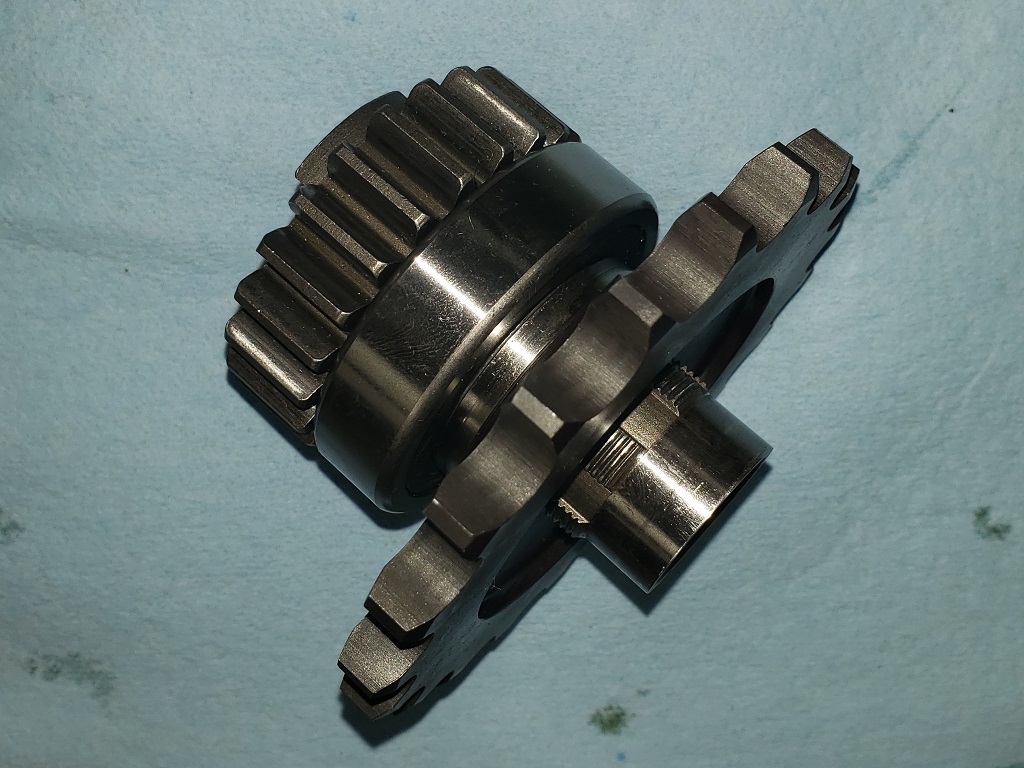
- The third picture shows the sleeve gear and bearing and the layshaft and bearing. I've used a puller to pull the bearing off the layshaft. Haven't figured out how to get the sleeve gear bearing off yet - it's supposed to be a snug slip fit!
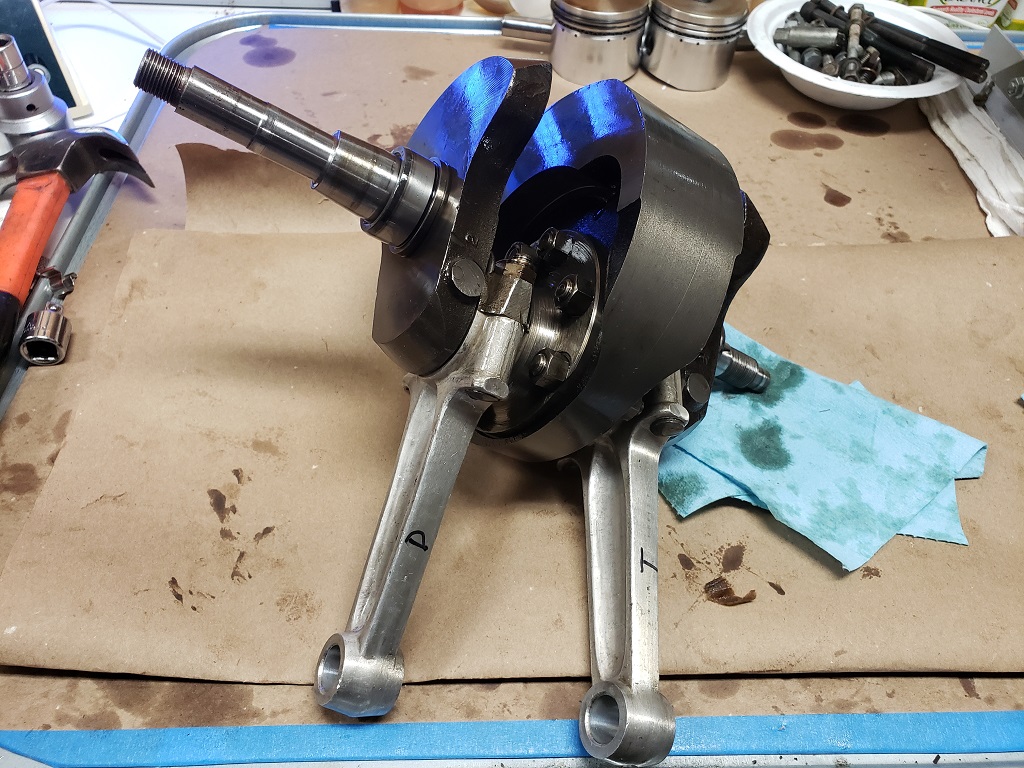
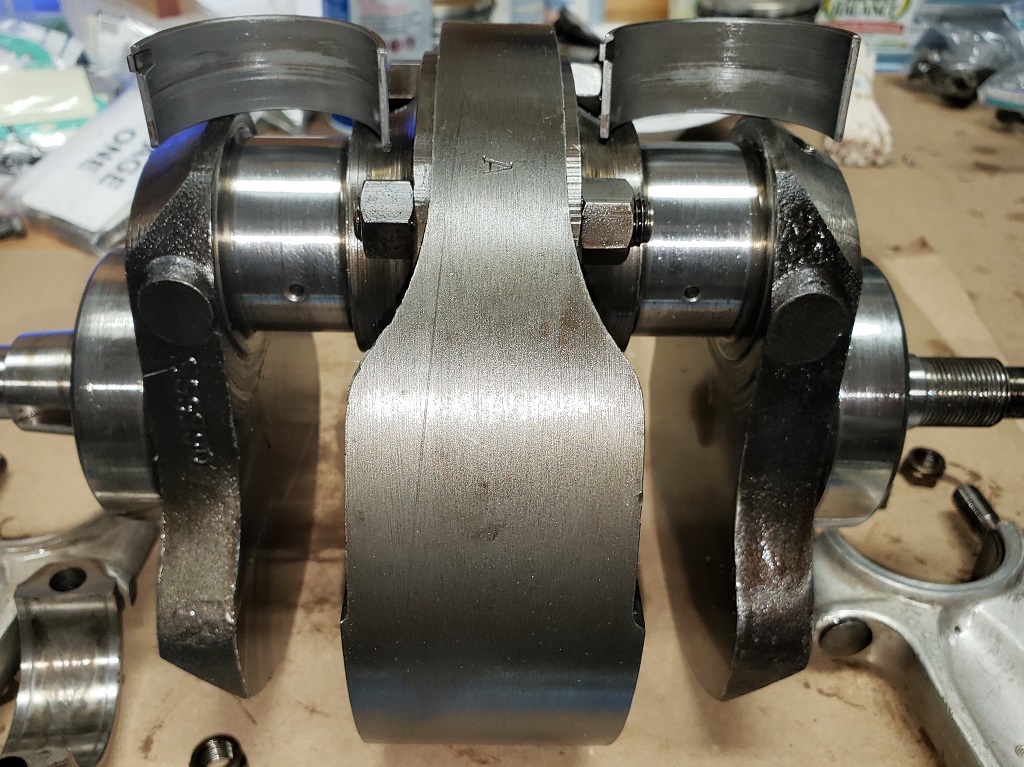
The last picture shows the crank and rods. It all looks and feels good. The rods have some nicks and scratches I'll remove - can't leave stress risers on connecting rods! I suspect that the shells are new - they feel perfect but I will take them apart and check none-the-less. I hate to split the crank, but with all the things I've seen done wrong, I always do whenever I've got the crank out.
(13 Hours)

January 22, 2023 Spent a long time trying to get the sleeve gear out of the bearing without damaging it. I'll either have to make a specialized puller or replace the sleeve gear - the bearing must be replaced.
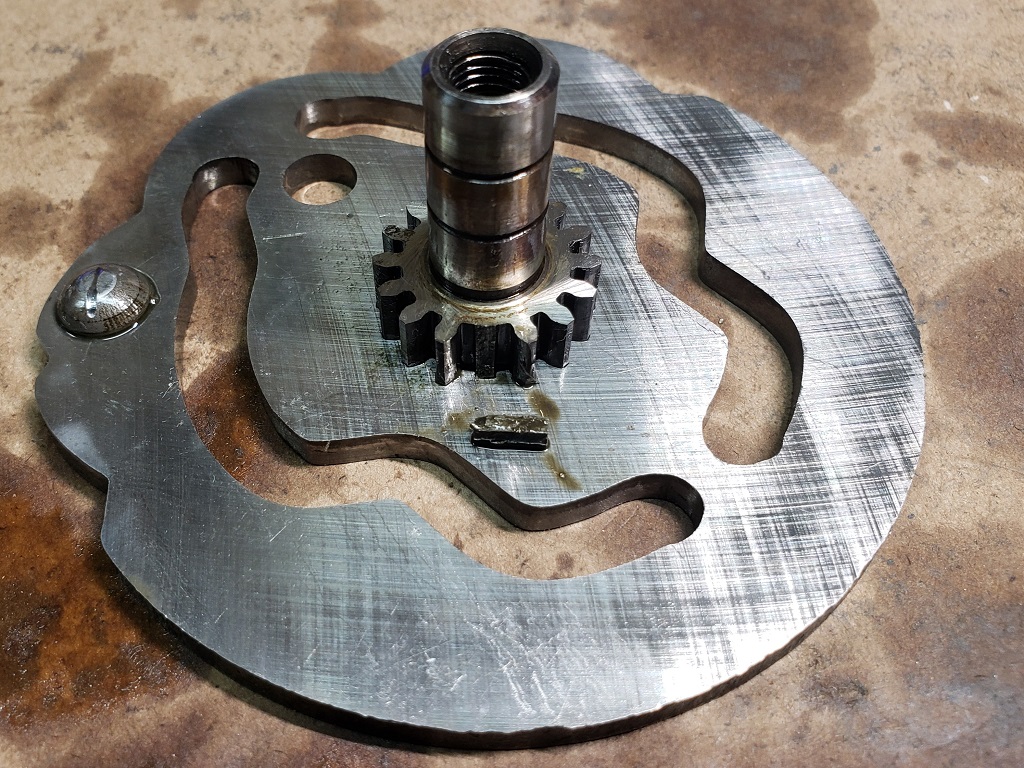
Next I turned my attention to emptying the gearbox shell and inner cover. The inner cover was no problem except getting the glued on gasket off. The screw for the camplate spindle was very stuck. After lots of heat, I finally got it loose. Again, the red-looking Loctite was used and again I'm sure it was not red as I didn't get it hot enough to release red. Look what I found when I removed the camplate (first picture). The missing tooth is in the middle of 4th gear and the broken piece was in the sludge at the bottom of the gearbox. Unfortunately, I have good used spares but not for a MKIII. You can buy the assembly or three separate pieces but I've never put the pieces together before - I'll ask the techs at AN how it's done. The MKIII uses a different gearchange quadrant from
earlier models. It is held in with a circlip. Unfortunately, the circlip and end of the shaft was exposed to the elements and they were very rusty. The circlip came off fine but the rust has "grown" the shaft so it wouldn't come out. WD40, brass brush and fingernails on 400-grit sandpaper finally cleaned it up so it would slip out. I'll change the circlip and before I put it back, I'll "blue" the shaft so at least it has some protection.
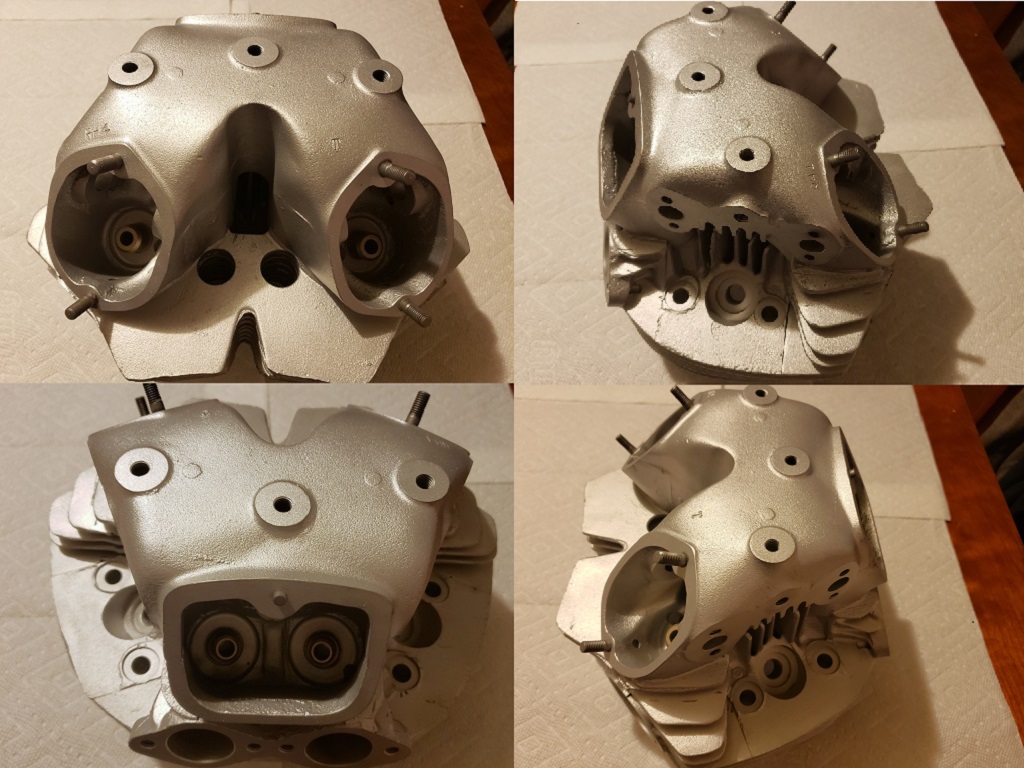
Next was the head. That was uneventful. I mentioned a probably bad rocker. I think it is OK. It was missing the thrust washer so it was rubbing on the aluminum of the head. The drive side exhaust rocker had two thrust washers. I forgot to mention that I did a leak test when I removed the head, and the valves didn't leak. The valves and guides appear to be in good shape. On the head is fully cleaned I'll inspect more but I don't expect to find any problem. I will lap in the valves just to be sure they do seat properly.
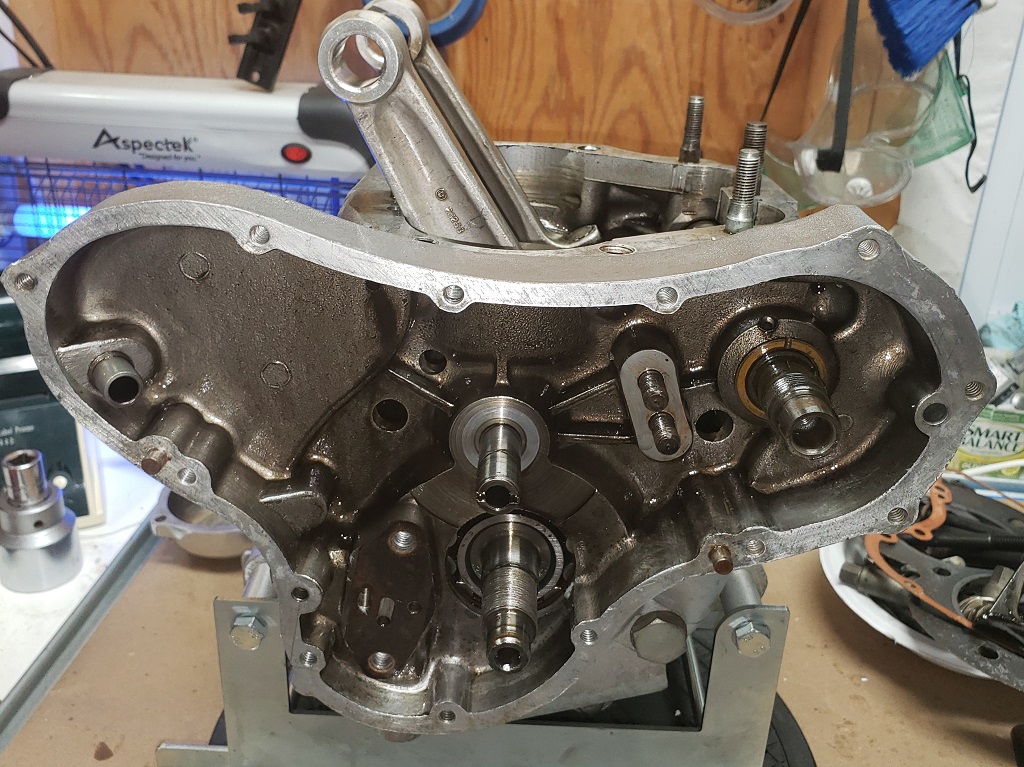
Next I gutted the cases. I'll
check the main bearings later - they were too hot from heating the cases to get them out.
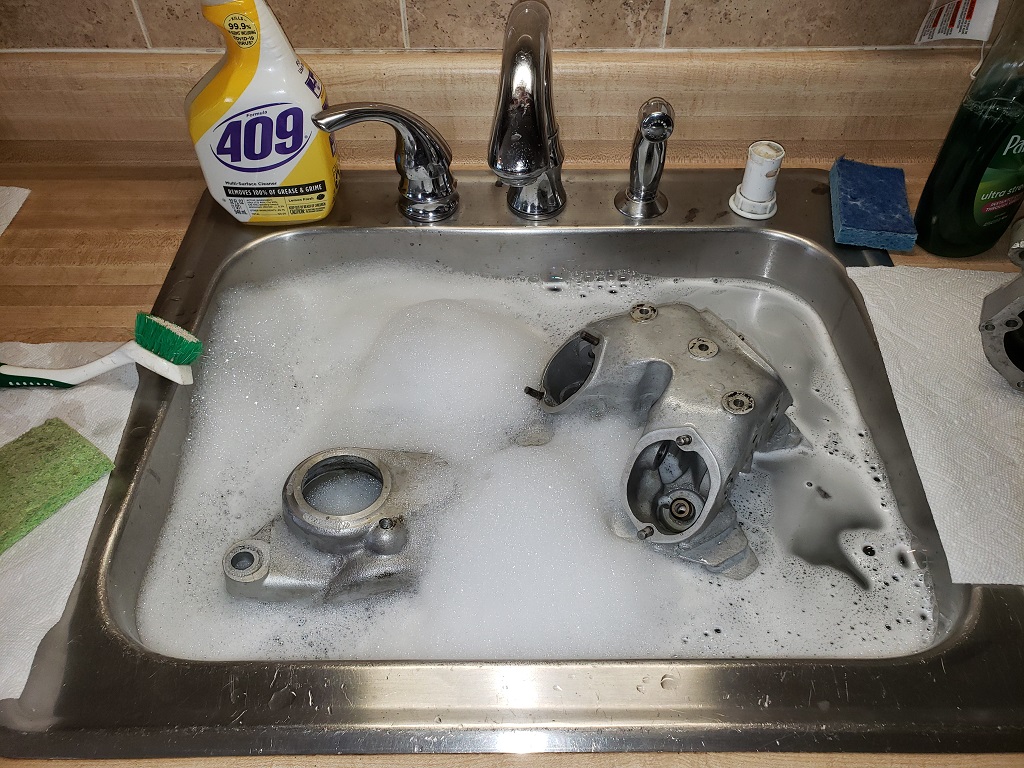
Next came the first cleaning phase - using WD40 and a brass brush to get rid of caked on grease and grime. They don't wash off easily and they don't blast off at all. The second picture shows them ready for the second phase - that's where I prove I have no woman in my life - kitchen sink it is! (17 Hours)
January 23, 2023 I got an answer fomr AN. The cam spindel is a press out, press in. He says they have the parts made seperately and press them together. I have one in the Old Britts parts I bought so I'll give it a try.
I realized today that people ask all the time how I get cases and heads looking great. I tell them but have never really written it down in detail. Since I'm in the middle of that, here goes:
Edit, first and foremost, don't sit down to write something like this with you kitchen sink filling or at least figure out that weird noise sooner - the flooding is a PITA.
- First, patience and cleanliness are important. If you cannot be patient enough to complete this process - don't start! Leaving blast media inside an engine or gearbox will not end well!
- If you are changing hardware or have old spare hardware, it's best to close all threaded holes. It's not imperative, but they are hard to clean out later.
- Use a brass brush and WD40 or a parts cleaner to get and grease or road grime off. Washing it off is hard and it will not blast off.
- Give everything a good scrub in soap and water. The point is to remove any remaining oil.
- Blow the parts completely dry.
- My blast cabinet is generally loaded with #75 Glass Abrasive and/or Garnet. You don't want a really aggressive media at this point. Glass beads will not work! If your cabinet's gloves are not clean, clean them, replace them, or use clean rags to handle the parts. Use any pressure between 45psi and 90psi that works.
- Blast the parts. The goal is to get the inside clean and the outside spotless and all looking exactly the same. The metal will be dull, look weird, and be consistent when done. The insides sometimes work just like the outsides but often there are inclusions and there will be black dots you cannot get rid of. The engine cases set I'm working on are nearly black inside even after WD40 and soap and water scrubbing - must have been stained by non-conventional oil - Do not touch the parts with your hands or dirty gloves from here on.
- Time to thourghly scrub the parts in soap and water and then inspect them. If you see anything you missed or if some hidden oil gets on the surface, go back to 6.
- Blow the parts completely dry.
- Removed every speck of media from your blast cabinet. - Put a couple of cups of brand new glass beads in the cabinet. I use #8.
- Turn the pressure down to 45psi. High pressures can break the beads turning them in glass abrasive!
- Go over the outside surface at an angle. The metal will change before your eyes! This takes very little time. Just be sure to go over the entire surface. I would say that a crankcase half takes at most 3 minutes to do the outside.
- After doing the outside of all parts, do the inside. You're not trying for pretty, just well peened. This also takes very little time. Remember - don't touch!
- Scrub with soap and water until you're convinced there is no media left.
- You're wrong - scrub again and use something like pipe cleaners in ALL open holes. Scrub until you are convinced there is no media left.
- You're wrong. If possible, scrub in a stainless steel sink since and run water into every hole. Feel the sink. Feel media? Keep scrubbing!!!!
If you're married, show you wife the first picture. Maybe she'll realize she could do worse!
that's step 4 happening.
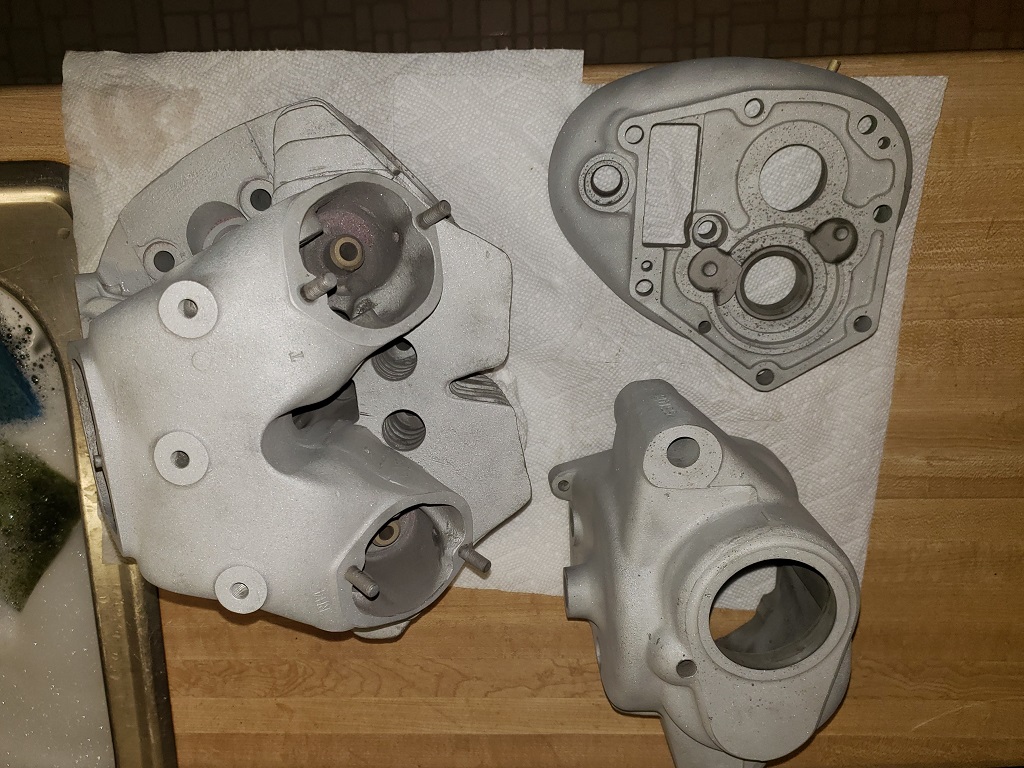
The second picture shows the head and gearbox ready for step 8. You can also see the black dots in the inside of the gearbox inner cover - the covers are almost always porous. You can see that the head is not consistent, but I think it will be once washed - if not, back to step 7. My cabinet gloves are dirty so I handled the parts with clean rags and they tend to collect dust. Also, before removing from the cabinet I blew every part clean but you can see garnet sitting in the drive-side exhaust valve area. You can also see that the alloy is slightly different between the head and gearbox but once finished you'll never be able to tell. (21 hours)
January 24, 2023 Didn't have a lot of time today. Did get all parts through step 9. Will change the blast media tomorrow. (23 hours)
January 25, 2023 Everything was completely dry and moved to the shop for inspection before the next step. All good except the head. Most of it was fine, but the rocker feed passageways bled some oil. Not even enough to see without extra light, but since the metal is “open' right now, it would show once peen'ed. So, scrub-a-dub, two men in a tub! OK, that done and re-blast then clean again. Now it looked good so changed the media to beads and did the head. Seems good, but I
wasn't happy. Too many inclusions, scratches, ridges, little chunks of metal that should have been cleaned up at the factory.and so on. So, reduce the scratches, filed the worse of the ridges, removed the metal chunks and so on. Then is was back to glass abrasive to smooth out what I did, then more cleaning, and back to beads. This is the longest, by far, I've ever worked on making a Norton head look good. The area beside the spark plug holes that looks dirty in the pictures is not - the metal is wavy almost like it was rubbed while molten (obviously not). (25 hours)
January 26, 2023 All nice and shiny now and the hard steps have started. Sure would like an ultrasonic cleaner big enough to completely immerse the head - I have no idea whether it would help, but it would be worth a try!
The head was the only pain. The other parts all went as expected. Even the insides came out fine. The gearbox is quite clean inside. The crankcases are clean but there are, as usual, LOTs of pinhole inclusions - you can blast them spotless and a little later a shadow appears around them - fortunately, they hurt nothing. The head has been washed twice (steps and 14 & 15).
Unless I find something interesting I won't update again until the parts as completely clean and the studs are replaced (the owner bought stainless steel replacement). (29 hours)
January 28, 2023 The cases are all cleaned and all threaded holes and passage ways are being checked. If I find anything, it's time for another wash. I'm also making sure I have all needed parts. So far, I do except that the owner wants the cam replaced with one I don't have. I'll order that soon. In checking the gearbox shell threads (all good) I realized that all but one stud should be replaced. I mentioned earlier that the studs were coming out with the nuts. Even the ones that didn't are rough and/or rusty. Fortunately, I have them and they are not expensive.
While looking at that I tackled two more things. I mentioned before the broken tooth in the camplate. The AN tech told me that they assemble them in house - a simple press the old one out and the new one in job. Since I have one from the Old Britts buyout that's what I did and it was simple.
Much more difficult was the sleeve gear bearing. I'm surprised it worked - see the picture. At first it would not budge so I heated it a good bit and then it came loose. Like I said before, it is supposed to be a snug fit, not an interference fit! Once I had it off I tried the new bearing - would not go. There were quite a few burrs at the ends of the splines so I removed those with a very fine file. That got the bearing on up to the end of the splines. Then trying to get it on, pulling it off, and sanding the marks over and over again got it about halfway one. So then wrapped it in 400 grit sand paper and twisted about 20 times, cleaned, tested and repeated about 10 times. It finally slipped on with effort to about 1/8" from home. So, then 600-grit paper and WD40 and polished it. Now it just goes on - perfect! Not wanting a battle while building the gearbox I decided to dry-fit the spacer and new sprocket. Of course, the sprocket would not consider going on! Its splines also had
burrs so a bunch of time with that fine file and it was on. Now I can take it back apart, heat the case and drop in the bearings knowing that I won't have trouble with the sleeve gear or sprocket. (29 Hours)
January 29, 2023 After figuring out the parts I need to order and doing some other paperwork, I got back on the gearbox. First up - putting in the bearings. Normally, I heat the case to about 200F and they drop right in. Not this time, they got stuck. So a good bit of heating and got them out without damage, then more heating and they dropped in. Then the inner of the new layshaft roller bearing fought me, but I won and got it on the layshaft.
Then I cleaned and inspected the rest of the internal parts and rushed head to making my standard mistake. Put in the oil seal, sleeve gear, spacer, sprocket, and got that all torqued down. You could have heard me yell anywhere in the area: "You Idiot!". You cannot put the shift quadrant in AFTER the sleeve gear. I know this. I reminded myself before starting. It's not the first time! OK, back apart, camplate and shift quadrant in and back to the sleeve gear.
From there it was a simple matter of putting gears and shafts in. That is until I came to the kickstart shaft. I gave it a surface clean and put it and in inner cover in so I could see how much layshaft shim I need and to make sure it worked right - it barely worked at all. So, tried to get the pawl out to inspect and finally had to drive the pin out with a punch and hammer - it is VERY bent. There were also a lot of burrs and dings. I cleaned all that up and need to see if I have a pin. I think with a good pin it will work fine but I'll test to see.
A guy stopped by yesterday on his Combat for a visit. He said he was having trouble kicking it. So, I showed him my method. I think helped him but my bike starting days may be over. I already had my left hip replaced several years ago and need my right done now. It has been hurting me off and on for many years. Today, I cannot walk with assistance - that really slowed me down.
January 31, 2023 I'm working on the gearbox while waiting for engine parts. I mentioned before that most of the internal parts look new. Well, not the gearchange mechanism. It was last put together will a lot of grease. Grease has no place on sintered bronze bushings and worse than that was grit and rust. Once all cleaned, everything but the gearchange ratchet spring is OK and I had to change one screw. That spring is supposed to have a tiny gap between it and the pawl, but it was rubbing on one side and is about halfway worn through - didn't help that it was installed upside down. Anyway, the cover is polished and as soon as I find a spring, the gearbox will be done. (37 hours)
February 1, 2023 I forget to fully inspect the crankshaft before placing my parts order. With a good bit of luck, that worked out fine. The journals are standard size and in excellent shape. Where the luck comes in is that the engine wasn't run long after being rebuilt. You can see in the picture a bright spot on each of the bottom shells. Those aren't polish marks - you can catch a fingernail! At first, I thought there must be burrs on the journals, but there are now. It became clear when I split the crank. It had been cleaned of sludge, but there was grit present. The other reason luck was involved was that the drive side conrod nuts were Loctite'd and very tight. The timing side nuts were not Loctite'd and came loose very easily. There is no need for Loctite but there is a need for proper torque! I mentioned before that there are some nicks and scratches on the conrods - I'll polish those out. Fortunately, I keep shell sets in stock so I can proplerly clean and re-assemble the
crank. (40 hours)
February 2, 2023 Cleaned the three crank parts very thoroughly then started on the journal polish. They just needed a light going over with 800-grit paper and oil to be sure there were no burrs. Then more cleaning and inspecting. On close inspection, there was nothing wrong with the journal oil holes on the drive side but when I felt inside with a bare finger, I got a cut from one hole on the timing side - when the hole was originally drilled the metal broke through on the inside rather than being cut. So, I used a 1/8" long drill through the opposite hold to properly cut the inside of that hole. Then I noticed that the factory forgot to chamfer the outside of the hole as well! So, a second with a 3/16" drill and that was resolved. Of course, then I re-polished that side to be sure there was nothing raised.
One final cleaning and it was time to put the crank back together. Since it is held together with studs and nuts and the nuts are not easy to get to, I make sure they will screw on using fingers only. That turned out to take a long time. All the studs and nuts were new and had a thin preservative coating. None of the nuts would easily screw on. So, WD40 and a brass brush on the studs while the nuts soaked in alcohol and then try each not on a stud. Once all seven studs had a nut screwed all the way on each end, I was confident I could put it together and properly torque them. The studs must be installed in the flywheel and then chank cheek pushed on over them, and then the nuts put one. Each stud has an end with short threads and one with long threads. I put all the shorts on one side and checked the same about of stud stuck out on each. Then I put on the other side nuts and got them all finger tight with the cheeks firmly seated against the flywheel. I will torque them tomorrow -
tired and don't want to do something so important while tired! (43 Hours)
February 4, 2023 I guess I'm getting slow in my old age! I really expected the bottom end to be done today. Got the crankshaft back together - that took a while because the rods had a lot more nicks than I thought. They are all reduced/polished out now. It is important to not have stress risers. They went on the crankshaft fine once polished.
Then came the crankcase halves. The drive side was not a lot of trouble since it has only a few threaded hold to clean. Removed the old studs and replaced them with stainless steel. Then heated the case and installed the outer portion of the main bearing.
The timing side was not easy! Besides there being many more threaded holes and passageway, the front big internal cylinder bolt would only screw in 1/4". When I removed the cylinders, all four internal bolts were a pain to get out but that one was the worst. At the time, I chalked it up to Loctite. It turned out that the helicoil was bad. It probably galled either when the bolts were installed last time or when I took them out. That left me with the nearly impossible task of replacing the helicoil with the same size. It's easy to install a new one - getting the old one out without damaging the hole is VERY hard. Basically you must find a way to get hold of the end and then unwind it out of the hole. The metal is STRONG! Anyway, that's all done, all the other threaded holes are tested, and the bearings and new stainless steel studs are in. (50 hours)
February 5, 2023 The bottom end is nearly done. Most things when fine. You can see in the video that the rods are not loose or tight - they fall together.
Had a issue with the timing chain tensioner . There is supposed to be a thin plate behind the tensioner and a thick plate in front of it. There were two thick plates. I didn't have a new plate in stock, but did find a good one in my spare parts.
The new cam's keyway was too tight for the key, so that took a while to correct. The cam is running very smoothly in the bushings and of course is time. The oil pump was gorilla serviced. The screws were doubt punched and Loctite'ed. I almost gave up but finally got all four screw out. It's had to tell in the picture, but the wear of the gears against the base is uneven - I don't even know how to accomplish that! 956 hours)
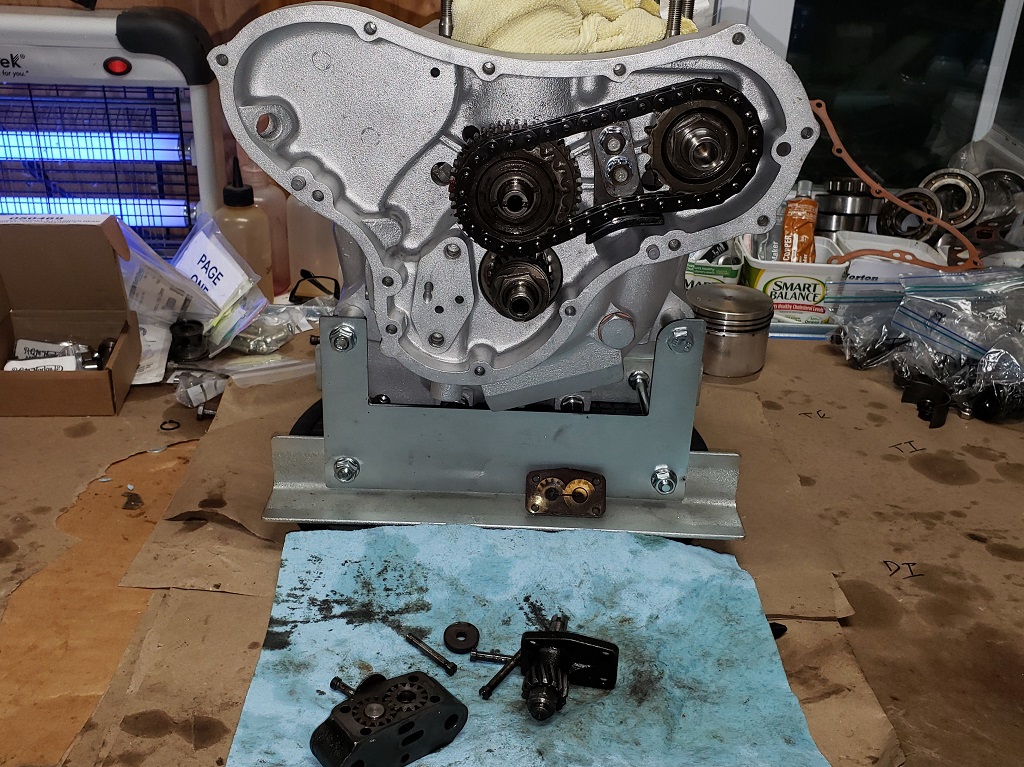
February 6, 2023 It turns out that the cam chain adjuster on MKIIIs is supposed to have two thin rather that one thin and on thick backing plates. I asked AN about this and they said it is because the intermediate gear is thinner. That makes no sence. It is located by the crankcase boss and the chain adjuster is located by the thin inner plate. The thick outer plate has plenty of clearance. I suspect that Norton changed it to save a few cents. Anyway, I didn't have a good used one so I took one from stock.
Then I moved on to the oil pump. There aren't enough threads left in the original back or in the screws so I dug out a bad pump. It has a good back and screws. In the picture you can see the back that came with the original pump and the donor after 320-, 400-, 600-, and 800-grit paper flattening on a dead flat plate glass. I'll finish it with 1000 before final assembly but wanted to check it before doing more. With the original gears it would feel fine but catch enough that I couldn't overpower it with my fingers. It did that before I started but I thought it was grit. I removed the driven feed gear and there was rough spot but no catch. The rough spot was two teeth rubbing on the housing. That would have eventually corrected itself but I spend a little time fixing that. Then put the gear back in and checked again, the catch was still there. So, I inspected both gears under a big magnifying glass and I could see two teeth side-by-side with burrs. I dressed those burrs and I think it
will be OK now. Next issue - the MKIII case has less room behind the pump and two of the screws are sticking out the back far enough to prevent the pump from being installed. The screws are the same for all years, but the ones that came with this pump were clearly ground down after being installed. I'll do that, then take it all apart gain, clean, and assemble.
(59 hours)
February 9, 2023 I've been under the weather for a couple of days so I haven't gotten much done. In discussions with the owner he decided he wants a new oil pump so that has the be ordered. So, I set the engine aside, covered, cleaned up and got back on the gearbox.
Almost got it done but an unannounced visitor stopped by. I found a good ratchet spring, installed the gearshift and kickstart seals. Then it was time for two Norton PITA operations. Installed the kickstart return spring and polished off the inevitable fine scratches that causes on the seal surface. Then it was time for the clutch actuator. It is imperative that the clutch actuator arm point precisely at the opening for the clutch cable. That opening is in the outer cover, not inner. So, you must put the outer cover on, mark the inner cover, remove the outer cover, and use the mark for alignment. Unfortunately, there is no way to firmly hold everything in the right orientation while tightening the retaining ring. After several tries you'll magically get it to line up - it did.
Tommorrow I'll put the outer cover on with a couple od sxrews and test the gearchange. Assuming that works right I'll finish installing it.
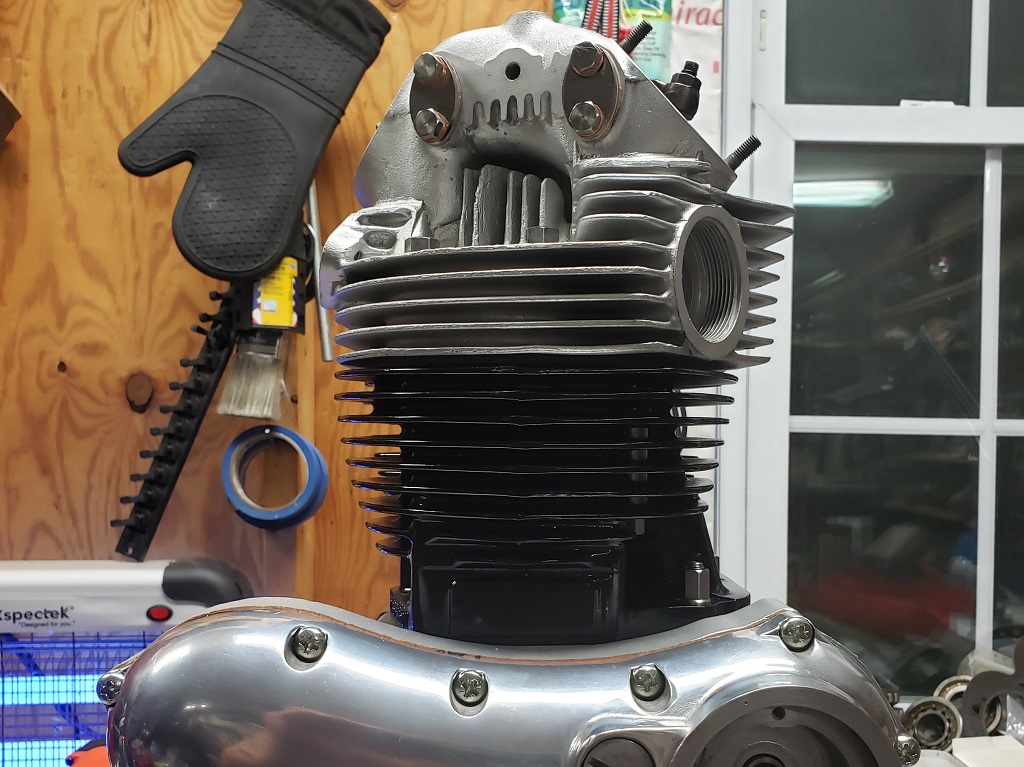
Then I can move on to the cylinders. They were nicely painted but the hard to get to areas were not properly prep 'ed or they were simply missed. I'll remove the tappets, wash the cylinders very well and dry them. Then I'll blast the rust. Assuming the other areas stay OK, I'll move on. If needed I'll blast them completely clean, but that takes way more time than I counted one. Regardless, another through wash and dry followed by a lot of masking and then painting with special barrel paint. Then I can address the honing required followed by another wash and clean and finally the tappets back in. (62 hours)
February 10, 2023 The gearbox is about done. I have to order a neutral switch - the one that came with the gearbox is intermittent. The outer cover gasket was missing from the set, but I stock those so no problem. I cannot properly test the gear change without to other parts so I'm ordering the coupler for the cross-over shaft and will weld something to it so I can use it to change gears without damaging the splines. That will be a handy bench tool. I'm surprised AN doesn’t sell one. (64 hours)
February 11, 2023 First I removed and inspected the lifters. I'm, 99% sure they are new. Most importantly, the cam surface is smooth and unmarked and the surface is well bonded to the body in each.
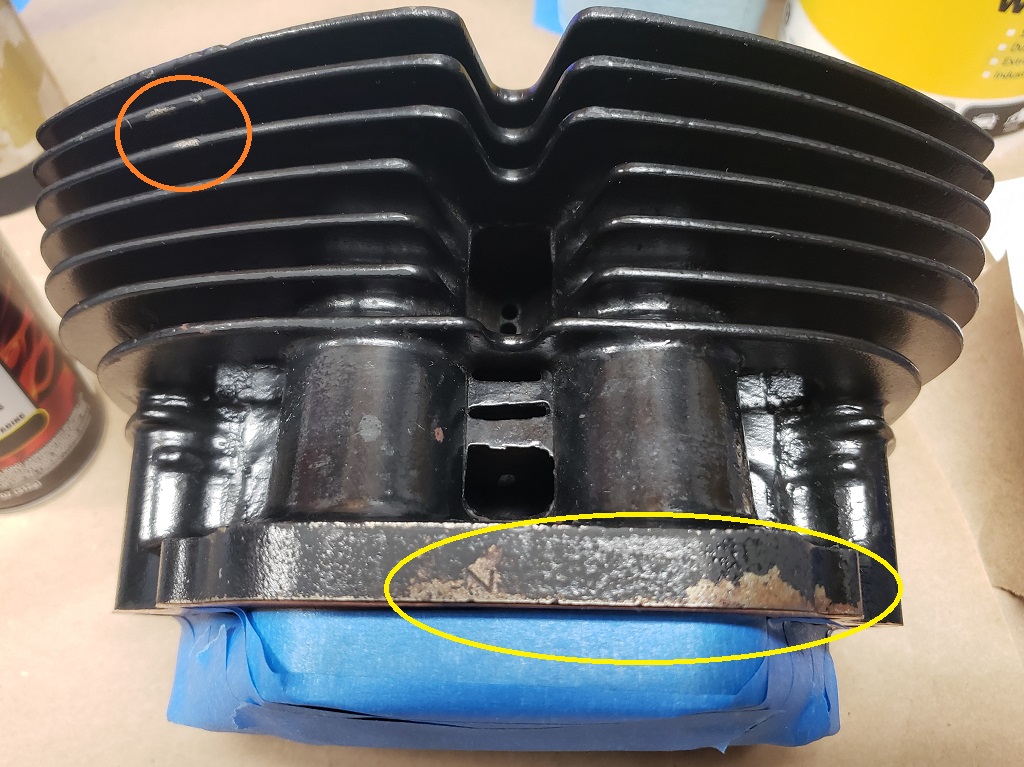
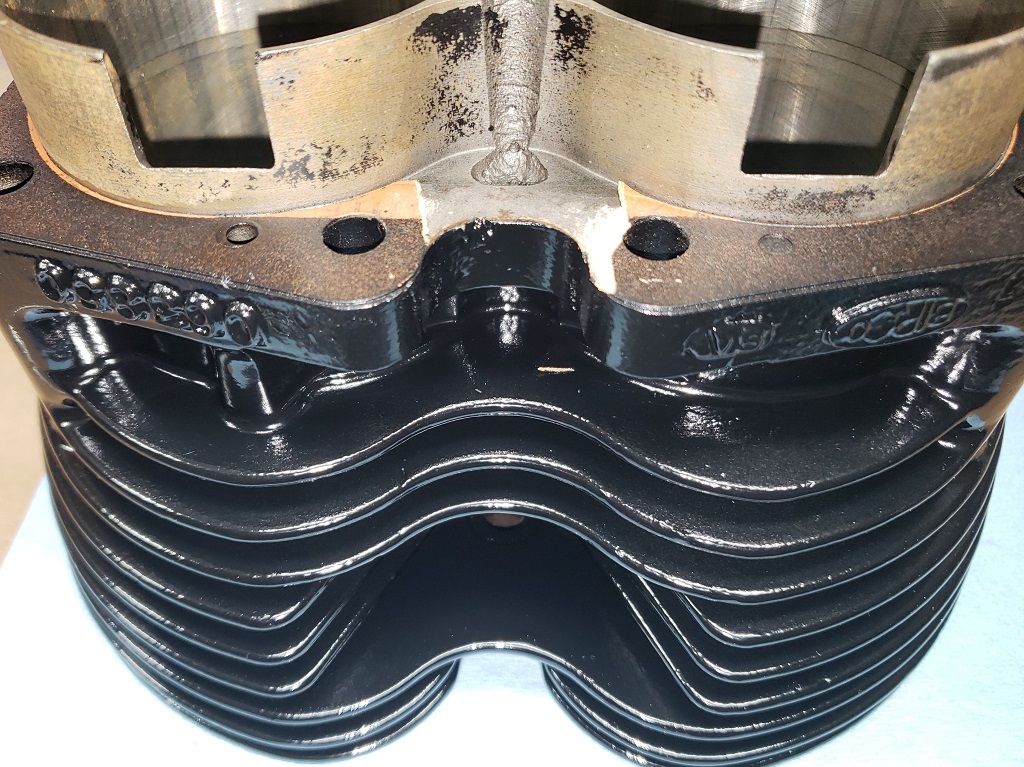
After thoroughly washing and inspecting the cylinders, it was clear what to do. After finishing masking, I smoothed out each chip or other problem. The minor chips were easy to smooth out. In the first picture you can see in the orange circle a couple of chips. In the yellow circle is an area where old gasket sealer was not removed and painted over. Also not shown is that the bottom of the cylinder was not masked the last time it was painted and it took a LONG time to get all that paint off.
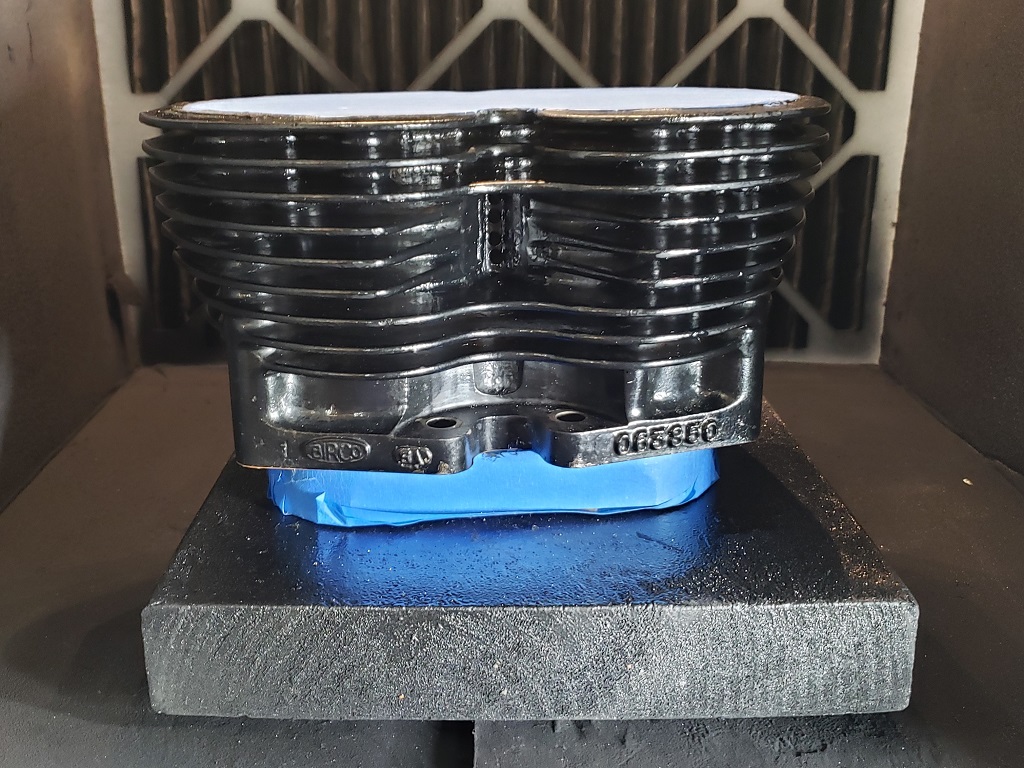
Between picture 1 and 2, I addressed each problem and immediately touched the spot up to prevent flash rust. For most people, the cylinders would have been considered done at that point but not for me. The second picture shows it in my paint cabinet on a turntable right side up for the first three phases of painting.
I first paint at a slight upward angle 1/8 of the cylinders and then turn 1/8 and keep going until I've painted all the way around. Then wait 8 minutes. Then paint the same way but at a slight downward angle. Another 8 minute wait and then using the same method, I paint straight on and wait 8 minutes. Then there is an area in the front center and rear center of Norton cylinders that I get in real close and quickly shoot, and you guessed it, wait 8 minutes.
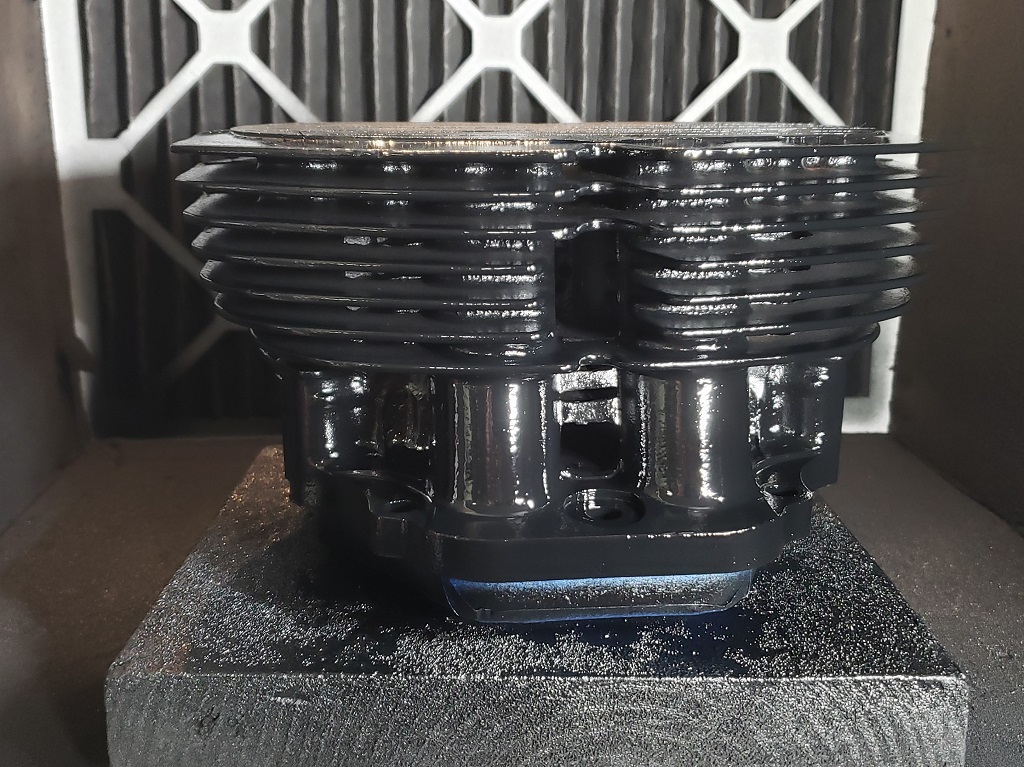
Then comes the hardest part. Turn the cylinder over without touching the painted areas. Picture 3 shows that ready to happen. Then I repeat the whole 24-step process again (downward/upward/straight) each with 8 minutes between. Finally with a strong light I inspect all to see if there's anything missed - didn't find any this time.
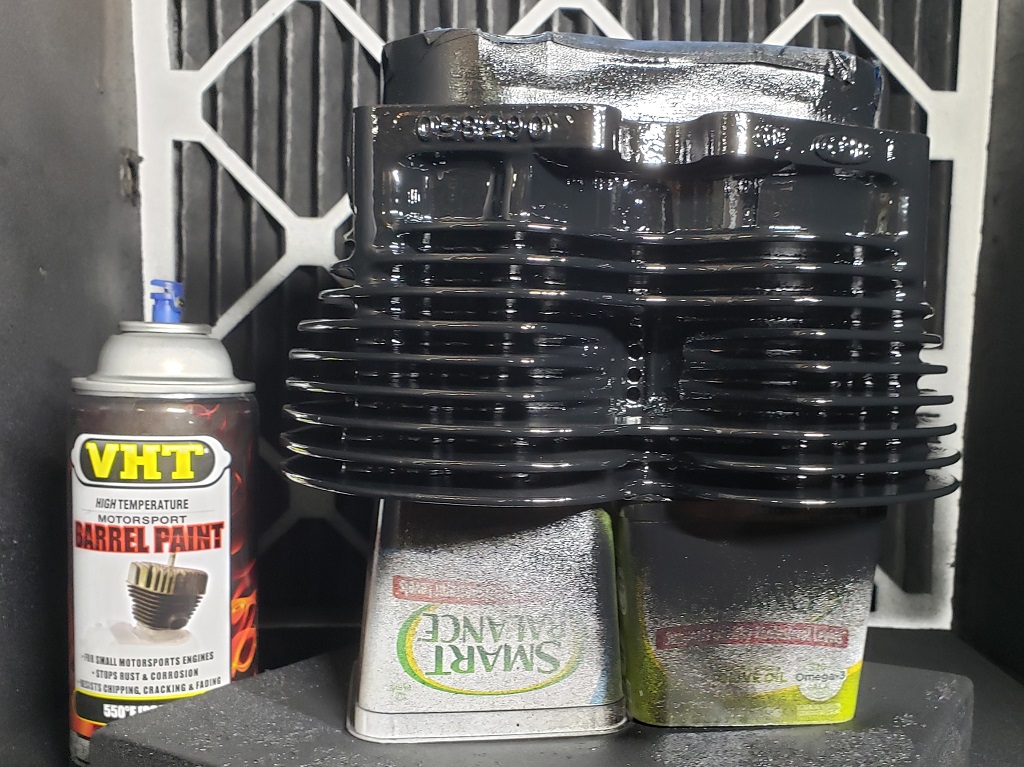
Why all the timing? All coats must be on within one hour and between coats the paint must get too tacky to run. Picture 4 shows them done. The light makes the black a little funny in the picture - they are glass black. (69 Hours)
February 12, 2023 While letting the cylinders harden up, I figured I'd get the head finish. Well, it's ready to go on but a good RGM screwing prevented it from being finished! More on that in a minute.
I install the valves one at a time like this:
- Clean valve with alcohol
- Masked the stem
- Bead blast the valve clean at low pressure.
- Remove the masking and clean the valve.
- "Blue" the business end of the valve - makes it easier to see the seal in the next step.
- Lap the valve.
- clean the valve and put it with the other parts for that location.
Once all valves are lapped, the head is thoroughly cleaned, blown dry, and finally double checked that all threads are ready. The the valves are installed followed by the rockers. Of course, everything gets assembly lube.
Next, is supposed to be the rocker spindle covers. The owner bought stainless covers and bolts from RGM. The covers did not come with inner covers - that's OK, the old ones will work, but they have been heavily glued. More importantly, the fancy set of eight stainless bolts are fine threads, probably BSC. The are supposed to be 1/4" x 20 BSW. I normally re-tap those 1/4" x 20 UNC and use Chrome bolts from Home Depot. Too late, the head is together. I guess I'll put it together with the old bolts.
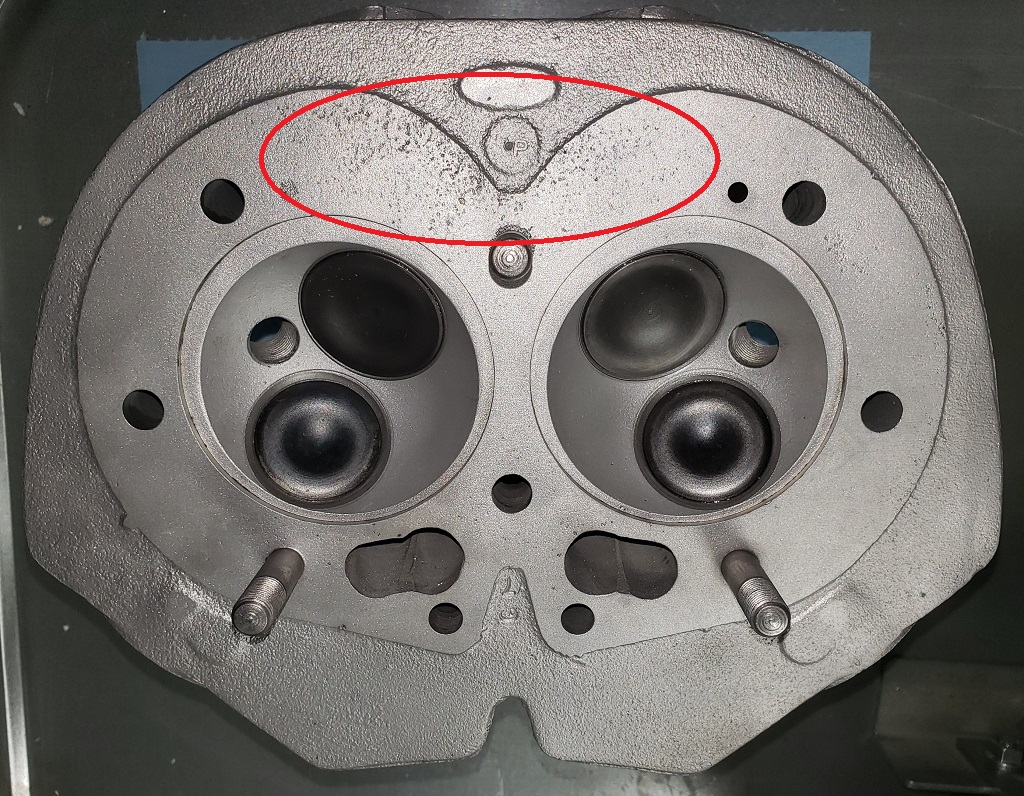
The area circled in red in the first picture seems to show a dirty place. It's not. The head is very porous in that area. I don't normally use anything on composite head gaskets, but I will use copper coat on the head side of the one for this engine. It's probably would be OK without anything but I'll feel better with the copper coat. (75 hours)
February 15, 2023 In case you haven't figured it out, I hate gasket sealer!
The paint on the cylinders is beautiful and hard so I was able to get back on them. I left that base gasket attached as masking. I didn't realize it was glued on. Five single-edged razor blades and 40 minutes of work and the gasket was finally off. I guess I'm lucky it was not glued on both sides - never would have gotten the cylinders off! Similarly, the gasket was glued onto the oil line - that took a long time to get off and then at least I saw why. The surface was not flat. I fixed that and I re-plated the them.
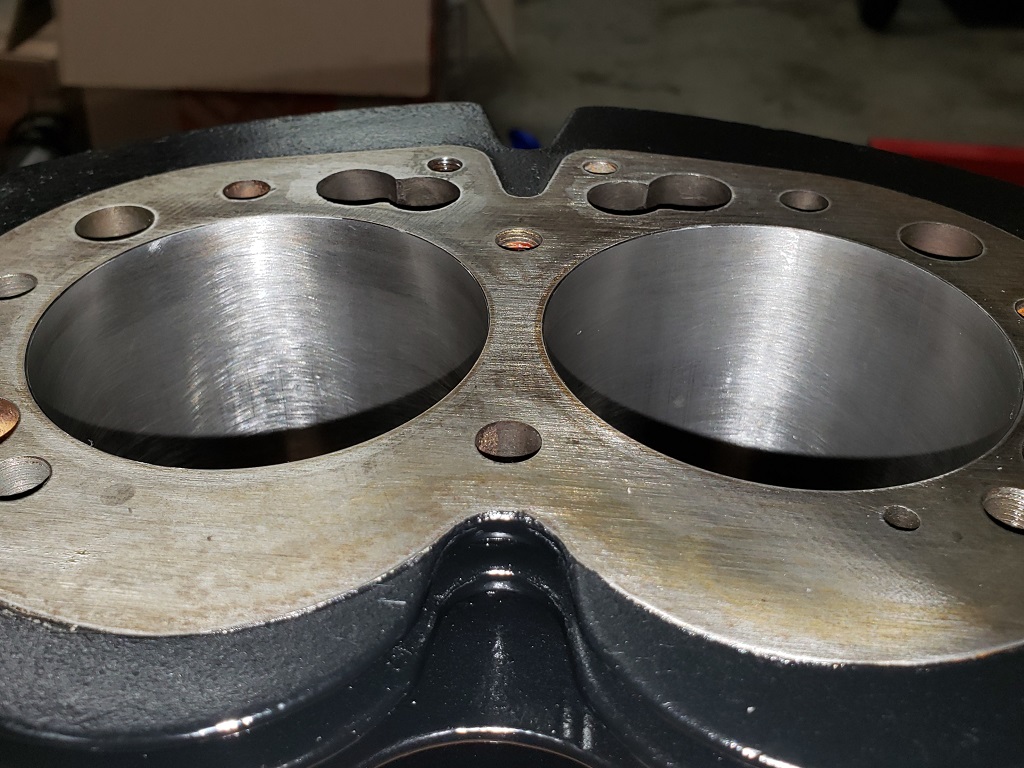
Back to the cylinders. It turns out that they were close to perfectly bored but the hone job is lacking. The piston skirt to cylinder wall clear is a snug .004'. The ring gaps are a snug .010 top and middle in both cylinders.
So, I will hone without going overboard. Just need a clear cross-hatch but not remove much metal, if any. The cylinders have no taper at all. (78 hours)
February 16, 2023 Got a steroid shot in my foot this morning so I had more go power. Unfortunately, they no longer put me in superman mode, but at least it's easier to work a very long day.
Back on the cylinders. Very thorough wipe down inside with a WD40 cloth and honing. Once the shadows I didn't like were gone, another clean and then a cross-hatch hone with fresh stones. They are perfect to the naked eye - hard to capture in a picture.
Next came a very thorough soap and water wash including all stud and threaded hole. The comes the mad dash! Blow dry and wipe all exposed metal with WD40. Even after the soap and water, you get some imbedded oil and of course surface rust. Kept wiping with fresh towels and WD40 until clean. Then brushed out the stud holes with a brass brush and more WD40. So, the cylinders and now clean and protected from rust until I can Install them.
Then I turned my attention to the lifters (tappets). The owner wanted new or ground but the ones with the engine weren't even broken in and they are the quality stellite-tipped ones. My jury is out on the current “One-Piece' ones that AN sells. I have professional lapping paper from 40 microns down to .3 microns. First I verified each lifter against another with a strong light behind - they are all dead-flat. Then I went through each paper and removed the shadow from the short time the engine was run. These are the best lifters I've ever seen in a Norton. Then I cleaned them thoroughly and slipped them in. I was disappointed that they didn't move up and down as easily as I'm used to. On closer inspection, the tubes were not masked when the previous person painted the cylinders! I removed the paint then they moved perfectly.
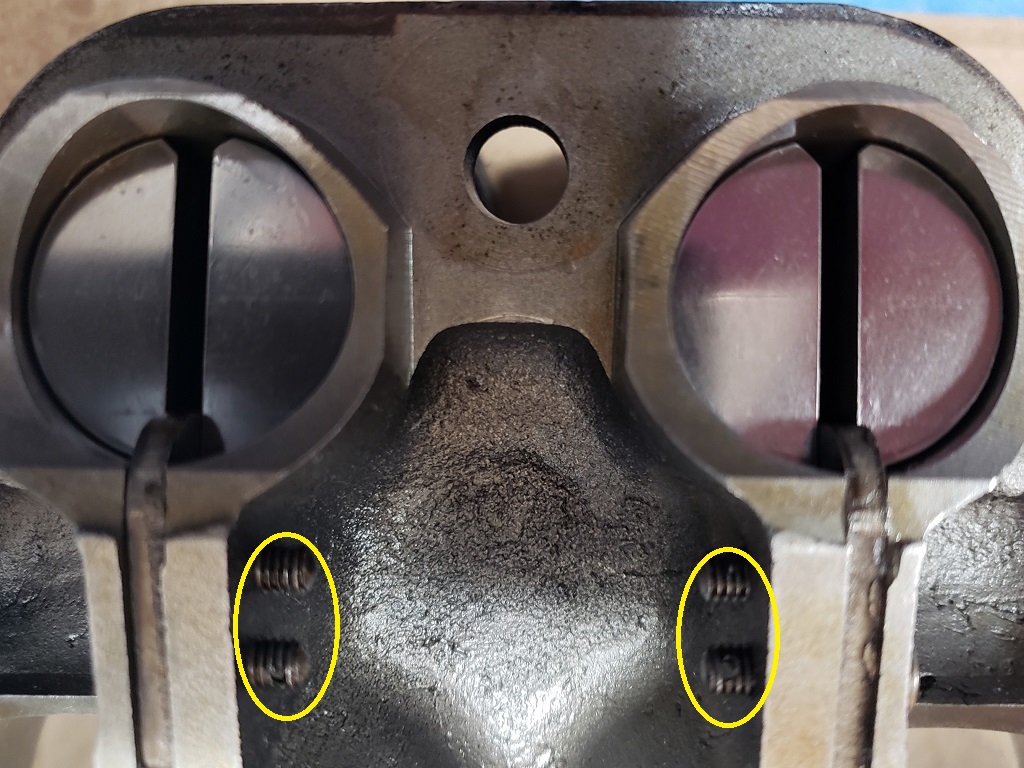
I'm not quite done. In the picture you can see two yellow ovals. Those screws get safety wired. The screws are back in the holes they came from but I will move the four around and try to find a more direct route for the wire through the holes. (83 hours)
February 18, 2023 Installed the sump reed valve. That was a little fiddly, it sticks down below the engine farther than my engine stand allows and it interferes with a cross-bolt in the stand. So, I had to modify the stand and put it on some 1x4s so the engine wasn't sitting on it. Also, they want the hose centered at the back of the engine, which I did, but the hose presses on the back of the engine. Probably would not be an issue with a pre-MK3 and it used 3/8" hose where this uses 1/2" hose. I think it is fine, but not to my liking.
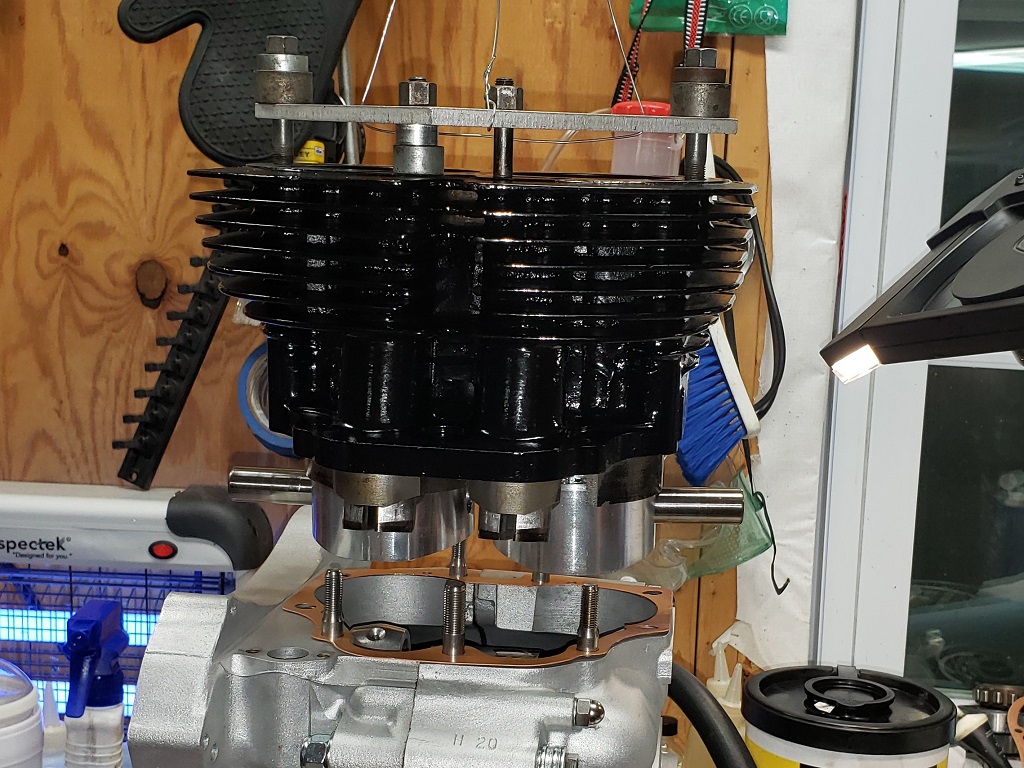
Then it was time for the cylinders. I finished the safety wiring. Polished the pistons, checked the end gaps on all rings and made sure they were marked correctly for the top. Then with everything clean I installed the rings and put the pistons in the bottom of the bores. Then it was rigging time. I am no longer anywhere near strong enough to hold a set of Norton cylinders and manipulate rings or even to hold them and shove in the pins. So, I suspend them from my engine hoist. Then when everything is in position, I push in the pins, install the clips, and start working the cylinders down into place. 750s are easier as there is more room between the outside of the bores and the crankcase, but wiggle, wiggle, wiggle and the 850 ones go in just fine.
he two base nuts on the intake side must be started before the cylinder is all the way down so the hoist helps with that too. I still have to install the through bolts and torque it all but two of the through bolts were missing the special washers so I need to find some of those in my spares. (88 hours)
February 19, 2023 Today was mostly "Paperwork Sunday" but I did get some things done. The cylinders are properly torqued and the intake drain into the timing chest is tested.
The oil pump was a bit of a fiddle. It's brand new and the instructions say to just install it without wiping it off. Well, it was dripping with oil. The key would not fit, and neither would the gear. On inspection I saw that there was a nick across the key slot. Spent quite a while with a tiny flat file fixing that. Then the gear would not go on. I didn't want to sand the shaft without taking the pump apart and I didn't want to take the pump apart so I worked on the inside of the gear. Once I got the gear to go on the only thing left was to tighten the nut. The workshop manual shows doing that with the pump installed - impossible - no room. So, I clamped the gear in soft jaws in my vise and tightened.
The sump reed valve came with a brass taper plug to fill the old timing case breather. It only screwed in a short way and left the outside quite ugly. So, I used a cNw plug - expensive but looks good as it is polished stainless steel and goes all the way though.
In the picture, you can see that all the head bolts have been dry fitted. Stainless bolts often are hard to screw in which throws off torque readings. Those have all been cleaned up so they go in with fingers only. (91 hours)
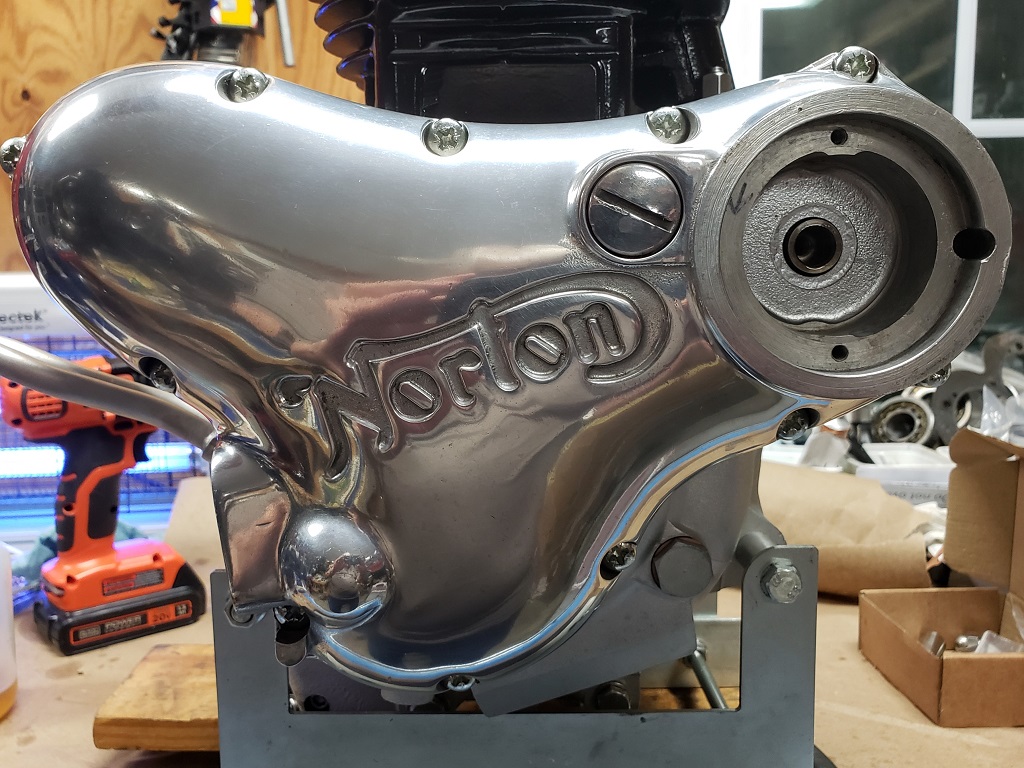
February 20, 2023 Cleaned and polished the timing cover then installed the new seals. That went fine. In the picture, you can see me taking the picture. Then, let there be weird. I expected to see stainless socket screws to hold the timing cover on but there were 12 Posidriv screws 1-1/4" long. I checked with AN to see what they should be which turned out to be 1-1/4" long 1/4" UNC. Then I checked RGM and they said 1-1/4" long 1/4" BSW. It turns out that RGM sent the right screws - UNC, not BSW.
That done, it was time for the pressure relief valve. When I took it off, the body rather than the cap came loose so I had to get the cap off on the bench. I almost threw it away and replaced it all but finally got the cap loose. It was installed with HEAVY Loctite - that should never be done. Next, there was only one shim and it was between the screen and piston! That was a disaster coming for sure! I damaged the body getting it apart and the body has rust so I’m changing the body - luckily, they are not expensive.
Then I tackled the tachometer drive. The engine has the “improved' version with a proper seal for the shaft. Unfortunately the seal is worn out and the shaft was running in grit. Also, AN lists no part number for the seal and the gasket/seal kit did not come with it. I have no idea at this point what to do about that. (94 hours)
February 21, 2023 Bullet dodged (actually two). Everything checked a laid out to install the head. Then I got the head gasket out of the sealed envelope. What! The fire ring on one side was kinked and there's no way it would seal. Then I remembered that I had two in stock because I fat fingered a part number in an order a while back. The head went on fine and only the rear center nut gave me trouble. The casting on this set of cylinders did not let the special tool for that nut fit over the nut. A lot of grinding on the tool and now it fits.
The head is torqued but I will do it again before setting the rocker clearances. Composite head gaskets sometime relax slightly in a short while.
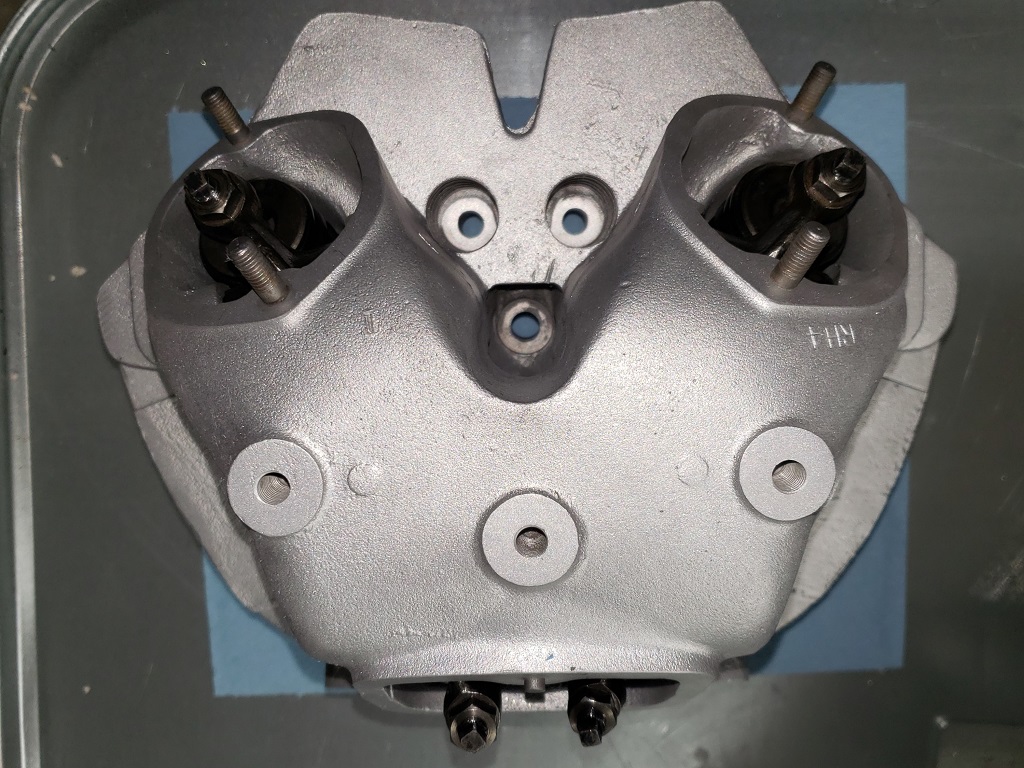
Next I cleaned up the inner metal spindle covers and installed. The top front bolt in the timing side did not want to go in, so I had to chase those threads. Fortunately, you can get to the other side so there's no chance of contamination. Tomorrow, valve adjustments and covers. (99 hours)
February 22, 2023 It can't be! The world must be ending! Nothing went wrong today!

Retorqued the head and adjusted the valves. Polished the rocker covers and installed. (102 hours)
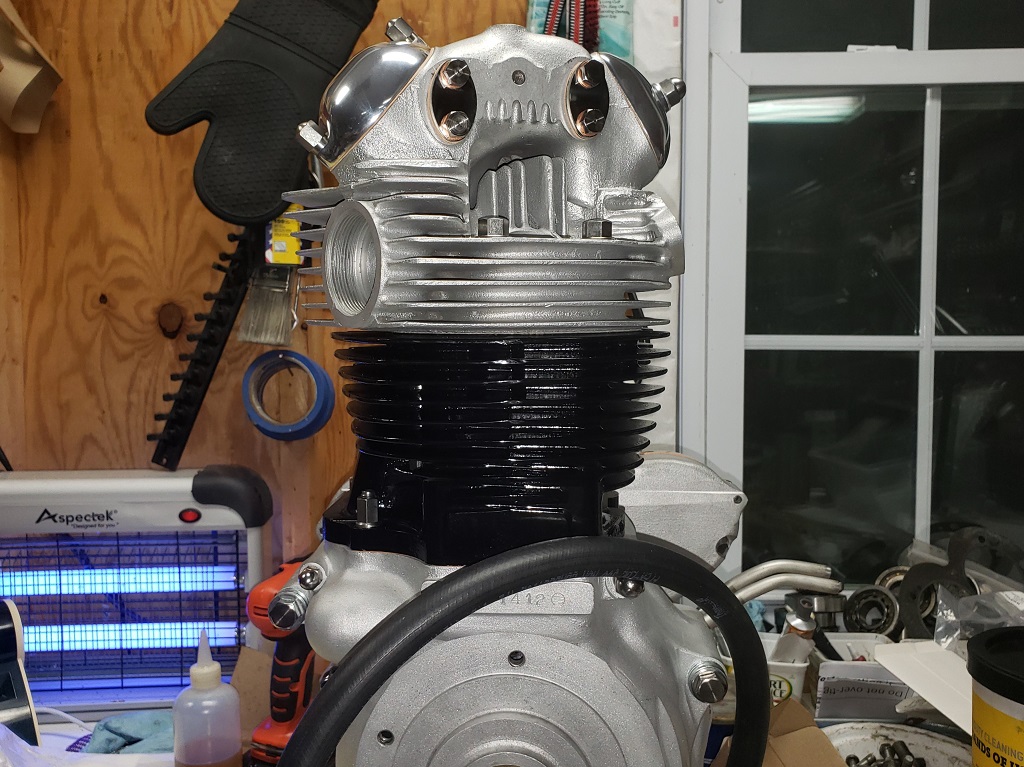
February 24, 2023 The engine is done except for the ignition and tach drive. The tach drive that came with the engine is worn out. I have others, but I imagine the owner will one the kind that came with the MK3. Anyway, it takes two screws to install. The gasket and those two screw are there with a silicone stopper filling the hole.
The engine is fully primed. You can see the hose I put on to loop the oil pipes. The oil looks a little orange even though the conventional oil I used is normal clear/tan. The orange is coming from the lube pack that came with the cam.
After I install the Tri-Spark, I'll go back to the gearbox. I have what I need to make a tool to test the gearchange now. Assuming that works right, the gearbox is done. (104 hours)
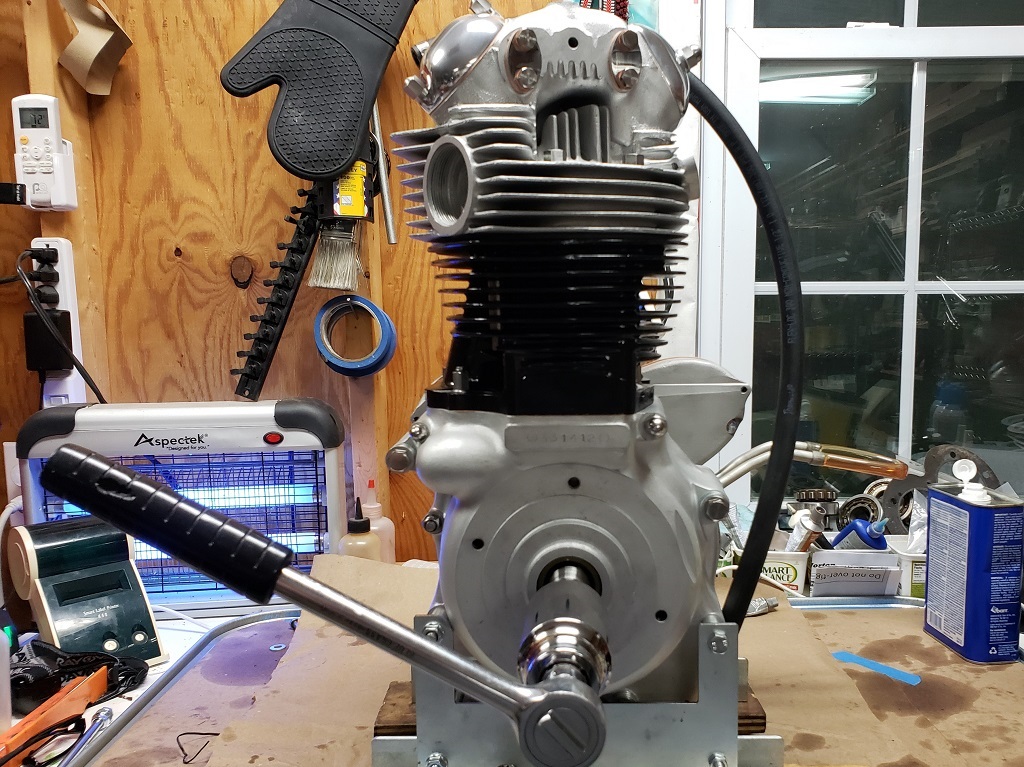
February 25, 2023 Es ist fertig! Installed the Tri-Spark igniton. Had to set up a test rig to do the static timing and while setup, I could run the self-test. Turn your volume up and watch below. The video was hard to get without help! You have to hold the test button, connect the power, all while trying to record - short a hand! Then I made a tool to test the gearchange. The tool and the gearchange work great. Then it was onto the neutral switch. I bought a new one because the one the gearbox came with was flakey. Unfortunately the new one stops the gearbox from going between first and second (both way) unless you jam it very hard. So, I spent time flushing the old switch WD40 and operating it - it finally started working reliably and it works fine in the gearbox. With that, the gearbox is done. (108 hours)

March 7, 2023 The owner picked this up today.
For those wondering, I expected to make about $8/hour on this project but ended up at $4.63/hour. In contrast, when I have an unskilled helper, I pay $17.00/hour and in my IT work I charge up to $200/hour. This is why it's difficult to find people to do things like this for you unless you have really deep pockets. Anyone trying to make a living doing it would have had to charge at least $2500 in labor for the job and that would still not be much of a living!
|