|
|
 | Tuesday, July 28, 2026 |
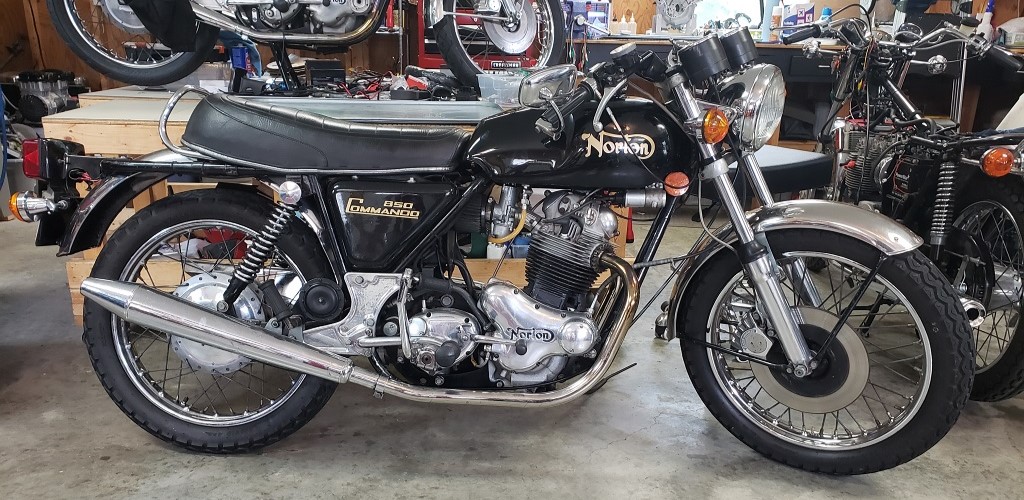
May 13, 2023, New project. I've documented other Nortons but this 850 is a little different so I'll document the work. Most British bikes in the US are low mileage. The bike arrived today, and we went over its history and the work it appears to need. The owner estimates that this one has 50k miles. He got the bike from his brother who got the bike with about 6k miles. So at least from 6k miles until now, they know that the head was off once, the cylinders have never been off, and the bottom end has not been out of the frame.
This project is primarily an engine rebuild. It runs and rides fine, but the engine is making noises so it's time. The owner reports that the gearbox works fine. The bike has a belt drive - I haven't seen inside the primary yet, so I don't know its condition, but the owner says that the crank may have excessive end play, and the rotor nut may be hitting the primary cover. The bike has no center stand which will be a minor PITA until I install one. He also thinks
that the wheel and headstock bearings are original and may need service - I'll investigate that.
This will take a while. I had my right hip replaced April 6, 2023, and that was great until May 5, 2023, when I woke up barely able to walk. I've been back to the doctor and the implant is fine, so something has happened to my hip/thigh muscles or tendons - it sure is hard to get around quickly!
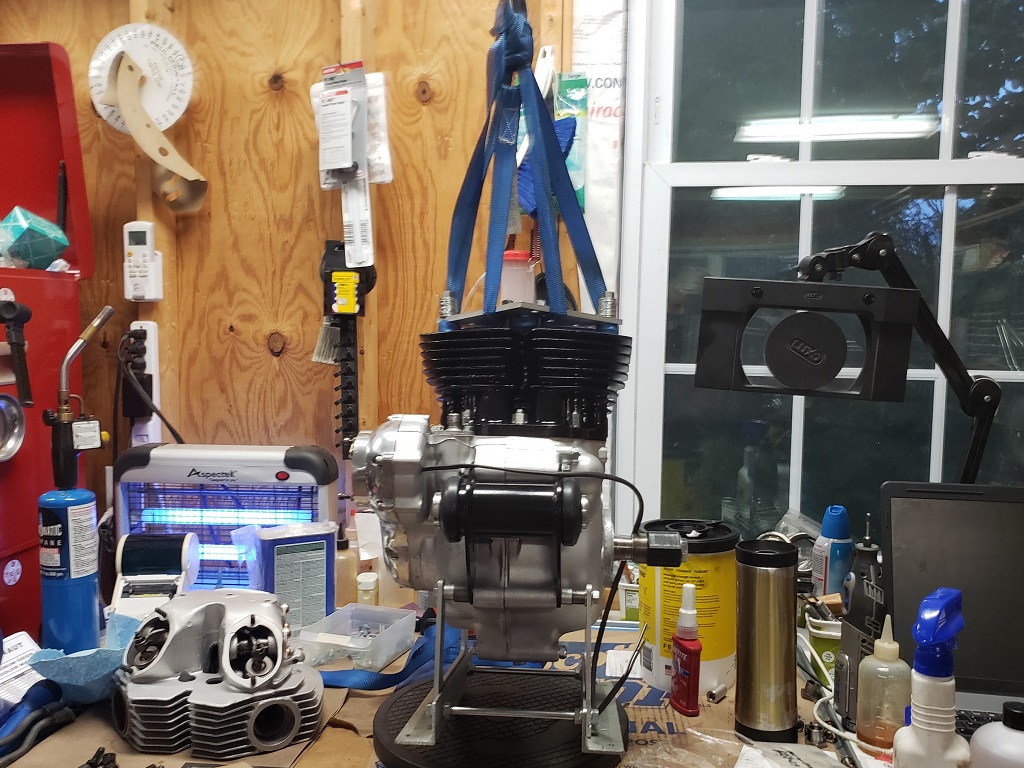
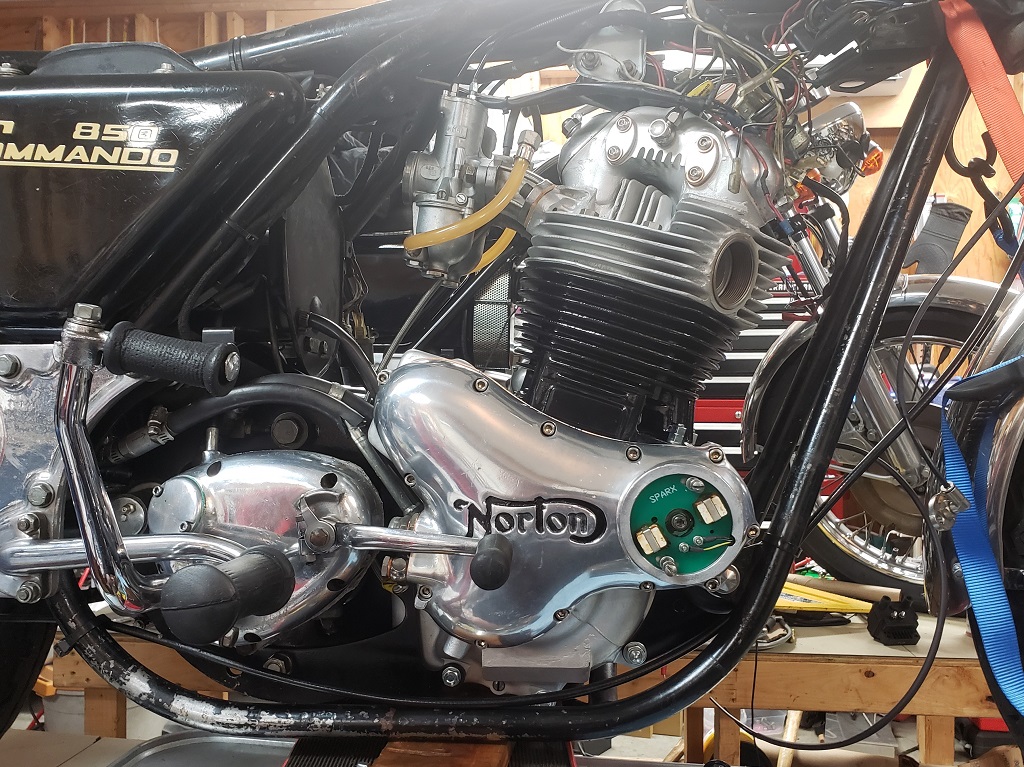
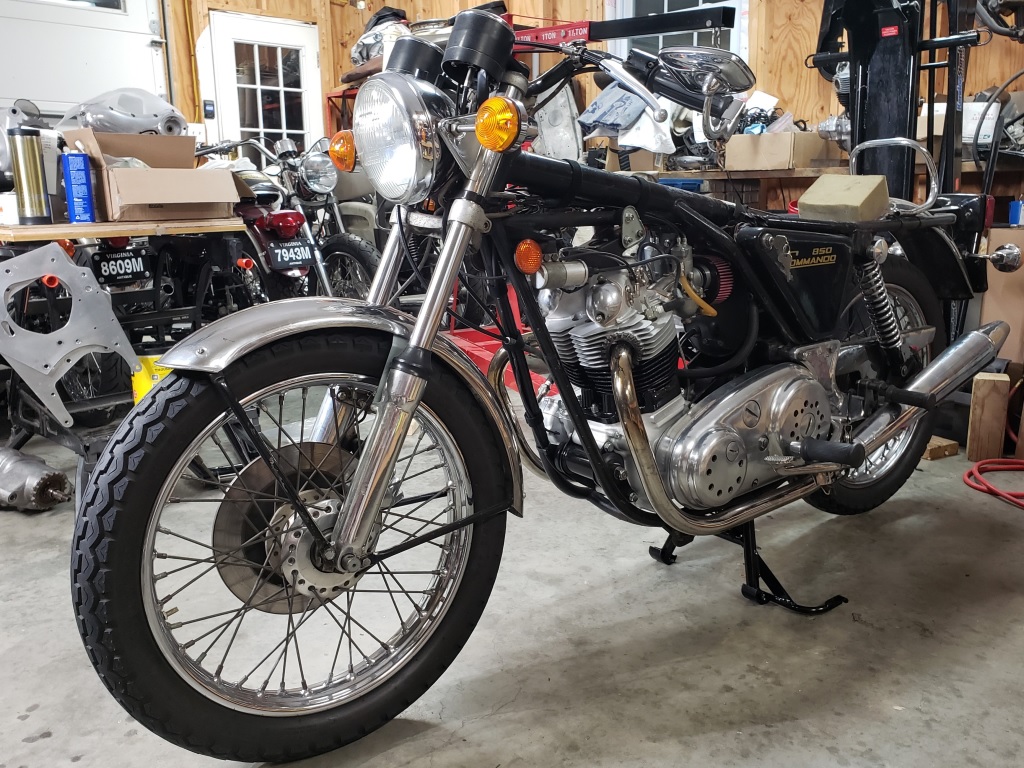
The first picture is before starting and the second is the bike ready for the head to come off. I'm keeping a running total of the time spent. (2 hours)
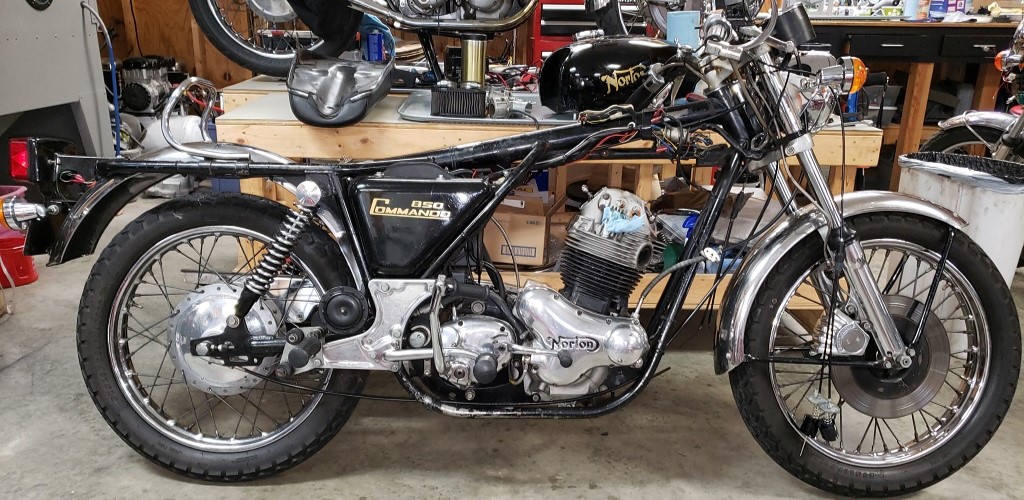
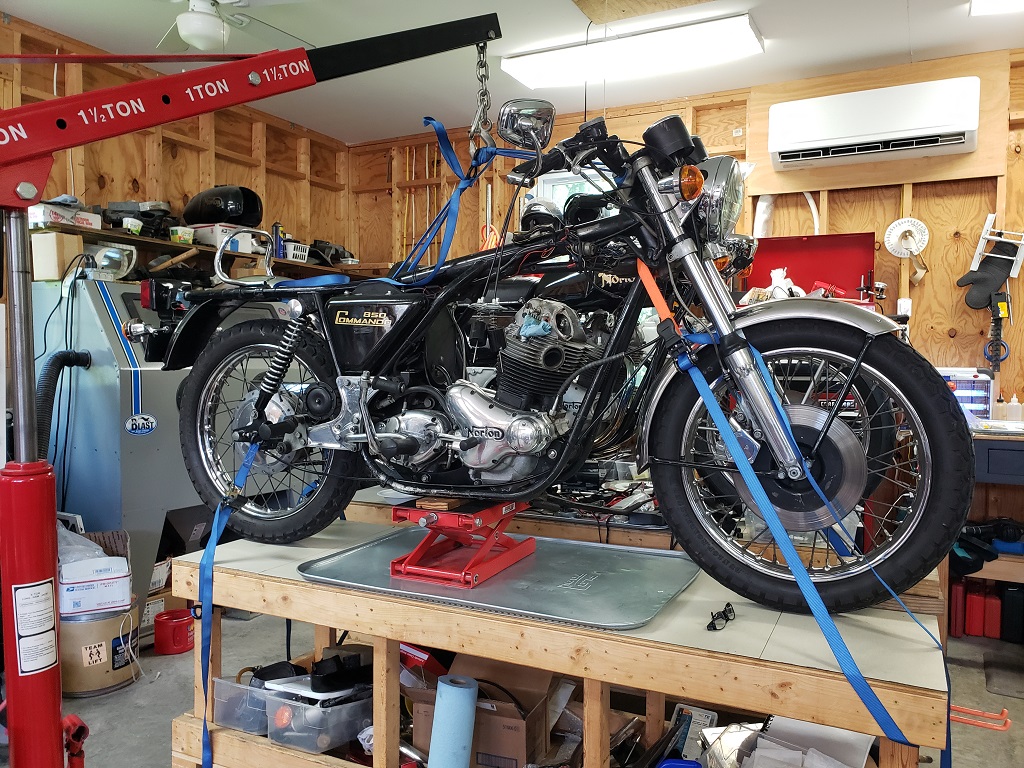
May 14, 2023, after putting all the parts I removed yesterday in containers for safe storage, I rigged the bike to go on the table. Generally, I just lift them up, put down the center stand and set them on the table. Since this bike has no center stand it was a bit more complicated. Had to strap both eh front and rear ends and use a jack. The bike is firmly in place now, so it was time to start removing the head.
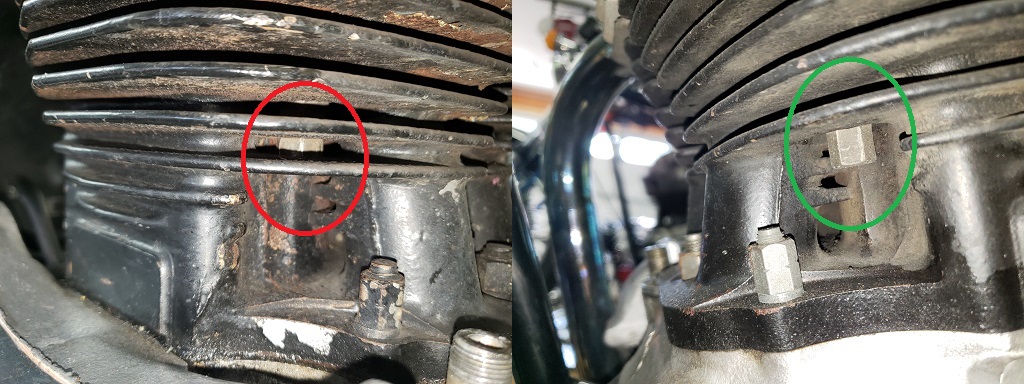
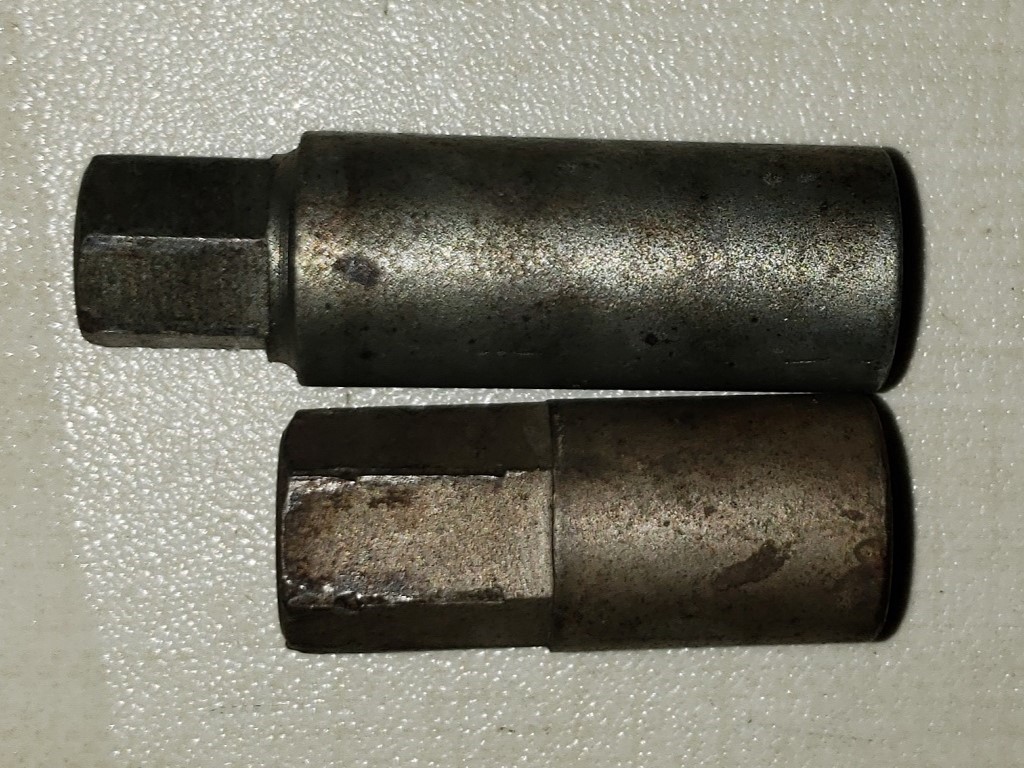
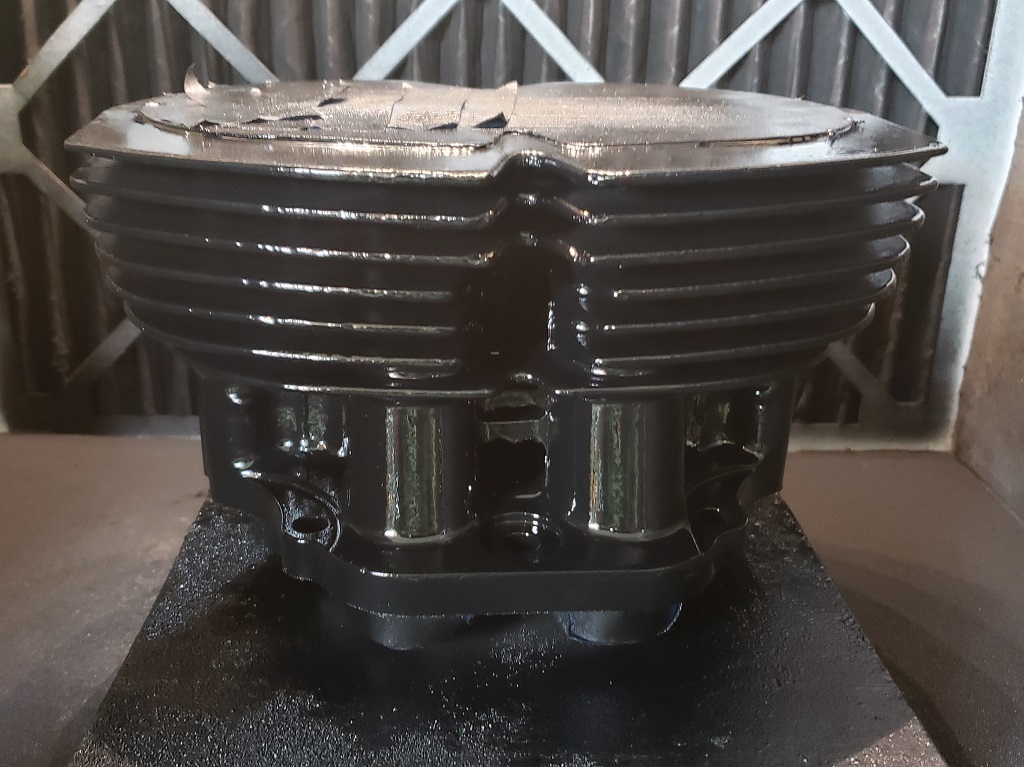
It usually takes about 20 minutes to remove a head - not today! The 850 sleeve nuts are supposed to require a 7/16" wrench and they are supposed to protrude below the bottom fin as shown in the green circle. This bike's sleeve nuts require a 5/15 BS wrench and did not protrude as shown in the red circle. I had no wrench or combination of tools to remove them, so I had to make a tool. The second picture shows the correct sleeve nut and one from this bike.
Then it should have been a simple job to remove the remaining eight fasteners. The rear nut was easy - it was finger tight! The two nuts for the front two 5/16' studs were the wrong thread and came out very hard and one brought the stud with it. The four outer head bolt all came out VERY hard. They were installed without the special washers, so the aluminum of the head crashed into the bolts. The front center nut came out normally.
Fortunately, a visitor came by just as I was about to take the head off. With my arthritis I find it difficult to
do by myself - but it's easy with a helper!
(4.5 hours)
May 15, 2023, I was having real trouble standing today so decided to inspect the head. There is much less carbon than I expected, and the bike must have been running on non-E10 gas. The plugs show a perfect tan.
Both timing side rockers felt rough. I took all the rockers out to inspect and so I can take the valves out. Once cleaned, all the rockers and spindles feel OK, but those two spindles have wear I don't like. I will check all four rockers with a new spindle and hopefully they are fine. I will replace those two spindles regardless.
Did a seal test on the valves and they all seal fine. I haven't taken them out yet to check the guides - ran out of steam.
The cylinders are shiny - no crosshatch showing, and there are rust spots in the cylinders. I'll measure them once they are off, but I'm guessing a bore will be needed. While turning the engine over to look at the cylinder walls, I heard what sounds like a bad big end or main bearing - whatever it is, it's not good. (6 hours)
May 17, 2023, Took the primary and timing side apart so I could the clutch locking tool to remove the cam nut, oil pump drive nut, rotor nut, and clutch nut. In the process I found several problems and the bad noise is related to the rotor nut, rotor, and primary cover - glad of that.
- The owner was worried about crankshaft end-play. This engine actually has the least I've ever measured - 0.017" - nothing to worry about there!
- The primary drive is a belt and the clutch pushrod seal was installed, but it was unscrewed so it was doing nothing.
- The clutch nut was missing the 06.3447 washer that goes between the tab washer and nut. So, the tab washer was compressed which made the nut loose. Fortunately the tab washer worked.
- The rotor was installed with two spacers that were not only not needed but part of the rotor nut problem - they were 0.074". The other part is that rotor is thicker than normal (appears to be a Trident rotor). It is 0.044" thicker. All together, that made the front of the rotor stick out 0.118" and the net does as well. The nut was rubbing on the inside of the outer cover and the rotor timing marks o the timing scale.
- The stator looks find but the rotor has been through hell at some point.
- The clutch stack height was too high. It was very difficult to get the circlip out - will need to investigate when re-assembling.
- The oil pump studs were loose in the case - removed the nuts and studs with fingers only!
- The oil in the engine was WAY past time to change. (8 hours)
May 18, 2023, It's the little things that slow a project down! The front pulley had different threads and different spacing that the standard sprocket. Took a while but I was able to cobble together a puller that worked. The rest of the primary came about fine but I'll have an issue putting it back together - the seal plates behind the clutch are a mess. The next simple job that took a long time was getting the oil line off - they were very hard and I finally gave up and cut them off. Next was the bottom engine mounting bolt. The bolt is a standard 5/16" UNF but the nut is something weird. I had no wrench that fit it! Finally had to use an adjustable on the nut and unscrew the bolt.
When you're old, a shadow of your former self, and can barely walk, picking up a Norton engine, even a partly stripped one, and walking with it is a non-starter. The metal plate above the cylinders has about 25 holes in it. It's a puller, lifter, and more for Norton, Triumph, and BSA. In this case, three of the four outside deadbolts secure it to the cylinders. A little rigging with a strap and out the engine comes. I normally wheel them over to the bench dangling from the engine hoist, but the path was no clear enough today. So, I sat the engine on my roll around cart, wheeled that to the bench, and was able to pick it up and set it on the bench. (10.5 hours)

May 19, 2023, Lots of progress today - had some help. The bottom end is apart. The top ring on the timing side was in two pieces! The bores and pistons were otherwise running fine. I haven't measured you, but from feel, I think a bore will be required. The cases were VERY hard to split - the location dowels were rusty and had sealer on them. The crankshaft looks good too. Tomorrow we'll take the rods off and inspect but again from feel, I expect to find them in good condition. We'll also split the crank and clean it out. We have one big problem with the crankshaft. The pinion gear's key, which is normally easy to remove, would not come out - tried for over an hour! Ended up grinding it off and will get it out without the cases in the way. (16 hours)
May 20, 2023, First we disassembled the crankshaft and inspected. I first glance I thought there would be a big problem - the big end shells looked burned and the big end journals also showed signs of heat. I think this was from running without oil due to a check valve in the oil feed line. The shells are toast, but I always change those anyway. Surprisingly the journals felt and measured OK. So, I gave them a light polish and they are fine.
Then, worked on the pinion key for quite a while. Finally drilled a small hole in its center and tried to lever it out - would not budge. Then two more holes in the key - still no good. Then drilled the first hole with a bit the width of the key to split is in half. With it split, was able to lever it out. The amazing part is that I used enough precision that you cannot tell they ever was a problem!
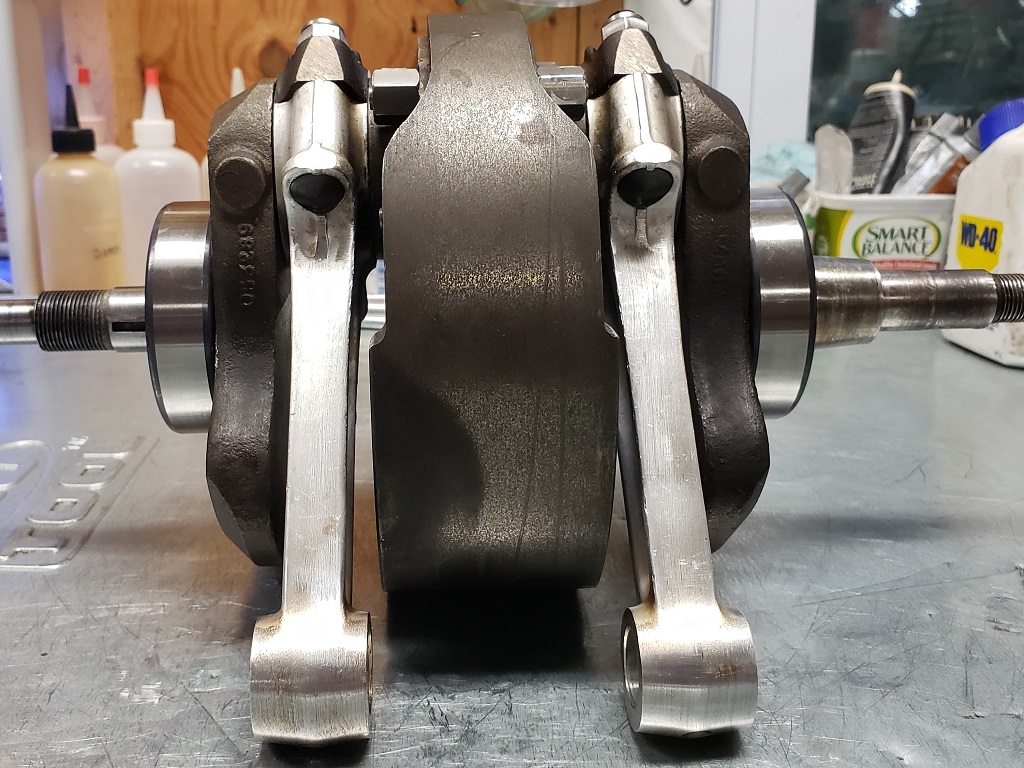
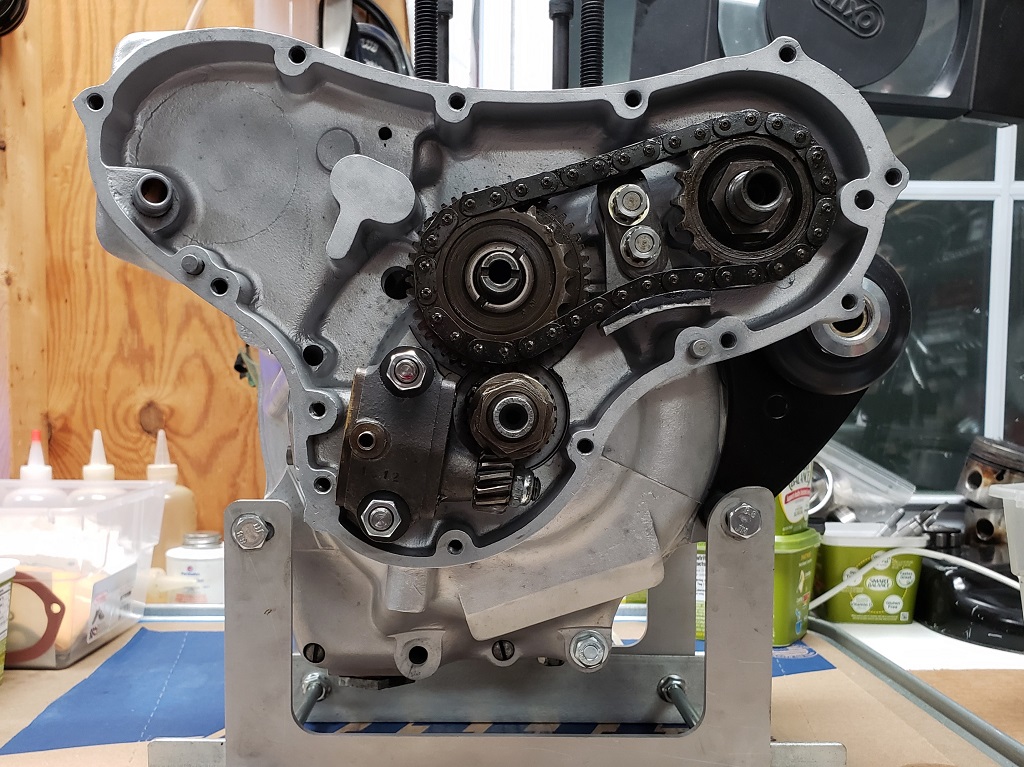
Those issues resolved, cleaned everything thoroughly and reassembled the crank. Also, I forgot to mention before that the lifters look new, and the cam looks almost new. So, as soon as I beautify the crankcases bottom end can go back together. The picture shows the crank all back together with new "Superblend" bearings, new shells, new conrod nuts, and new hardware to hold the crank halves together. (17 hours)
May 21, 2023, Didn't have help today, but did make some progress. The cases are cleaned, blasted clean, and cleaned again. They need to be peened and then have the final clean. Then the bottom end can go back together. That was WAY more standing than my hip liked.
I'm 99% sure the bottom end was never apart, but I'm also 99% sure that the cylinders have been off before. The base gasket had a lot of damned hard to remove gasket sealer and the factory used none. (21 hours)
May 22, 2023, I guess I overdid it yesterday. Walking to and from the shop multiple times and standing for a couple of hours was out of the question today.
May 23, 2023, Finished the next to last step of beautifying the cases. They need the final soap and water washing and then the bottom end can go back together. They look good, but like most 850 cases, they are porous, mostly on the inside. So, you make them spotless, and 30 minutes later there are little black circles. There are only a few porous spots on the outside and they are where they won't show. (24 hours)
May 24, 2023, Forgot to update. The cases are clean and the bottom end can go back together. (25 hours)
May 25, 2023, Got a steroid shot in my foot this morning. It fully kicked in around 5pm so that's when I started on the cases. I call it "Superman Mode". If my hip weren't so bad, I would be without pain, without inhibition, and likely to hurt myself - can't afford anything else to go wrong so I worked slowly and methodically.
Removed all the studs from the crankcases and cleaned all the threads so the studs, bolts and screws would go in all the way with my fingers. I had a hard time getting the through bolts out of the cylinders when I took it apart. Figured out why today, two of them bent! I have so good used ones so not an issue. When I put the studs back, I will use a little blue Loctite and just snug them in. That way if they ever need to come out again, a little heat and will be no problem. Most people go all gorilla and drive them in too hard. The bolts and screws need clean threads for accurate torque settings, and they are all that way now.
Gave everything a very thorough
blow at 100psi to be sure there was nothing to contaminate anything, and then installed the main bearings. These are the most porous cases I've seen. While heating to install the bearings, oil kept coming out of the pores and I kept wiping it up with alcohol-soaked towels. It doesn't' really hurt anything but I don't want it on my hands when I touch the outside of the cases. Some areas of the outside weep too, but that's in areas that don't show. Makes me wonder if some of the pores go all the way though the case. As I said before, they are all somewhat porous and the 850s are worse than the 750s. Obviously, it's OK - hasn't harmed this bike.
Could have put the bottom end together today but thought better of it due to the steroids - need to make sure I don't get in a hurry and forget to do something! (28 hours)
May 26, 2023, The bottom end is together but not yet in the engine stand. Since I'm installing the engine in a built bike I'll put the front ISO on first. But, it's rusty needs new boots, and the inside is very hard - made by RGM. It looks compatible with the AN internals. The other parts seem OK. Unfortunately I could not get the internals out. They were installed with axle grease which may be why they are stuck and hard. I'll press them out tomorrow and inspect. Once I get it apart I'll blast and powder coat the housing. Once done, it should never need touching again in the owner's lifetime. If the internals need replacing, I have a stock of AN internals that I get for almost free so assuming they fit those will be a low-cost fix. (31 hours)
May 27, 2023, Finally, a milestone worth showing! The front ISO is restored and on the finished bottom end. The top ISO mounting bolt is fully torqued, the bottom is aligned but the proper hardware will be installed once it comes off the engine stand. A weird thing about Commandos is that there is no way to torque the three rear bolts until connected to the cradle. When I build bikes from scratch, I make sure the cradle is ready when I put the cases together but there's no way to do that when just the engine is out. All nuts and bolts that can be torqued are. Planned to put the timing side back together tomorrow but this bike still has the all metal cam chain tensioner and I am out of stock on the rubber faced one. Will soon place an order but want to be sure of what all I need first. (35 hours)
May 29, 2023, News, bad news, good news, great news!
Did a full inspection of the cylinders yesterday. The taper is just under 0.0045" and the official Norton limit is 0.005". If I were to install new pistons and rings without a bore, the honing would put them at the limit so it's not a great idea. So, checked with the owner and will have them bored +.020". So that's the news. I figure on sending them to cNw as they not only bore but clean and ceramic coat them which would save me (and the owner) time - denied! Matt has so much work right now that he's not taking more. Jim Comstock would be my second choice as I know I can trust his work, but he's had two of my crankshafts for about two years so there's no telling when he will get to this. That's the bad news. I checked with two people I trust who build Norton engines, and each gave me the name of who they trust to do the bore. I'll call them tomorrow as today is a holiday.
Got back to work on the head. Before removing the values, I did a leak test. While not actually needed as the valves will be lapped in, I like to know the seating condition before starting. The Norton workshop manual says to do a 20-second leak test after lapping the valves. This was a 4-hour leak test with absolutely no leaks! That's good news. Then I removed the valves and inspected them one-by-one. Each is in excellent condition - WAY better than expected and WAY better than needed to stay with the valves and guides - that's great news.
I've started the head beautification but have run out of steam for the day. (40 hours)
May 31, 2023, The first phase of the head cleanup is done and it's clean and ready for the beads.
One of my guys came through with a trusted machine shop to do the bore. I spoke with them and am comfortable that they will do a good job. Their turnaround is 2-4 weeks - best I've found. The long poles in the tent are:
- They are in Seattle, so shipping won't be cheap.
- I need to find a strong shipping box and good packing. Norton cylinders are heavy, and the skirts are easily broken if hit on the side.
- The pistons must go with the cylinders so they must not be crushed in the process. Normally I would jump in the car and go to the place where I buy boxes - a little more difficult right now.
(43 hours)
June 1, 2023, the head is now spotless (I hope). The next to last step of my process is to wash the part and make sure it has absolutely no media. To do that, I wash it in my stainless-steel kitchen sink. I use plenty of soap and a variety of small bottle brushes to clean out every hole while running water in the hole. Then I lift the part and feel the bottom of the sink. On the first round, it is always clear that there is still media. So, I run the water over the part while draining the sink and then I make sure the sink is spotless, and repeat. The second time, there is usually a hint of media. The third time, usually none. Then I do another complete rinse with now soap followed by using compressed air to dry everything.
The final (I hope) step is to try bolts in every threaded hole and if any grit is found I clean that out on the bench. If any threads need help, I chase them at the time. If I find any grit or if I had to chase any threads, it's back to the kitchen sink. Sounds
long and complicated, but it is imperative and doesn't take a long time.
So, I've mentioned the kitchen sink. Pretty clear that I'm a widower. Tuesday, my cleaning ladies came. The three of them saw the head sitting on the counter and begin women, almost in unison started nagging. I told them to hush and that one of them needed to carry it to the shop for me. Then I told them that a new replacement is about $4k and to be damned careful. When I brought it into the house it was almost more than I could do - walking with a cane, carrying a head that you have to be very careful with, climbing stairs - almost too much. It sure was nice to have them carry is back out for me!
On further inspection the head is in good shape. The timing side exhaust threads have been replaced as well as the timing side exhaust valve guide - it's bronze like the rest but the combustion chamber end is slightly tapered than the others. That's no problem at all. The head was heavily carboned but that's
100% gone now.
I studied how to ship the cylinders today. I'm going to make a wooden custom-fit box to put inside the cardboard box. That will ensure that nothing can happen to the cylinders, especially the skirts and the box I make will be easily re-usable to send them back to me and for next time I need it. I have always either had or been able to find cheaply a good set of Norton standard sized cylinders and then sold the ones needing bored. Hasn't worked out this time. Triumph cylinders are much lighter, and the skirts are much tougher so those are no problem to ship.
(45 hours)
June 3, 2023, ended up cleaning the head three more times yesterday! Most things came apart hard when I disassembled and when I tried the threads, many would not go in with fingers and some still had grit. All are good now, but it took a good while.
Started on the valves today expecting to have the head together in about two hours - pipe dream!
When I take a head apart, I bag each valve and its associated parts and mark the bag. When I put them back together, I take one valve out, clean it and lap it in. To clean them, I clean the stem thoroughly with alcohol, cover it with tape, and bead blast the working end at low pressure to get the carbon off, remove the tape and clean it very thoroughly.
Remember that I did a long leak test, and all were sealed so I expected a quick lap on all, a cleanup, and then install.
The first valve I lapped was the timing side intake. That was quick and easy, and it passed the light and engineers blue tests perfectly. Cleaned it and put it back in its bag.
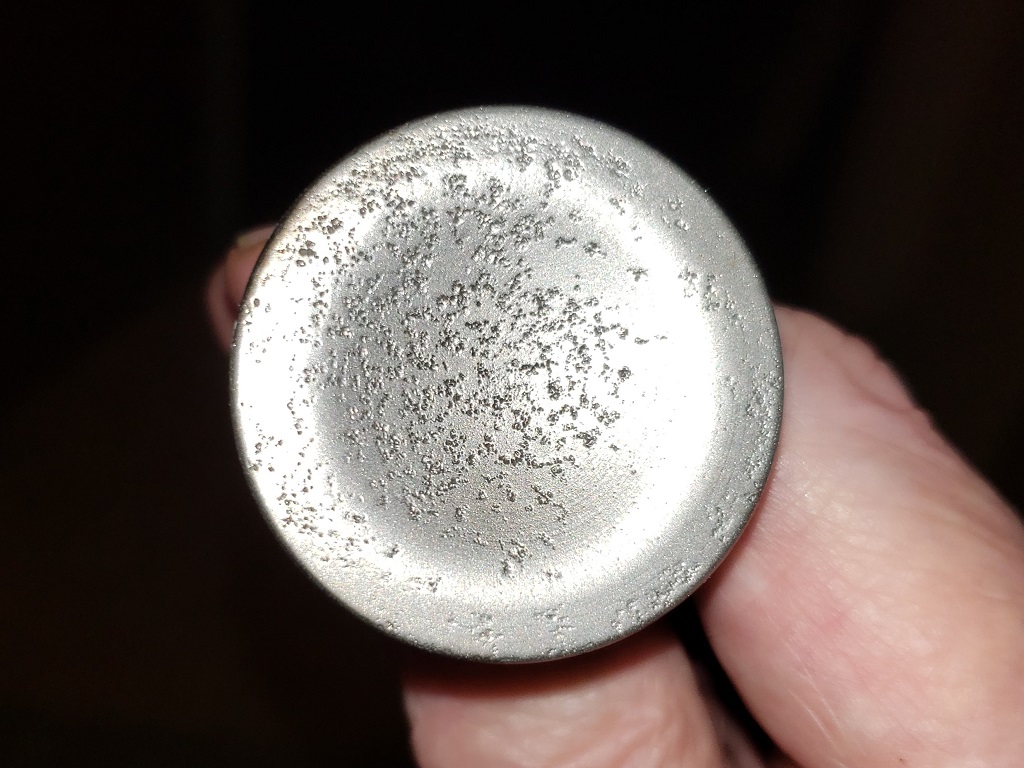
The second valve was the drive side intake - see the picture to see what I found! The valve had a light coating of carbon so the pits were not visible until blasted. That valve must have been open for a long time at some point in the past. Although the valve would have worked there was no way I could get the suction cup of my valve lapper to stick. I have a complete set of valves but didn't want to break it up. I had an extra head that had like new valves, so I took one from it. Took three tries to get it lapped in properly, but it too tested well.
The third valve was the timing side exhaust. That one was weird. On the first lap, it passed the tests, but the sealing surface was only about 1/32' - should be more like 1/16'. I guess when that guide was replaced, the lapping was not completely done. After two more rounds of lapping, I had about 1/16" and both tests passed well.
The final valve did not want to lap in. The light test showed it sealed turned a certain way but turn it a little and there was a sliver of light. It was also clear that the valve had not been turning. So, it was a slightly bent valve. Stole one from the same head and after four rounds of lapping it passed both tests.
The head is back in the house for a final wash to be sure all the lapping paste is gone.
I also found a suitable piece of wood in my stash to build the cylinder box and I hope to get that done tomorrow. (49 hours)
June 4, 2023, spent a while today designing and cutting out the parts for the cylinder shipping box. That was going well until I got out the pistons to figure out how to pack them with the cylinders. That's when I realized that I was bassackwards on what pistons I had in stock.
I thought I had a 20 over 750 set and a 40 over 850 set. No, just the opposite - just placed an order - they should be here Wednesday. Edit: Still bassackwards! Need 850 +20 and have them! Next, I realized that my wood glue was dried up! Ordered that from Amazon - supposed to arrive tomorrow. I can still barely walk so trying to go get things is difficult.
So, then I started on the head. Checked the valve springs free length. The outers are supposed to be 1.618" and the inners are supposed to be 1.482". The first set I checked are 1.515" and 1.402". Fortunately, I had a new set of springs in stock. Installing the vales with the new springs went smoothly. The rockers will go in when I get the two new spindles.
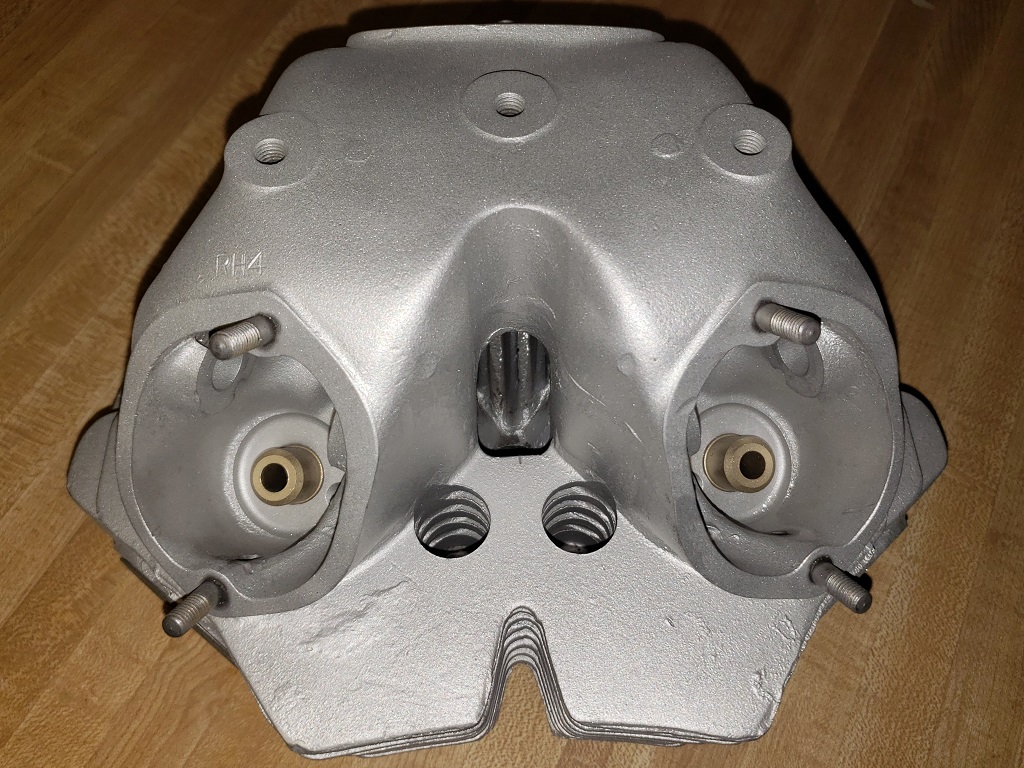
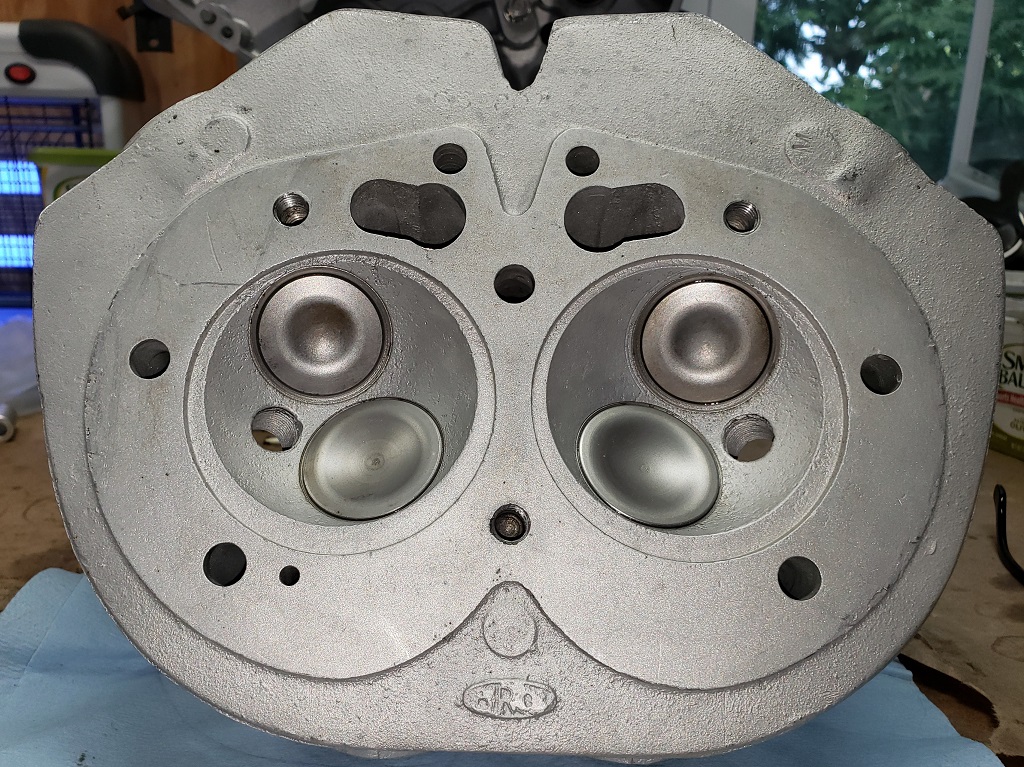
There is a good bit of pitting in the combustion chambers, but that is common for Norton heads. The seats and valves are good. The mark on the left that looks like a crack is just a very fine scratch - it's not a problem. The spark plug holes are far from perfect but will be fine as long as the plugs are screwed in by hand to start. (51 hours, the box building is on me).
June 7, 2023 the box is done. 12x12x12 cardboard. Inside, 1/2" plywood bottom, top and four sides. Cylinders bolts to a 5/4 board that fits snuggly between all four side and has legs that hold the cylinder on the bottom. The top has legs that hold it from the main board. The pistons are protected between the top and main board. It's all reusable which is why i went to the trouble. The cylinders are blasted clean. (53 hours, box building on me)
June 8, 2023 the box is shipped. I normally use USPS Priority mail which would have been 2 days and at maximum of handled 5 times. But that was $128 at a discounted rate. UPS 2-day was about $180. I sent it UPS Ground for $69 including $800 insurance (discounted rate) - no telling how many times it will be hand held and the box weighed just under 36 pounds. It will be there next Wednesday so only a couple of days later. (53 hours)
June 9, 2023 Hoped the AN order would arrive today even though is it scheduled to arrive Monday. Need the two rocker spindles and spindle covers to finish the head. (53 hours)
June 14, 2023 the AN order arrived late yesterday. Installed the rockers today. All four rockers were good but two new spindles were needed and installed. (54 hours)
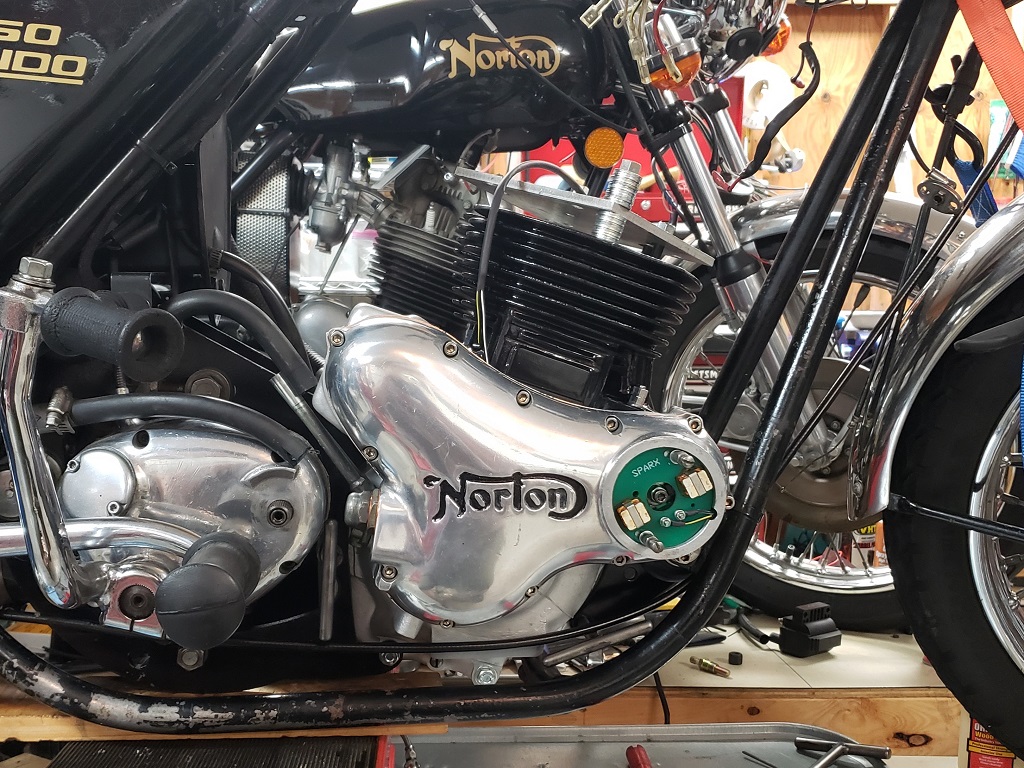
June 15, 2023 Installed the spindle cover plates. The screws that came with the bike were heavily rusted and the covers were ugly. I didn't realize I was out of the screws. But, 1/4 BSW is compatible with 1/4 UNC and I had the 1/4 UNC stainless button head screws you can see in the picture so I used them. I buy them in bulk so no charge to the owner on those.
My order also included the new cam chain tensioner and the new nuts you see in the second picture. The timing side internals are now done. I'll probably buff and installed the timing cover tomorrow. (56 hours)

June 18, 2023 I've been a little under the weather the last couple of days but I did get the timing cover cleaned, polished and installed. The screws it came with were all posidrive and the same length, Both the head and lengths were non-standard and many of the heads are bad. I don't have a set of proper dome-head slotted screws but I did have all the correct lengths of stainless socket cap screws so I used them. Many people prefer them anyway.
The oil pressure relief valve was a bear to get apart! Once I did it was also very dirty and had only one shim (two are needed), and the piston was stuck. Fortunately, I was able to get the piston out and once everything was clean it worked fine. I put the body in at the correct torque with a new copper washer, installed the piston, shims, and springs and then the cap, again with a new copper washer and at the correct torque. I also, cleaned up and installed the oil pipes junction block.
So, the bottom end and head are done. Just need the cylinders back from boring to finish the engine. (59 hours)

6/22/2023 Still waiting for the cylinders to come back but did accomplish two things and learn something!
I noticed that the wires from the Sparx pickup were oily, hard, and the wrong colors. On further investigation the red one was broken inside the heat shrink at the eyelet. So, I made a new harness for that.
When I removed the rotor, the nut was hard to get off - had to use a ratchet and strength all the way. Of course, it should go on using fingers only and be torqued at the end. The threads are 5/8"-20 UN. That caused confusion. Some say the thread are 5/8"-20 BSC. Since there is no such thing as 5/8"-20 UNC (11tpi) or UNF (18tpi)or UNEF (24 tpi). I was at a loss and thought it must be BSC.
Then I discovered the UN is none of those! UN is a standard of its own!
I used a thread file which made it better but still not acceptable. I searched everywhere and the price for a tap and die was WAY more than I was willing to pay. I finally checked eBay and for that massive some of $15.89 delivered I got both a tap and die. Of course, made in China and sold by a Chinese company. They arrived today - took 3 days. The die fixed the bad crankshaft threads, and the tap fixed three spare nuts I had. The nut that came with the bike is junk - it literally wiggles on the crank as most threads are gone! I assume it had bad threads and an air wrench was used to install it. Anyway, all good now. (60 hours)
July 20, 2023 I finally head from the people doing the cylinder bore. They say "next week". It is really annoying that they said two-four weeks and it's now five weeks since it got there. At this rate it won't back to me this month! I have another cylinder to be bored - not likely to sen it to them!
July 28, 2023 Now I'm really annoyed. I heard nothing all week. Found another guy who "thinks" he can bore the cylinders for the other engine but wants $215. Found a set on eBay that might not need bored, but their measurements are suspicious and they want $375 plus shipping. I offered $250 plus shipping but they came back with $325. If they didn't need bored, I would do that, but between boring and honing, finding someone to do it, shipping both ways, blasting and painting I would be in way too much time and money. I was stretching at $250. I've bought several at $250 or less that just needed cleaning, painting and installing.
August 2, 2023 Finally, some good news, Got a call today saying they were starting. It was a bit weird. He was misreading the box of pistons and he was focused on a 77mm bore. There was no metric used in the UK in the 70s. The std bore of an 850 is 3.030 according to the workshop manual and 3.031 according to some non-Norton books. Norton approximated that to be 77mm. He kept saying that there would be no clearance. So, I had him measure the skirts of the piston to be sure they were what the box said. He got 3.021! I made it very clear that he was reading wrong because that's less then std, much less 20 over! So, he got a different micrometer and the pistons were actually 3.0475 which is 20 over. 3.050-3.0475 is .0025 so not quite enough clearance. To make it very clear, I told him to make the bore/hone .004 larger than the skit of the piston - I think he planned to bore to a "book" size rather than the piston plus clearance! I sure hope I get
properly bored and honed cylinders back!
August 3, 2023 Didn't hear from the boring company today, hopefully they will call tomorrow saying it's done!
August 5, 2023 Didn't hear from them yesterday or today.
August 9, 2023 You would think that a 73 old would not have a lot to learn. I learned something today that I really did not want to know! The cylinders were supposed to cost $90/hole and I asked that they paint them to save me some time. That was supposed to cost $80. So, $260 + shipping. Somehow I was billed $391.23 and that's not the worst thing. Got a call today and they said that they had a problem with the painting and wanted to know if it was good enough - it certainly is not! When I sent them they where perfectly clean and without paint. They said they re-blasted them. Looking at the paint, they got oil on them before painting and they painted all at once rather that in multiple light coats. Rather than have more ridiculous delays I said to ship them to me. I'll have to re-blast and paint them.
So, stupid - when my special shipping box gets back I'll put in the next cylinders I need bored and send them to someone else - I'll certainly never use or recommend them again!
August 11, 2023 Can't win. According to UPS tracking they package got stuck in Seattle for two days without reason. If supposedly started moving this afternoon.
August 16, 2023 Just got an update from UPS and they say they are delivering tomorrow afternoon.
August 18, 2023 Stupid is as stupid does. The cylinders arrived today and I see what stupid thing they did. When I sent them they were blasted completely clean - no paint left. Then thoroughly washed and untouched my bare hands afterwards. They were blown dry with a heat gun and the bare surfaces what would not be painted were very lightly oiled. They were told all this. I asked them to paint them to save me time and to ensure that they would not have no oil contamination. If they were smart, they would have painted them before anything else. If I had been smart, I would have simply painted them - the actual painting takes about and hour and then they need to either sit a week or be baked.
After letting them sit for 8 weeks they unboxed them. Bored and honed them. They re-blasted them, blew them off with air and painted. I know they did this because in the nooks and crannies there were glass beads under the paint and there were several areas where finger prints were painted over and the oil bubbled out when they baked them and made little volcanoes.
They used VHT caliper paint, which is acceptable, but is higher gloss and thicker. I prefer gloss VHT Barrel paint as it is designed for the job and has the right level of gloss. Since they baked it, it is very difficult to blast off. So, I spent three hours, sanding, cutting off drips with a knife, more sanding, and finally giving them an overall blasting - this got rid of the loose places and gave the paint "tooth" so it will be good when I paint. Now I need to wash them, dry with a heat gun, clean up and surface rust that forms and then thoroughly clean with denatured alcohol (can't use water for the final wipe as the surface rust would come back).
Don't worry, the owner will not see the extra time or cost my stupidity caused.
One good thing to say. They bored and honed to perfection - zero taper - exactly on size.
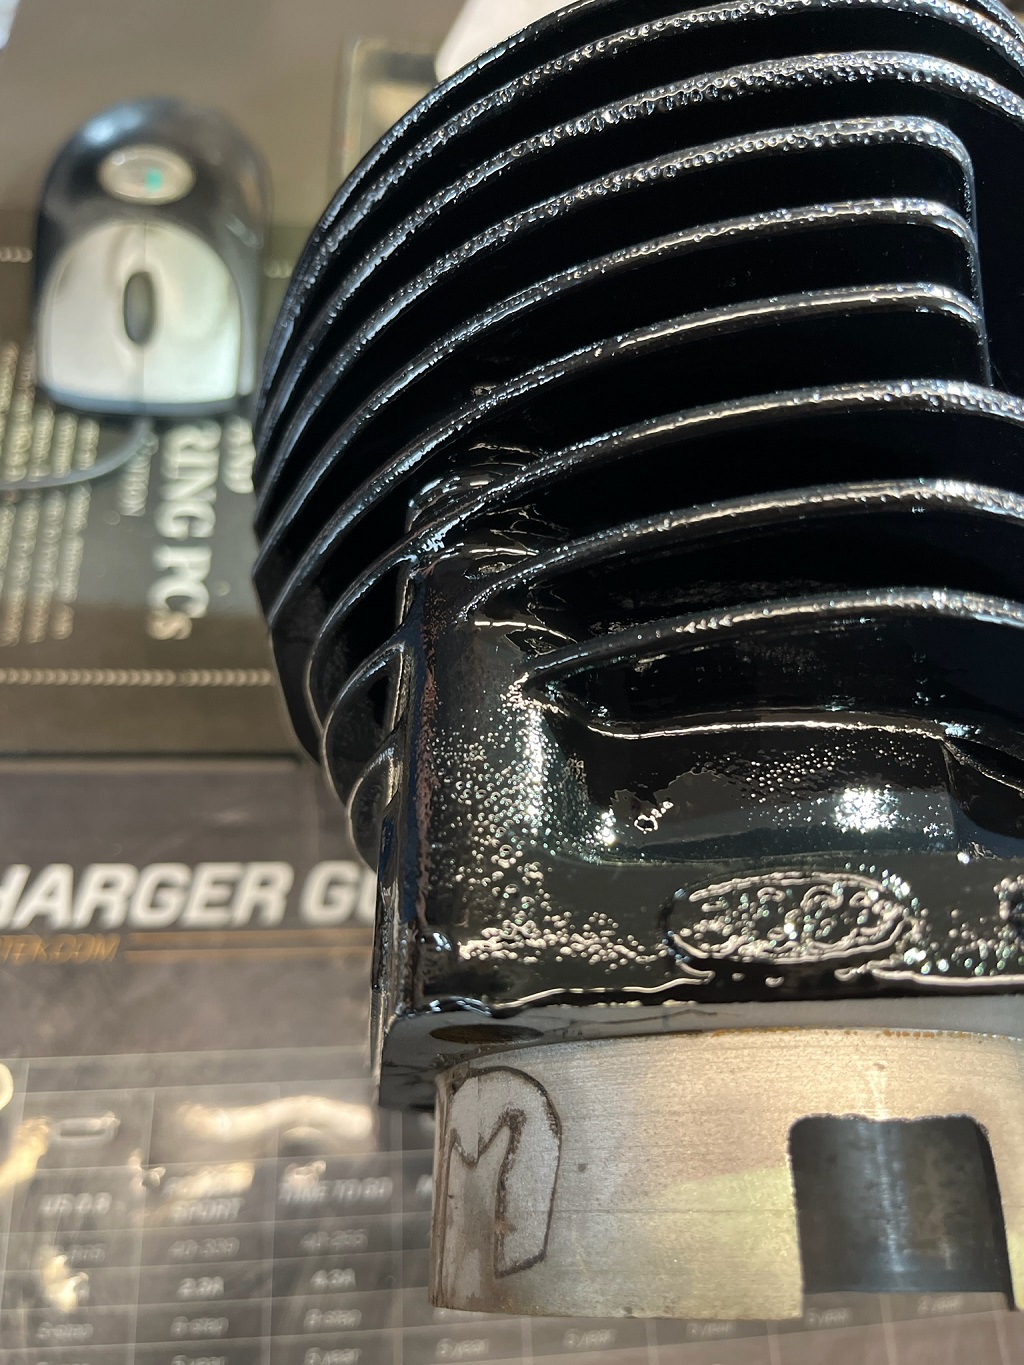
August 18, 2023 Well a lot more time getting them clean and then masked and I was able to paint them. The initial blasting and cleaning before are already in the hours. The masking today and the painting are what today's hours include. I actually work on them six hours today! The picture does not do them justice. It's really hard to get a good picture in my powder coat/paint cabinet. What looks like bare spots are just where the light it hitting funny. (63 hours)
August 19, 2023 No matter how hard you try there are always a few spots deep in the fins that don't get painted well enough and the four hole through the middle cannot be sprayed to cover the inside. So once dried enough to handle I turn them every which way and look with a strong light. Then using a pipe cleaner and the same paint I touch up where needed and especially those four holes. That went well. I had to let that dry a while, so I worked on other things. Then it was time for a short bake in the oven. That's not needed per the manufacturer - they say the engine heat will do it. I just gave it 20 minutes at 150f to toughen it up some for handling. Then once cool it was time to install the lifters.
I tested them and they move very smoothly. They had minimal marks on the cam end, so I surfaced them with progressive papers from 40 microns to 9 microns - they are now very flat mirrors! The only trouble I had today was installing the keeper/guide for the timing side lifters. Even though everything was going back where it came from, I could not get the screws in. I worked on it an embarrassing amount of time before I realized the screws and threads in the cylinders were fine - the holes in the keeper were drilled too close together! I have no idea how the last guy got the screws in - probably just forced them. It kept feeling cross-threaded to me. I had used keepers in good shape and once I tried with one of them, it went together normally. The other side was no problem at all.
August 20. 2023
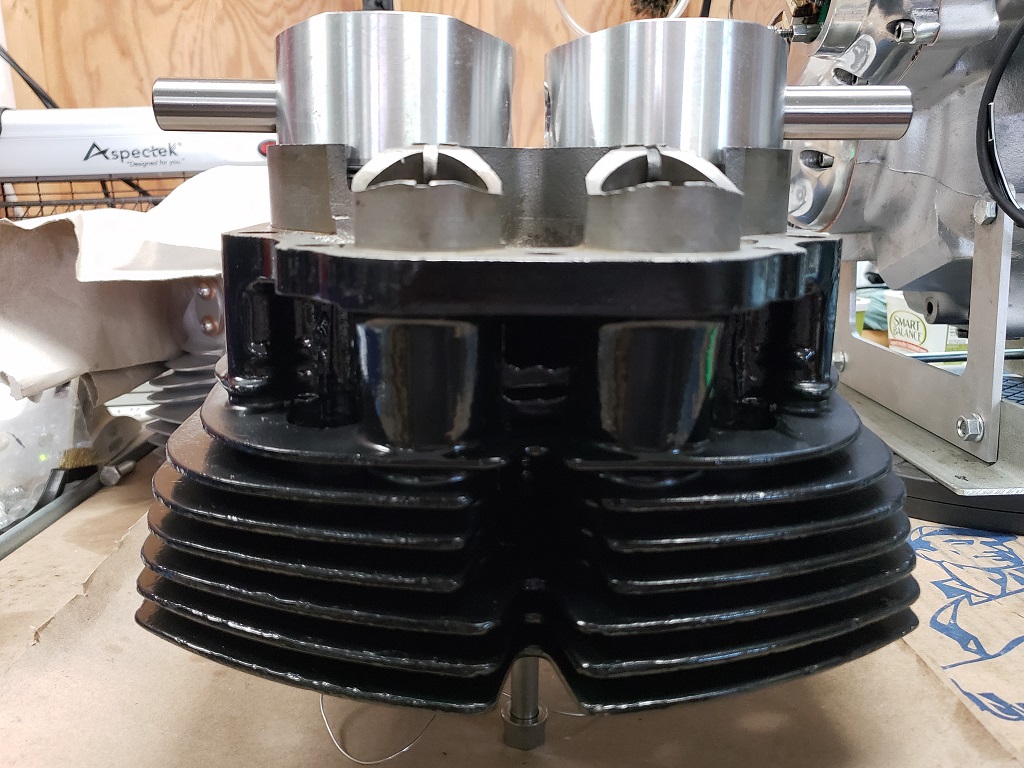
Finally! A long but uneventful day! Norton cylinders are too heavy for me to do the way I did years ago. I cannot hold them in one had and manipulate the pistons into the bores. So, I do them a different way that is normally quite easy. You'll see in the pictures. Most steps are normal except rigging them and using my engine hoist as a helper.
- First, a final cleaning and inspection. Then fit the rings. I was shocked! The top ring is supposed to have a .010" to .012" gap and the middle ring a .008" to .012" gap. All four have a .010" gap and it was the same when I switched sides. In other words, the bores were done exactly, and the rings were manufactured exactly. Nice!
- In the first picture, the cylinders have been rigged for lifting, flipped upside down and the pistons are part way in. The inner circlips are installed and the wrist pins are ready to push in.
- In the second picture, the cylinders are hanging over the bottom end. At this point lower the hoist/turn the crank/guide the
conrods until I have both pins pushed in. Then I install the outer circlips.
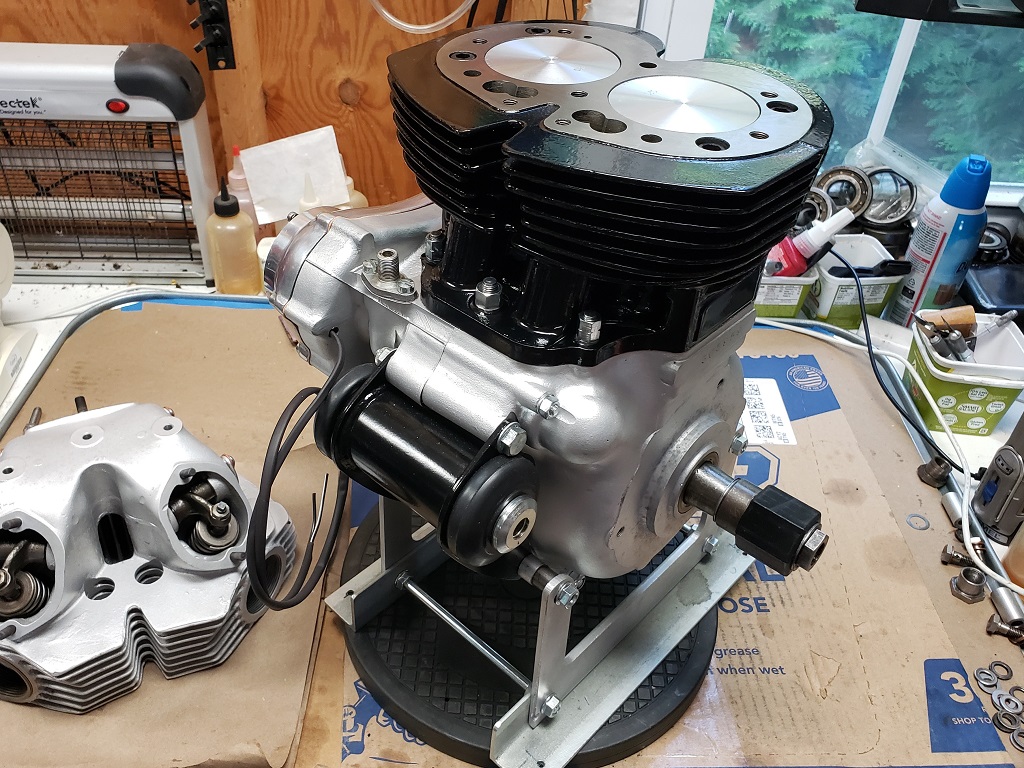
- In the third picture the cylinders are home and torqued down. I have also turned the engine many times watching and listening to be sure everything is smooth. It is very smooth.
That wasn't a lot to write, but it took six hours! Part of that is that I have so many projects right now that I had to move a LOT of stuff to get the hoist into place. Hopefully tomorrow I'll be able to rig the engine to move it to the frame an install it. I most definitely cannot carry it! (67 Hours)
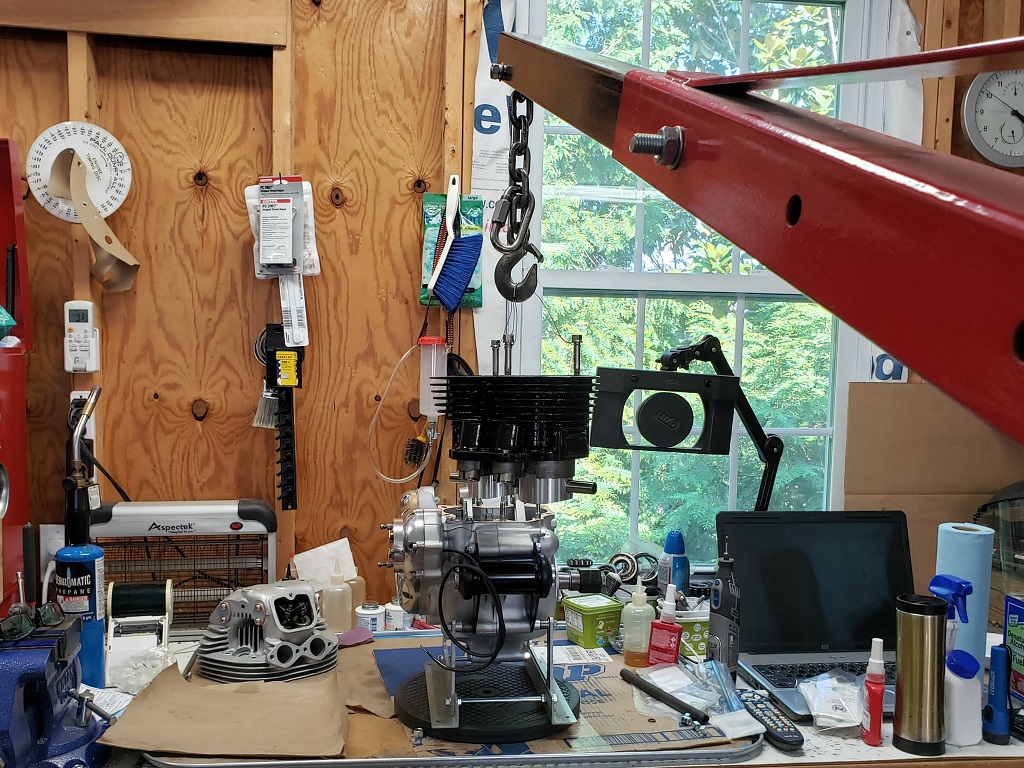
August 21, 2023 It's funny that rigging takes way longer than installing! The first picture shows the engine dangling just before I rolled the hoist and engine over to the bike. From there with just a little prodding, it was in the frame. Still have to torquer the mounting bolts but otherwise, it's time to install the head, primary drive and a few other things. I'm also supposed to install a center stand but I need help to do that. (71 Hours)
August 22, 2023 If you heard a scream about 20 minutes ago, it was me! Installed the studs in the head and cylinders. Inspected the pushrods - didn't like two of them so I got two used good ones from my stash. Polished them and then it was time to put the head on. Went on just find. Put all the nuts and bolts in finger tight and then started the torquing process. Didn't get far. The front center was fine, then next to tighten was the back center - would not tighten. It's a brand new stud and nut but it would not go over 5 ft. lbs! Didn't want to think it, but finally had to. The stud is pulling out of the head! That is a known issue, but I inspected the threads and did not expect it. Now, I have to take the head back off and helicoil it. I have no trouble putting heads on by myself, but a lot of difficulty getting them off by myself. (74 Hours)

August 23, 2023 The head is off and I found a local shop that might be able to drill for inserts. I have the 3/8" BSF thread repair kit and all I really need is the hole drilled with the drill that comes with the kit. They must be precisely vertical, or the head will not go on the cylinders! I probably can do it - I have a drill guide that fits but dialing it in on a mill is a much safer way to go. Get the hole crooked and the head is trash!
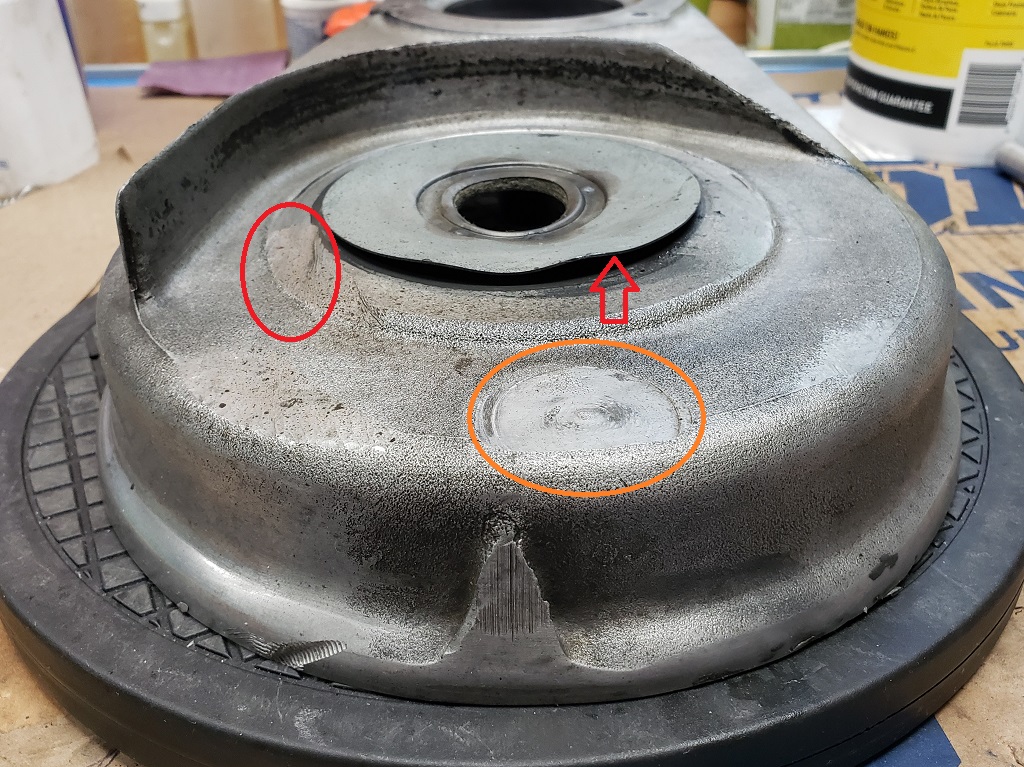
I figured I would go ahead and put the primary together. The first picture shows today's headache. The orange circle is the standard 850 problem of the inner primary rubbing on the swingarm. This is fixed by using two washers up front. 750s do not have this problem. The red oval and arrow show where chain hits have happened. I have one new plate - I'm hoping I have another not in inventory so I can fix this chaincase. I have a basically new inner chaincase, but it's a shame to use that when this just needs two new plates.
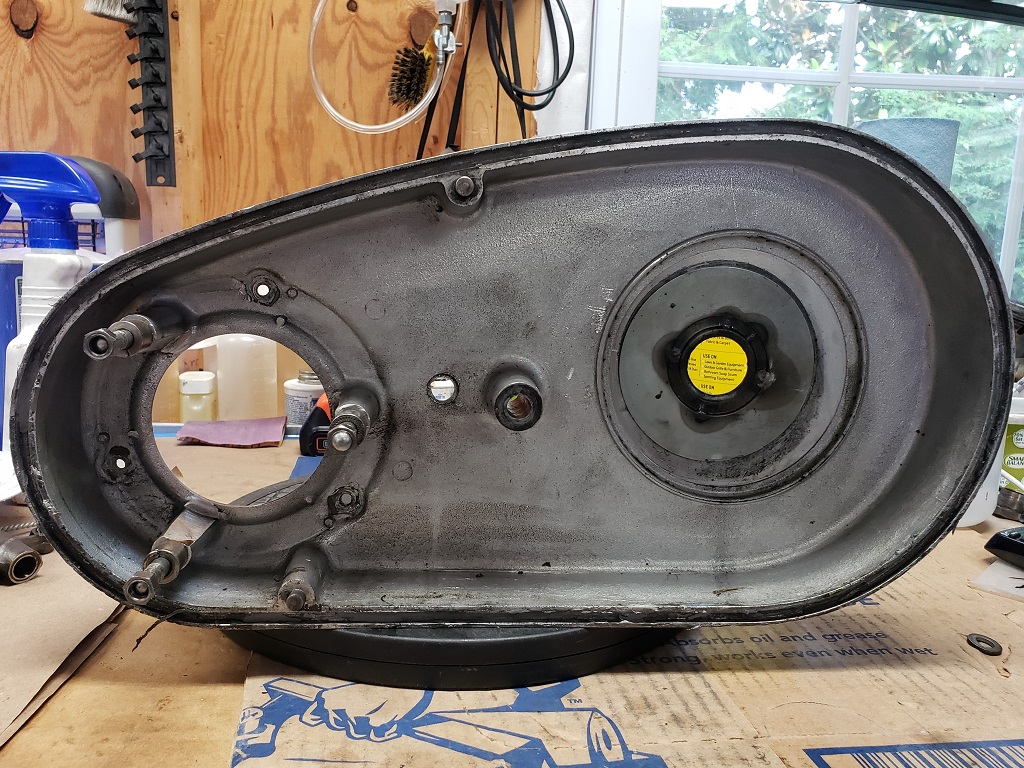
The second picture shows a standard error made by owners. A properly installed sealing band (giant O-ring) will seal the primary with no leaks. This a several layers of silicone - no way it can seal. Not sealing doesn't really matter for this bike since it has a belt drive, but I cleaned it up anyway - I didn't want to fight getting the cover on correctly. (77 hours).
August 24, 2023 I visited the shop today. They have a good milling machine so it should be simple for the to drill the three holes. Assuming that they do a good job, I'll do the thread repair on all heads going forward. This is the second time one has pulled on me - don't want a third! They say they will have it done tomorrow or Monday. Since the head is ready to go on, I'll have to inspect it thoroughly so be sure there are no filings anywhere and may have to strip it and re-clean it. They don't have the cleanest hands!
I had one inner gearbox seal plate in stock and I had one in a pile of un-inventoried parts I got when I bought a guy out. it's quite fiddly to put them together without a spot welder. I carefully aligned them and drilled for a 4-40 screw. Then put that screw in a drilled for one opposite. With the plates held in place then I was able to drill four more holes. Unfortunately, I have no 4-40 nuts (have them on order). They should arrive tomorrow so I should be able to finish the inner provide and then put the primary together (79 Hours)
August 25, 2023 Picked up the head today - great service, terrible work. Looked fine but all the studs are leaning inward about 2-3 degrees. Long story short, there is no way to put the head on. The head is now junk unless I can get Jim Comstock to fix it. His way will fix it as the inserts he makes are bigger than the new holes, but he has had two of my crankshafts to do small repairs on for over 18 months. I have another head for another project that I could use, but I really don't want to use any more heads without thread inserts - this is the second one this year that a stud pulled.
At least I got the seal plates installed. The nuts I ordered had star washers attached which I had to cutoff - not easy. The they we still too big for the slot so I had to round both side on the bottom to fit. Once all were fitted I took it apart and put it on the inner primary to make sure it worked correctly. It did so one by one I unscrewed, slathered with red Loctite and put the nut on for good - I NEVER use red Loctite but it seemed right here! (82 hours)
August 26, 2023 The primary is all back together. It originally had several spacers behind the clutch and the belt was running off the edge quite a lot. I discarded all those spacers, and the belt is now 95% on the clutch. There's no way to do better but it certainly will be better than it was. That also helped with the pushrod seal - now there are plenty of threads for it to screw onto.
The oil coming from the gear box is terrible, so it certainly needs to be changed, I'll do that tomorrow.
It's an 850 so of course, I used two gaskets up front and properly shimmed the center, so the inner primary is no longer rubbing on the swingarm and there's room for chain to run without tearing up the seal plates. I'll try to find one good thicker clutch plate. The clutch pull is heavy but acceptable. One plate a little thicker should help make the pull lighter. (85 hours)
August 27, 2023 this head problem is making me crazy. It is fixable, but there are only three ways I know and the simplest/least expensive is not guaranteed.
- A Timesert will fix it, but they don't com in BSF so it would have to be UNF/UNC with corresponding nuts - two of which would have to be made since they are sleeve nuts; or, UNC bolts would have to be cut to length and then BSC threaded on the other end. That part isn't terrible. But how do I get them installed/made? It's no longer possible to locate off this head and although it could be done by a careful machinist using the cylinders, "Joe Bob" at the local machine shop will never be able to handle it.
- Jim Comstock could easily fix the head. I've written him but he is so far behind that I'll be shocked if he even answers.
- I could pull the trigger on my shopping cart and spend the approximately $10k to buy the equipment to do it myself.
I did a lot of study today and finally know why it pulled and how to prevent it in the future. The
new stud I used has shorter than original threads and the original threads were already too short. The head can take .625" of thread but the new stud I had only a .449" of thread. I found some for sale with 9/16" of threads so I'll use a bad head and see what torque they withstand.
(85 Hours)
August 28, 2023 Got some good news today. Jim Comstock will fix the head and he says two weeks. I striped it today and it will leave in tomorrow's mail.
August 30, 2023 The Package got to PA yesterday and is delayed today :-). It's supposed to be delivered to Jim on Friday - I hope it does.
September 2, 2023 Now the package is scheduled to arrive September 5th since the 4th is a holiday :-)
September 3, 2023 I got the RGM order the other day and I installed a thicker plate in the clutch - it's now a much nicer pull. Put the rest of that side of the bike back together and now just need the head back. Also need to installed the center stand (need help for that) and replace the gearbox oil. (87 hours)
September 24, 2023 The head is on the way back - got an email with UPS tracking. (87 hours)
September 26, 2023 The head arrived late today. I gave it a good bath then put in some studs for a trial fit. It went on perfectly! Now I just have to put it back together and then I can finally install it! (87 hours)
September 27, 2023 Couldn't get to it today for people calling for free help. I guess I'm going to have to limit that.
September 28, 2023 People still calling but I did get the head ready to go on. (89 hours)
September 30. 2023 The head is on! Need to final torque it and adjust the valves. Now that there's nothing in the way of finishing (that I can foresee), this bike it the priority and I hope to have it ready for testing tomorrow or Monday. It will be nice to get it off the table and put away the workmates that I've been using for other projects! With a little luck, it will be all done by next weekend. (91 hours)
October 1, 2023 It's almost done. I still have to:
- Install the exhaust
- Install the coils
- Straighten out the wiring and make sure everything works
- Hook up the oil pressure gage (I forgot it had one)
- Install the center stand
- Take it off the table
- Install the tank and seat
Then I can test and tune.
I expected to be ready for test and tune today, but the left carb put an end to that. At full throttle the slide would stick hard. A Norton will happily hole 70 mph on one cylinder if the other is still firing! That's a very dangerous thing! At some point, someone over tightened the top two screws and warped the top of the slide chamber. Fortunately it was only the top. A great deal of measuring, tapping with a small hammer and re-checking got it back to round and only being stiff, not sticking. The some 600 grit paper and a finger smoothing out the top 1/4" got it to be like nothing was ever wrong. (96 hours)
October 2, 2023 We have a first! The Norton center stand is so hard to install that I always wait for help. This time, every time someone was here it couldn't be done for one reason or another. Today, I decided to find a way. Now that I have a way, will take one hour including prep. Today, it took four hours but the first three are not the owner's problem. (97 hours).
October 3, 2023 I like wiring bikes. I do not like fixing dirty, screwed up wiring on bikes. So, I made a rule a while back that I don't fix wiring I only re-wire them by hand. I had pity today and broke my rule. When I plugged everything back in several things didn't work due to a bad ground. Once I found and fixed that, the right-side turn signals wouldn't work. Found the bad connector and fixed that. Then the rat's nest under the tank got the best of me to I removed the extra wires and changed some loose connectors. At that point everything worked other than the ignition, which I had not checked.
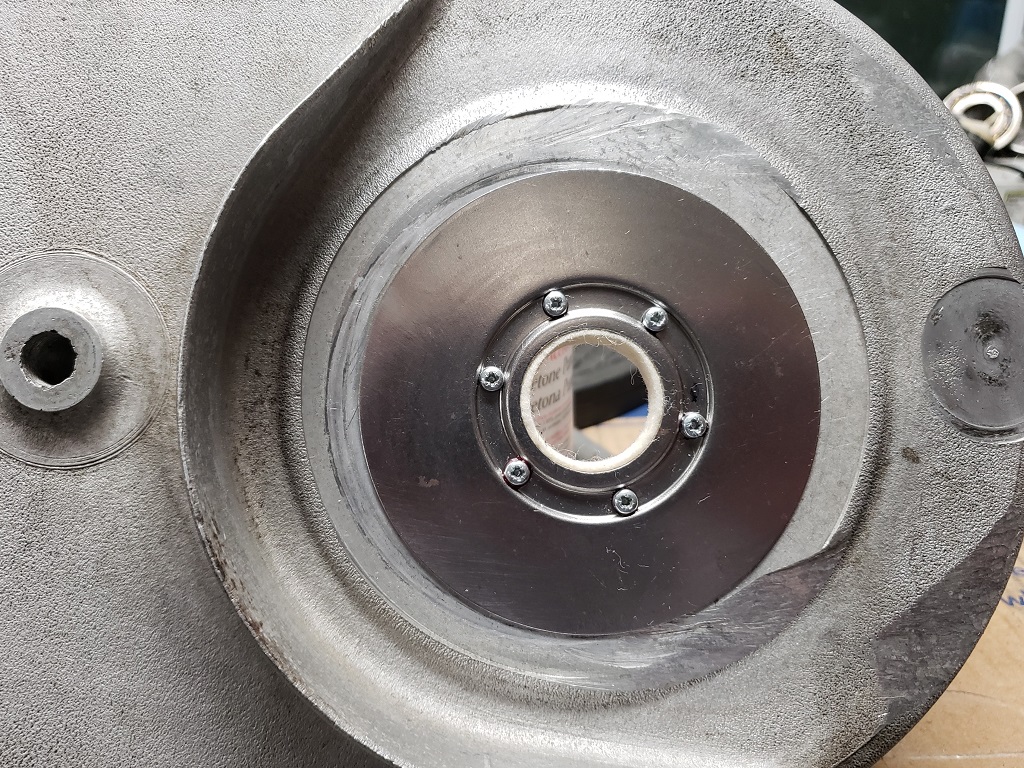
Of course, there was no spark! Since I had just rewired the connections to the Sparx box I figured I did something wrong but every check I made said that the wiring was good. That made me think that the Sparx box was bad or the pickups were bad. I removed the Sparx stator and touched the posts with a magnet and got a nice spark. So, now it was to the Sparx rotor. When I check it for magnetism, it was fine but the rotor spun in the end of the camshaft! On further checking. The bolt would not tighten more. I took it out expecting to have to shorten it - nope. Someone put a nut on it to take up space. but it was not too long - it was the wrong threads! I searched my Tri-Spark parts and found a correct bolt the same length that screwed in fully! When I put the rotor and stator in as while back, I didn't worry about timing since the primary was not on yet - I just snugged the rotor - I didn't want to misplace the rotor or stator! Snugging didn't come close to locking it to the taper and
there was no spark because the rotor wasn't turning. Once I fixed that the spark was fine. By then I was worn out and will time it tomorrow. (100 hours)
October 4, 2023 Rough day. My wife would have been 80 today and it was 11 years ago today that I last spoke with her. She died a few days later.
Finished small wiring jobs - bare wire at the horn, and a mess connecting the stator to the harness.
I replaced the oil feed line. I mentioned earlier that the check valve in the line was a bad idea and I saw evidence of loss of oil flow. When I took the old line off, I had to blow VERY hard through it to get it to open. I cleaned it out and then had to blow hard to get it to open. The Norton oil pump will not suck at all with a dry pump - it's a wonder that the engine wasn't destroyed!
Then I tried to do the last thing before taking it off the table: Installing the oil pressure sender. Nope! It replaces the inner and outer rocker spindle covers on the drive-side exhaust spindle. It has two tabs that are supposed to fit into the slots in the rocker spindle just like the inner cover does. The tabs are too wide for the slot. I checked other spindles and it's too wide for all. I have no clue how I'll fix that! Ideally, I would file the tabs but there is a threaded tube in the way of doing that. I could pull the spindle and make the slot wider but there's no way to heat the head with it all built and pulling a spindle cold is bad and putting it back cold is terrible - good way to destroy a head. I will get it done, but I'm not sure how right now. (103 hours)
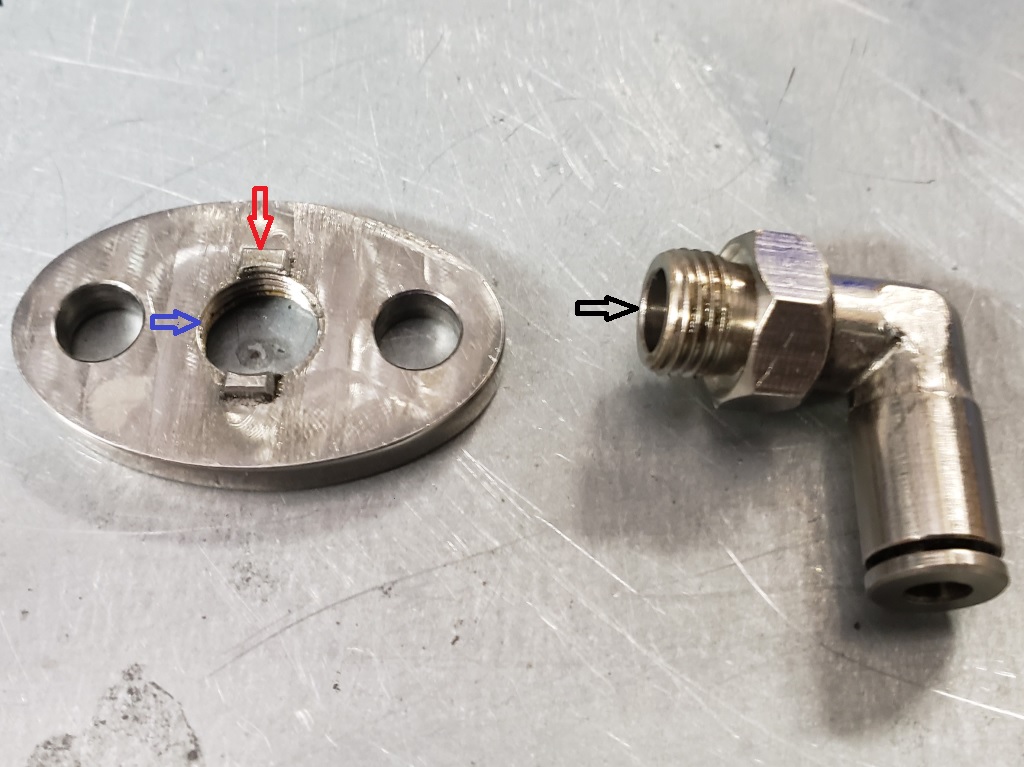
October 5, 2023 I decided that it was time for get it done or destroy and eliminate it! Finally got it apart. With it apart I could see at least part of what was wrong. The tabs that the red arrow points to were simply too wide. You can see where someone attacked it before. I put tape on both side so I wouldn't scratch it like they did and filed both sides of the tabs, rechecked the fit and repeated until it fit the slots well. The tab heights were no issue. Then I screwed it back together and it was better but still very wrong. The threads pointed to by the black arrow should have been flush with the back of the plate where the blue arrow points, instead, it went through to be even with the tops of the tabs pointed to by the red arrow. So, A LOT of filing and checking later and it was right. Took of about 1/16". With that done, it installed properly.
So, now it's ready to come off the table, but I spent a long time moving things to try to get the hoist into place. It looks like I'll have to put a couple of bikes outside to have room to get it down :-(
(105 hours)
October 6, 2023 I spoke too soon! I went over the bike inspection and realized I didn't change the oil filter. Good thing - I'm pretty sure it has been bypassing for a long time, the oil coming out of it was like light grease. of course, it was installed by a gorilla! I finally got a strap wrench to hold and then had to pull as hard as a 73 year old can in that awkward position! Once it started moving, I still had to use the strap wrench for the next 1-1/2 turns! Then I tried to put the air filter on - no way without taking the carbs loose so I installed a cNw filter. The old one was quite dirty anyway. Then while trying to figure out the dangling master switch, I realized that the bike has a old-style battery cover with a place for the switch. Of course, the hole is too big, but I resolved that with a washer. Now it was actually ready to come off the table. So, I moved more things around, got the engine hoist setup, rigged the bike and down it came.
Depending on the weather I may tune and test tomorrow if my hip will let me start it. I haven't tried to start a bike since March. (106 hours)
October 13, 2023 Good news: Started first kick, sounded good, and had good oil pressure. Bad news:
- Something is wrong with the throttle cable. When I synced the carbs on the bench, the cable was fine. Installed in the bike it's holding the slides up a little so it's idling way too fast. Probably an easy fix.
- Had a leak at the drive side rocker banjo. Used new washers when I put the feed line on but the inner copper washer was leaking. Changed it for an aluminum washer and that was resolved, of course the perfectly clean engine then had to be cleaned.
- Then the fuse blew. No issue I thought because it still had the low amp fuse I put in while messing with the wiring. Put in a proper fuse and the fuse holder and master switch (it was turned off) started smoking! Mind you, the entire electrical system was checked including making sure there was spark. Something happened when putting the tank on I guess - that's the only thing that makes sense. I definitely have to install a new fuse holder and possibly a new master switch.
So, unfortunately, it's still not done :-(
October 14, 2023 Took that tank off and had a quick look at the wiring. Nothing was obvious except that the fuse holder is partly melted, and the brown/blue (main negative) wire has been hot. I can't get at all sides of the bike right now so it will have to wait a little while
December 8, 2023 This is again the top priority. Did some tests and found the Brown/Blue wire had resistance to ground with the master switch off. Disconnected the regulator and it was still there so it was a wiring problem. Found the wires that used to connect to the Zener pinched between the timing side Z-Plate. Also found the old rectifier wires folded and zip tied as well as the old capacitor wires. Any of those could have been touching or did touch the frame. Once I got them out in the open, that resistance was gone. Also, the hole through the frame in front of the battery is supposed to have a grommet and there was none and the harness covering was worn through as was the power to the headlight. That may have been the problem with the smoking while the bike was running. (106 hours)
December 9, 2023 It's against my very being, but I am repairing the main harness - I normally insist on a complete rewire and eliminating all the connection under the tank. The taillight wiring is also a mess. I got the main harness off and am in the process of removing the filthy cover. As I go, I put zip ties at every wire breakout and I'm inspecting each wire for hard spot (ever heating) and bad insulation and replacing those that need it. Once done, it will be wrapped in professional harness wrap. (108 hours)
December 10, 2023 Got the covering off the harness - what a dirty job! Will replace the serpentine ground wires with a 14ga from taillight to under tank with branches were needed. Will eliminate all Brown/Blue (also serpentine) and replace with one from the battery to the master switch via the fuse and with a branch to the regulator. Will replace the serpentine brown form under the tank to the taillight with a branch to the foot brake switch. Will replace all white wires (again serpentine). Serpentine wires folded back on themselves and then tightly wrapped become work hardened very quickly and are prone to cracking or braking. The difference is easy to see - the turn signal wires are not serpentine and are still very flexible. When I wire there are no folder wires anywhere int he harness. Fortunately the headlight harness is all straight wires. (110 hours)
December 11, 2023 I was cold yesterday even though I had the heat on, I was worn out, and I had a pain in my chest and back. I was thinking it was from a too heavy box I lifted last week and not enough sleep. It was much worse this morning so I went to my doctor. After an EKG to verify no heart attack, we discussed the symptoms and she noticed a rash on my chest and back that weren't there yesterday - shingles! So several prescriptions including steroids.
I'm too worn out to do much today, but as soon as the steroids kick in that will change, big time.
December 22, 2023 Shingles is still raging but my left chest, arm, and shoulder don't hurt as much now, so I finally got back on the wiring some today. I've messed with it over the past week including scrubbing it in hot water and Dawn dish liquid - every time I touched it I got dirty! I actually made some progress today. The regulator and Sparx box are now properly mounted, all bad wires are replaced, all excess wires are gone and its fitted. Now the wrapping and termination can start. (115 hours)
December 30, 2023 I haven't posted, just haven't felt good and have been very busy closing out the year. But I have been slowly working on the wiring and I finished it today. Besides the things already mentioned, I tested the master switch. It had 2 ohms in every position - that's why it was smoking. I checked the turn-signal console - all good. The lighting console had various resistance readings when they should have been zero. No problem, I work on them all the time. This one was different. Once all the contacts were clean everything but the high beam was good. First, the rivet that goes through the board to the leaf arm of the contacts was loose - I was able to fix that, but then the actual contact had resistance to the other side of the board - no way to get at that. Fortunately I collect used ones of these so I cleaned up another and used it. I have one more thing to check. When I turn on the headlight the tail light dims slightly -I have a feeling that the headlight switch
in shell is bad - I haven't checked it yet. I also have to check that the ignition is working as I relocated but the regulator and Sparx ignition box.
I keep saying that I will no longer fix wiring - I''ll re-write or do nothing. I really mean it this time. It was dirty work, much harder, cost more, and produced a worse result than rewiring - no more! (122 hours)
December 31, 2023 It turns out that there were multiple problem in the headlight. The switch was bad - it was jumping between 0 and 3 ohms by just bumping it. The high beam warning light socket was intermittent, and the body of the charges light was broken. I didn;t have a good used switch but did have a new one and I did have the used parts to fix the indicators. The bigger problem is that the ground was wrong. The headlight bulb was grounded to the headlight shell but not to the harness. The frame on a Norton is not a reliable ground. Once those things were fixed, the tail light did not dim when turning on the headlight.
Retested all, including the ignition, everything is working now and all wiring is tied down. I still need to do somethings to keep the battery in place, install the tank, set the ignition timing and get it to idle. I'll probably try to do that tomorrow, but I haven't started a bike since my hip replacement so may need to wait for help. (126 hours)
February 7, 2024 Finally had help. We did the dynamic timing without issue and then it was time for a short test ride and to get gas. The bike ran very well an did everything is should. If it was much warmer outside I would take it for a longer ride. (127) hours)
March 26, 2024 I forgot to update. The owner came by and took it for a short ride a while back and asked if I could store it a while. He came and got it today and rode it home.
|